

For decades, I resisted the allure of royal icing, believing it was too complex and often lacked flavor. But then Instagram happened. I found myself captivated by the breathtaking edible art created with this versatile frosting. My curiosity led me on a mission: to develop an easy, delicious royal icing recipe perfect for beginners, one that actually tastes as good as it looks. And I succeeded!
In this comprehensive guide, I’ll share my foolproof recipe and all the essential tips and tricks to confidently decorate cookies that will impress everyone – without looking like a five-year-old frosted them. This recipe is ideal for decorating The Softest Sugar Cookies of Your Life, classic Gingerbread Cookies, or even rich Chocolate Sugar Cookies. Get ready to transform your baking into stunning, delectable masterpieces!

Table of Contents
- What is Royal Icing?
- Why This Royal Icing Recipe is The Best
- Meringue Powder vs. Egg Whites for Royal Icing
- Optional Ingredients for Superior Royal Icing
- Royal Icing Recipe Ingredients
- Step-by-Step: How to Make Royal Icing
- Pro Tips and Tricks for Royal Icing
- Creative Ways to Use This Easy Royal Icing Recipe
- How to Store Royal Icing for Sugar Cookies
- Can You Freeze Royal Icing?
- Royal Icing Frequently Asked Questions
- More Sweet Treats You’ll Love!
- Easy Royal Icing Recipe For Beginners
Just the other day, as I was mindlessly tapping my foot, my daughter Valentine quietly approached, a mix of concern and accusation in her voice: “Mom… do you need to go to the bathroom?” Turns out, my foot had just fallen asleep! It’s always amusing how kids manage to “Mom” you right back sometimes. A taste of my own medicine, indeed!

It felt perfectly fitting to share a story about my sweet Valentine in a post dedicated to cookie Valentines! While it might still be January, the seasonal aisle at Target always knows what’s up: Valentine’s Day is just around the corner. And I am absolutely here for it!
Now, by a show of hands, how many of you have lost countless hours watching mesmerizing cookie decorating videos on Instagram? Your eyes glaze over as you tumble down the rabbit hole, muttering “Whoa!” and “That’s so cool!” through a slackened jaw. You’re not alone, are you?

It’s utterly captivating! I always discover something new. I consider this Instagram habit to be firmly in the “entertainment” category of my life. I have no illusions of dedicating the immense hours required to become a professional cookie decorator, capable of creating museum-level edible masterpieces!
Interestingly, when I meet people in real life, they’re often surprised by my lack of skill in elaborate cookie and cake decorating. They assume that because I “do food,” I can whip up a bakery-quality birthday cake. Nope! Not even close, and honestly, a good laugh ensues every time!
In fact, for years, I hesitated to share my favorite Gingerbread Man Cookies recipe with you, solely due to my lack of confidence in decorating them. I simply didn’t believe I could make them look good enough! I was so nervous preparing that post, but in the end, they turned out wonderfully, and I had far more fun than I anticipated.

That experience was so enjoyable that I decided to dive deep into creating an entire post dedicated to royal icing. While it’s a vast and intricate subject, and I’m certainly no expert, I realized there are many beginners out there like me who would appreciate a straightforward guide to making genuinely appealing cookies. Your creations might not instantly go viral on Instagram, but they will undoubtedly impress your friends and family. More importantly, you’ll have an incredible amount of fun in the process, and did I mention, they’ll be absolutely delicious? (Because, in my book, fantastic flavor always trumps perfectly straight lines!)
I originally shared my recipe for The Softest Sugar Cookies of Your Life back in 2017. Can you believe it’s been seven years already?! Have you tried that recipe? It’s one of my top posts and has converted countless people who previously thought they hated sugar cookies. I’d hate them too if I’d only ever encountered rock-hard, dry versions! My recipe delivers cookies that are incredibly soft, wonderfully thick, and bursting with flavor.

Ever since I posted that sugar cookie recipe, along with my Buttercream Frosting complement, I’ve received a steady stream of requests for an icing recipe that “stacks.” My readers were craving a sugar cookie topping that would dry firm enough for easy transportation and gifting.
They might not have known it by name, but royal icing is precisely what they were searching for.
What is Royal Icing?
Royal icing is a classic confection traditionally made from just egg whites and powdered sugar. Today, we’re opting for meringue powder, which we’ll discuss in more detail shortly. This simple combination is truly magical: it creates an icing that remains liquid and workable while you’re decorating, but then hardens completely into a smooth, candy-like shell. This complete drying property is what makes it perfect for stackable, transport-friendly cookies.
Beyond its practicality, royal icing offers limitless creative possibilities. It can be tinted to virtually any color imaginable, allowing for intricate designs, fine lines, and smooth, glossy surfaces. It’s like a blank canvas for your edible artistry, transforming simple cookies into stunning, decorative treats.
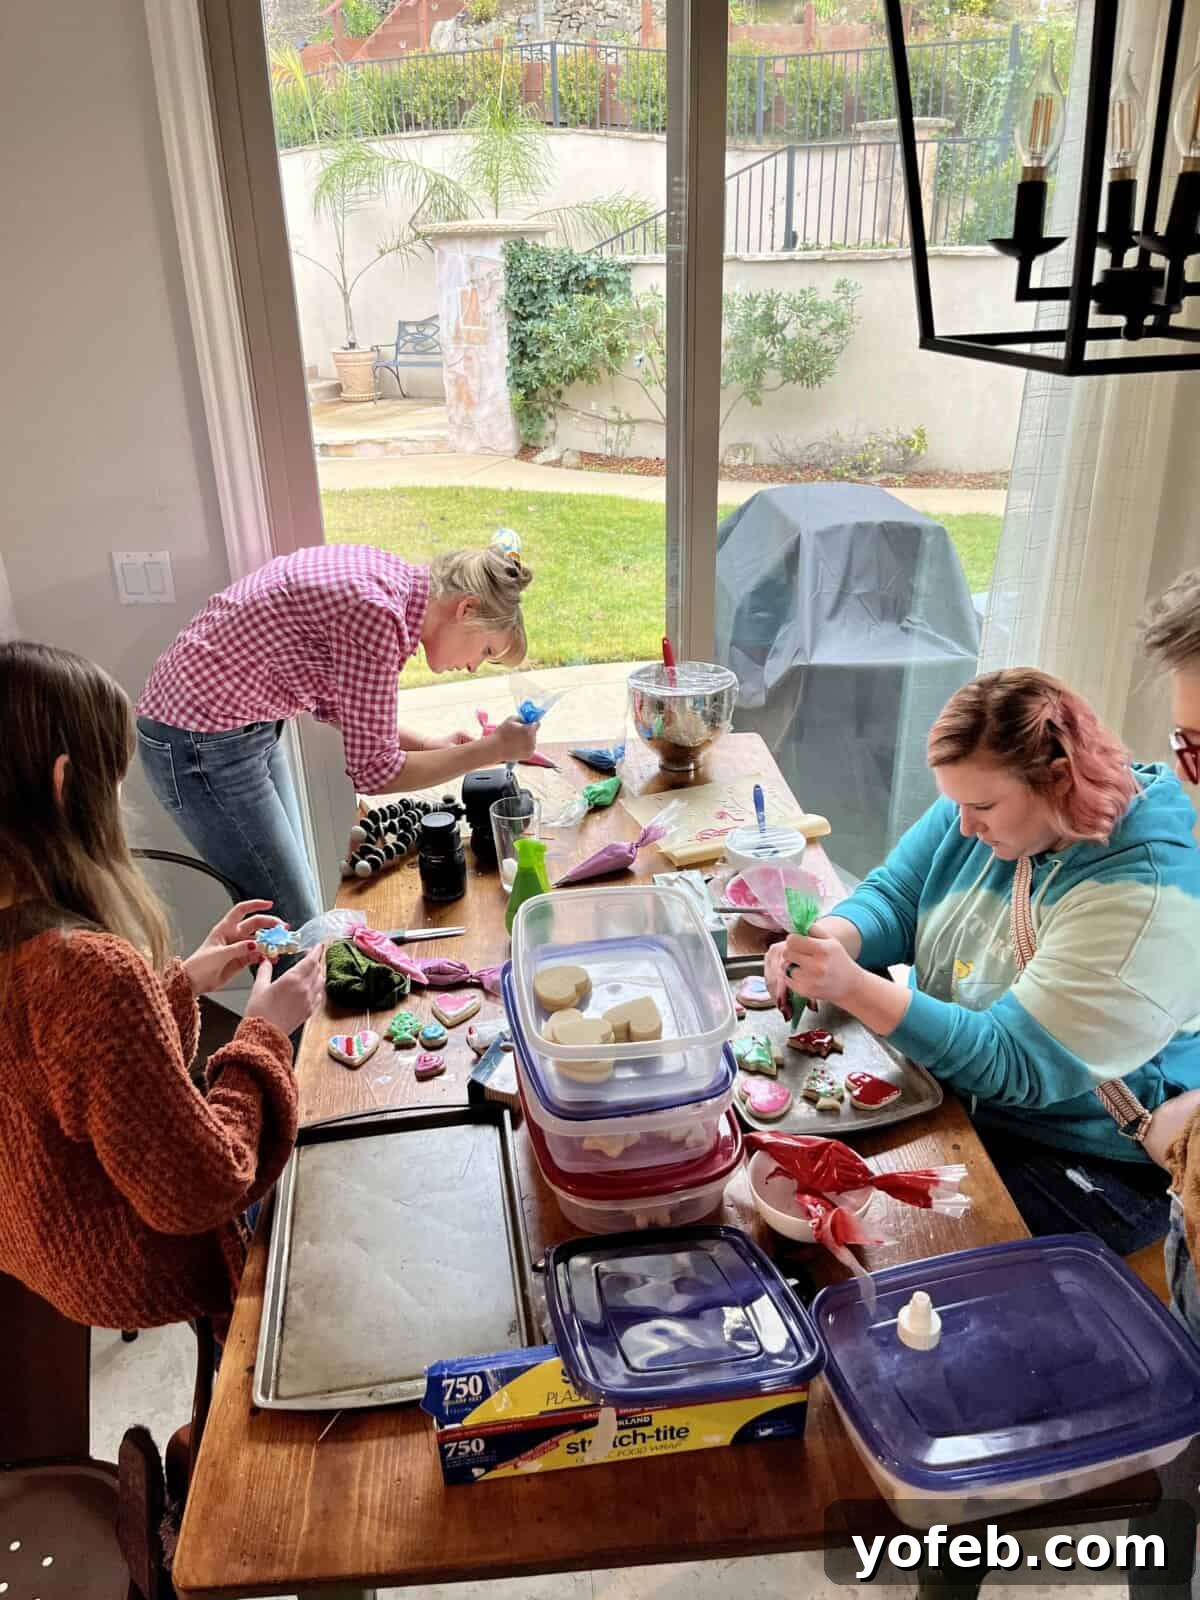
I like to think of decorating with royal icing as an enjoyable arts and crafts project – one with the added bonus of being deliciously edible! It’s genuinely super fun, especially when you turn it into a group activity. Here you can see me with my daughter, Charlotte, and my sister-in-law, Britta, as we tackled the dozens of cookies I baked for this post. We easily spent hours immersed in the creative process!
Why This Royal Icing Recipe is The Best
Many people, myself included, used to believe that royal icing tasted bland or unpleasant. But I’ve completely changed my mind. While it’s true that royal icing isn’t the same as fluffy buttercream frosting – you won’t feel like you’re eating a cupcake – there’s a unique and simple delight in its subtly sweet, crackly topping.
My recipe truly excels in the flavor department. I’ve often wondered why so many royal icing recipes out there are so basic, essentially just sugar. My secret? The strategic addition of high-quality extracts – vanilla, coconut, and almond – and, crucially, a pinch of salt. This combination elevates the flavor profile dramatically, making it leagues above most other recipes I’ve encountered. It’s baffling how few recipes include salt, which is absolutely essential for balancing the sweetness and enhancing all the other flavors.

Even with my enhanced-flavor recipe, I won’t lie: eating royal icing on top of a dry, unappealing cookie is still not a pleasant experience. To truly savor the combination, you need an exceptional base. That’s why I strongly recommend pairing this icing with my ultra-thick, soft Sugar Cookies, or any sugar cookie recipe you trust to deliver a wonderfully soft texture. The contrast of the crunchy, flavorful icing with a tender cookie creates the perfect bite.
Meringue Powder vs. Egg Whites for Royal Icing
For this royal icing recipe, I highly recommend using meringue powder over raw egg whites. Meringue powder is a powdered blend of egg white, cornstarch, sugar, and stabilizers, all designed to prevent your icing from collapsing and ensure a perfect finish. (Be sure to use meringue powder, not just powdered egg whites, as they lack the crucial stabilizers.)
Here’s why meringue powder is a superior choice:
- Shelf-Stable: Unlike fresh egg whites, meringue powder has a long shelf life, making it a convenient pantry staple.
- Food Safety: It eliminates the risk of salmonella, offering peace of mind, especially when serving to children or those with compromised immune systems. (Full disclosure: I am a self-proclaimed cookie dough addict, so this is a bit hypocritical coming from me, but safety first for everyone else!)
- Precise Measurement: Meringue powder ensures consistent results every time, as you can measure it exactly. Fresh egg whites, varying in size, can make achieving the perfect consistency more challenging.
While fresh raw egg whites are readily available in your fridge, meringue powder can sometimes be a bit tricky to find. You can often find it at craft stores like Michaels, but they were out of stock when I was shopping for this post. Walmart also didn’t have it, much to my chagrin! Thankfully, Amazon offers overnight delivery. Seriously, the convenience of our modern world is incredible – we are truly spoiled! This is the high-quality meringue powder I purchased on Amazon; it offers great value and will last you for many decorating sessions, as you only need about 5 tablespoons for a generous batch of icing.

Optional Ingredients for Superior Royal Icing
At its core, royal icing truly only requires meringue powder (or egg whites), water, and powdered sugar. However, a few additional, optional ingredients can dramatically elevate your icing from “edible” to “exceptionally delicious.” These extras are what bridge the gap between a cookie that tastes like cardboard and one that’s surprisingly delightful.
- Cream of Tartar: This acts as a vital stabilizer, helping to prevent your icing from collapsing, especially in humid conditions. Think of it as insurance for your beautiful designs! I add it every time, regardless of the weather. It also boosts the volume of egg whites when whipped, which is particularly beneficial when working with powdered egg whites like meringue powder, giving them all the help they can get. Furthermore, cream of tartar aids in preventing “weeping” in the final dried cookie, ensuring a clean finish.
- Corn Syrup: A small amount of corn syrup is a game-changer for the texture of your dried icing. Just a tablespoon added to the recipe ensures that once your icing is fully set, it will still have a soft, pleasant bite. You won’t risk cracking a tooth or feeling like you’re biting into cement with this icing!
- Glycerine: While not included in today’s recipe, I’m keen to experiment with glycerine in the future. Like corn syrup, glycerine helps soften the final dried icing, but it also imparts a beautiful, glossy shine. If you’re aiming for exceptionally shiny cookies, consider substituting 1 scant tablespoon of glycerine for the corn syrup in this recipe.

Royal Icing Recipe Ingredients
Here’s a quick overview of the ingredients you’ll need to gather for your shopping list. For full, detailed instructions and a list of necessary equipment, please refer to the complete recipe card below. (And trust me, stock up on toothpicks – you’ll need more than you think!)
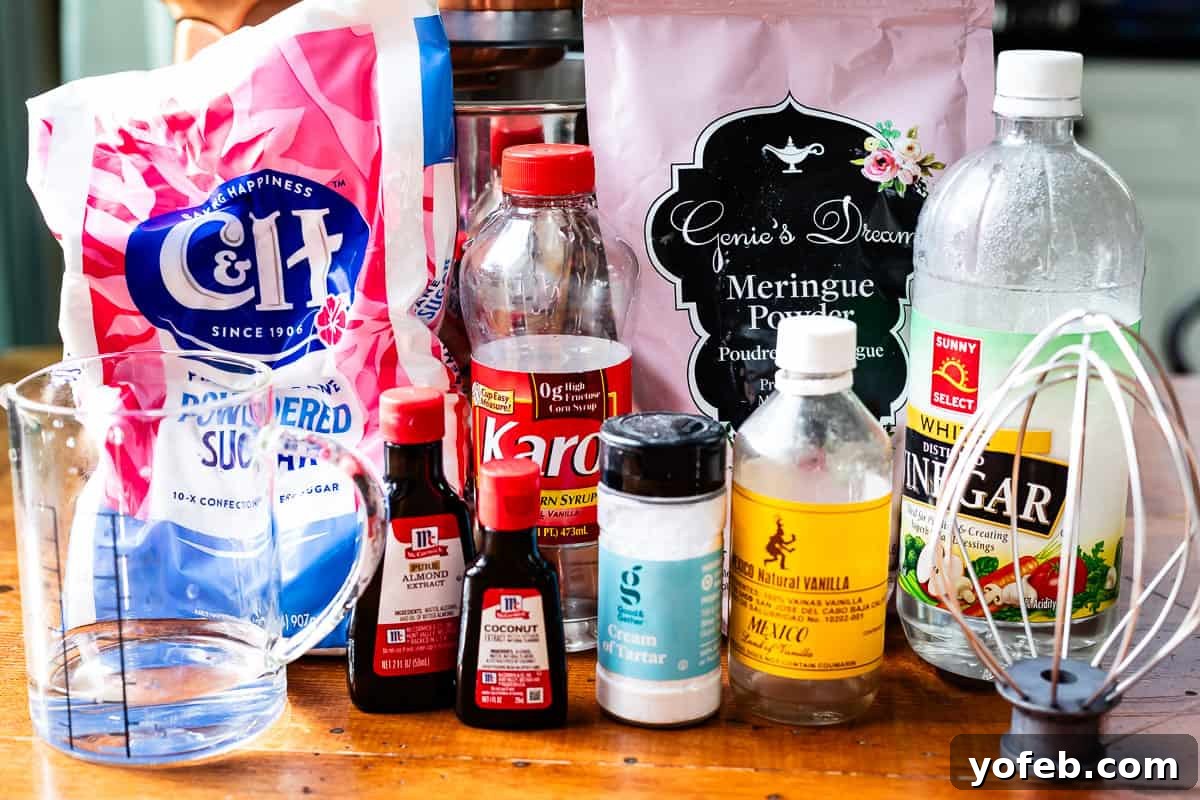
- white vinegar (for degreasing, *not* for the icing!)
- meringue powder (can substitute egg whites, see notes)
- kosher salt
- cream of tartar
- water (warm, plus extra for thinning)
- clear vanilla extract
- almond extract
- coconut extract
- powdered sugar
- corn syrup
- gel food coloring
Step-by-Step: How to Make Royal Icing
Royal icing demands a little extra care, so we’ll treat it like the royalty it is. The first and most critical step is ensuring all your tools are perfectly clean and grease-free.
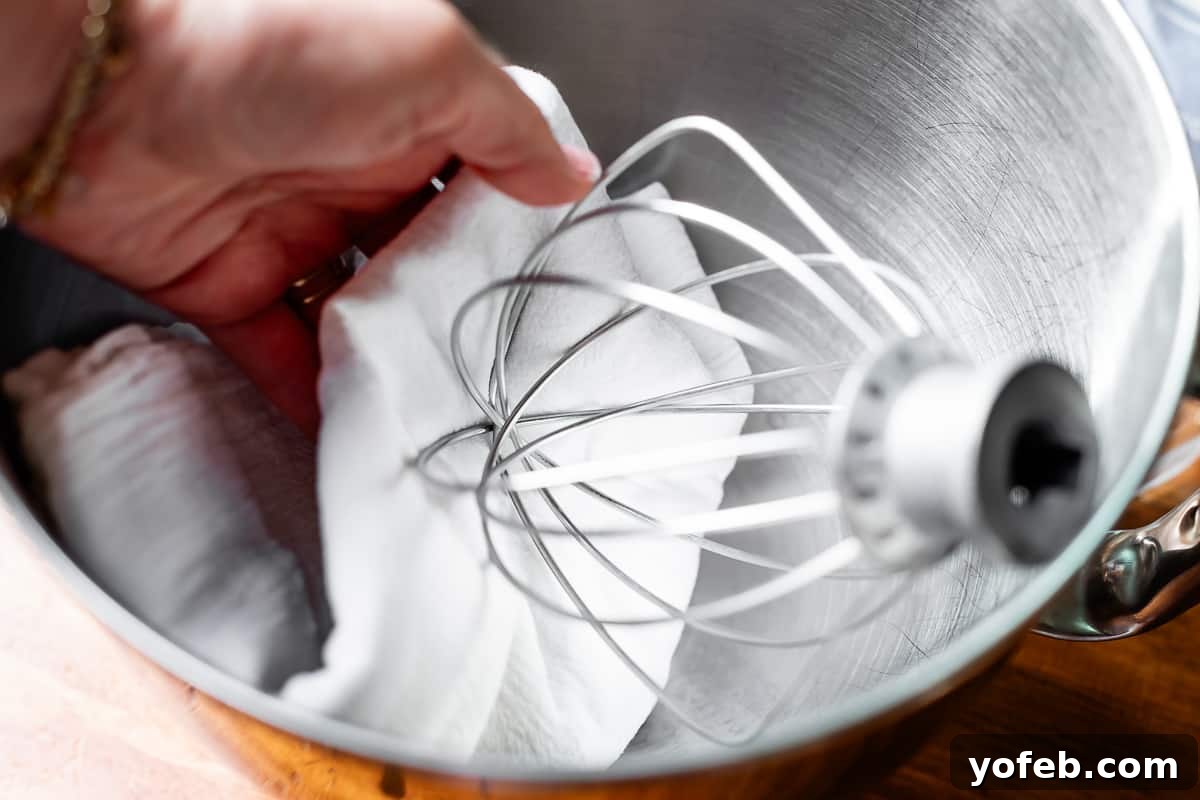
Even a tiny speck of grease can prevent your royal icing from whipping up properly, leading to a runny, unusable mess. I always use white vinegar for degreasing because it’s effective and I always have it on hand. Simply dampen a paper towel (or a tea towel, though paper towel is often easier) with vinegar and thoroughly wipe down your mixing bowl and whisk attachment. I prefer using a stand mixer for ease, but a hand mixer works just as well. Ensure your bowl and whisk are completely dry after degreasing before you proceed.
I recall making this royal icing during the holidays when my house was packed with 18 people and my kitchen was in glorious disarray for days – with tips, icing, and cookies everywhere! My nephew kept mentioning a weird smell in the kitchen, and it wasn’t until the next day that I realized I’d left that vinegar-dampened towel casually hanging in a corner. Oops! Laughter ensued.
Once your tools are clean and dry, add your dry ingredients to the bowl first: the meringue powder, a pinch of kosher salt, and the cream of tartar. The cream of tartar, as mentioned, acts as a stabilizer and helps achieve a better volume.
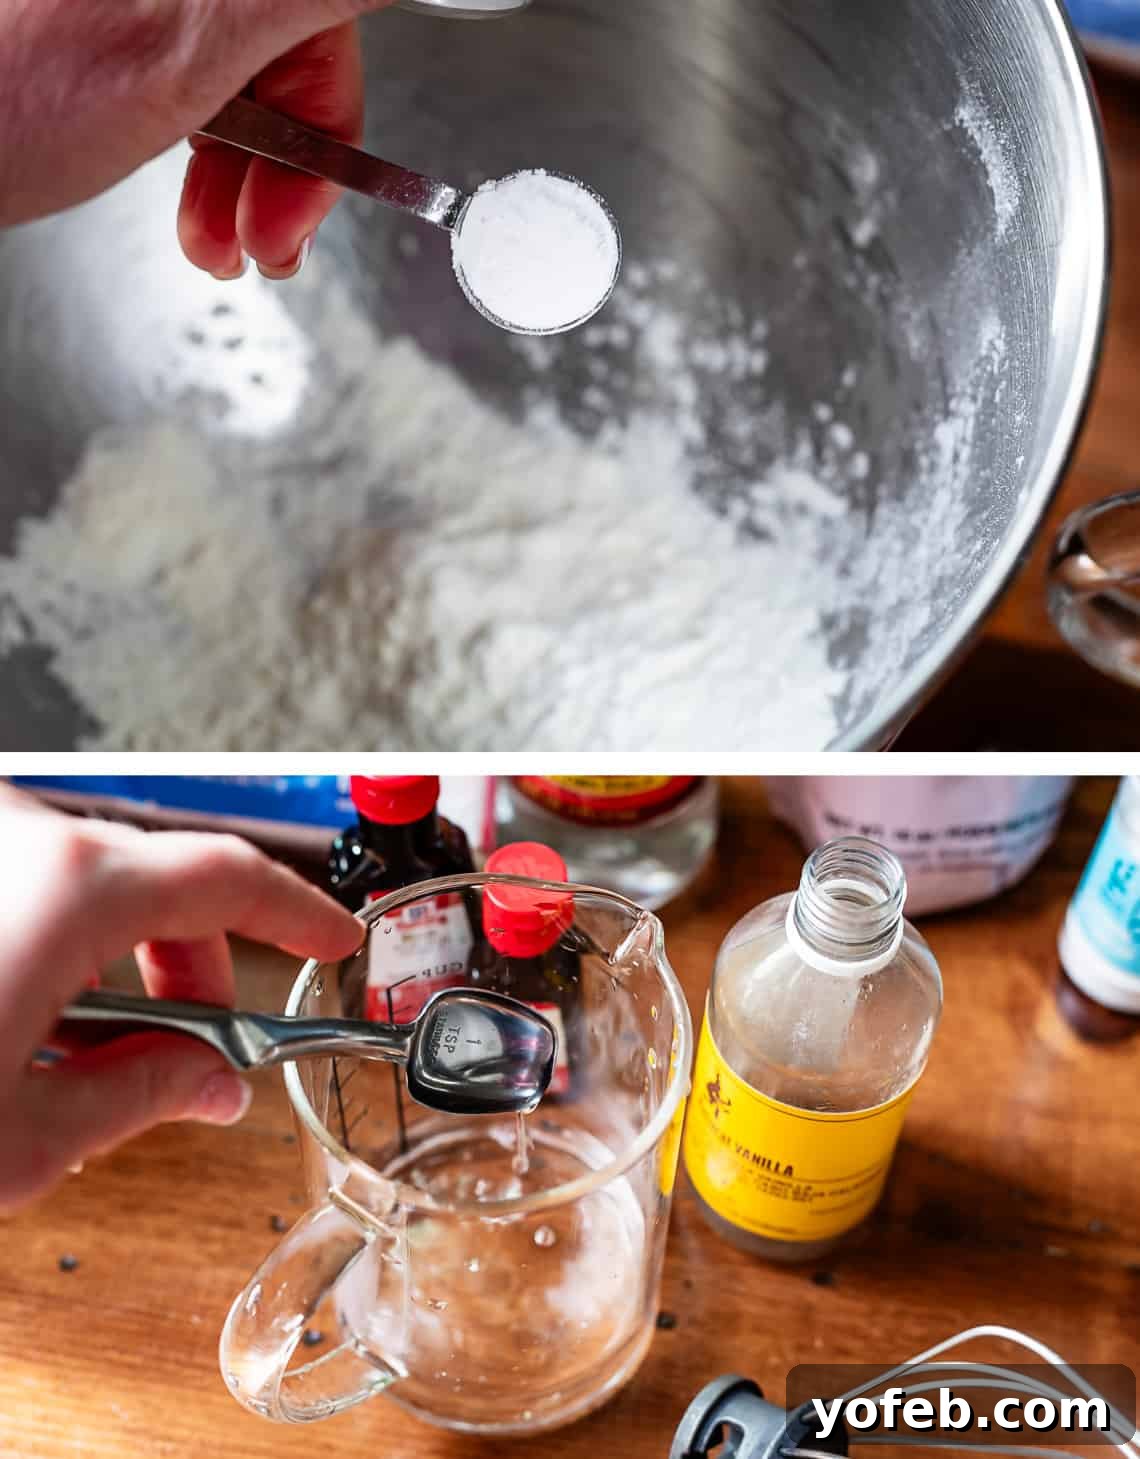
Next, measure out 1/2 cup of warm water into a separate cup. To this water, add your clear vanilla extract, almond extract, and coconut extract. This trio is my absolute favorite flavor combination for sugar cookies, a blend I also use in the cookies themselves and my buttercream frosting for incredible depth of flavor. If you’re preparing gingerbread cookies, I recommend replacing the almond and coconut extracts with an equal amount of additional clear vanilla for a more traditional spice profile. Remember to use *clear* vanilla to prevent any brown tint from affecting your icing, especially if you desire pristine white or pastel colors. Pro tip from experienced decorators: for truly brilliant white icing, add a touch of white food coloring. This not only enhances brightness but can also help prevent other colors from bleeding into your white designs.
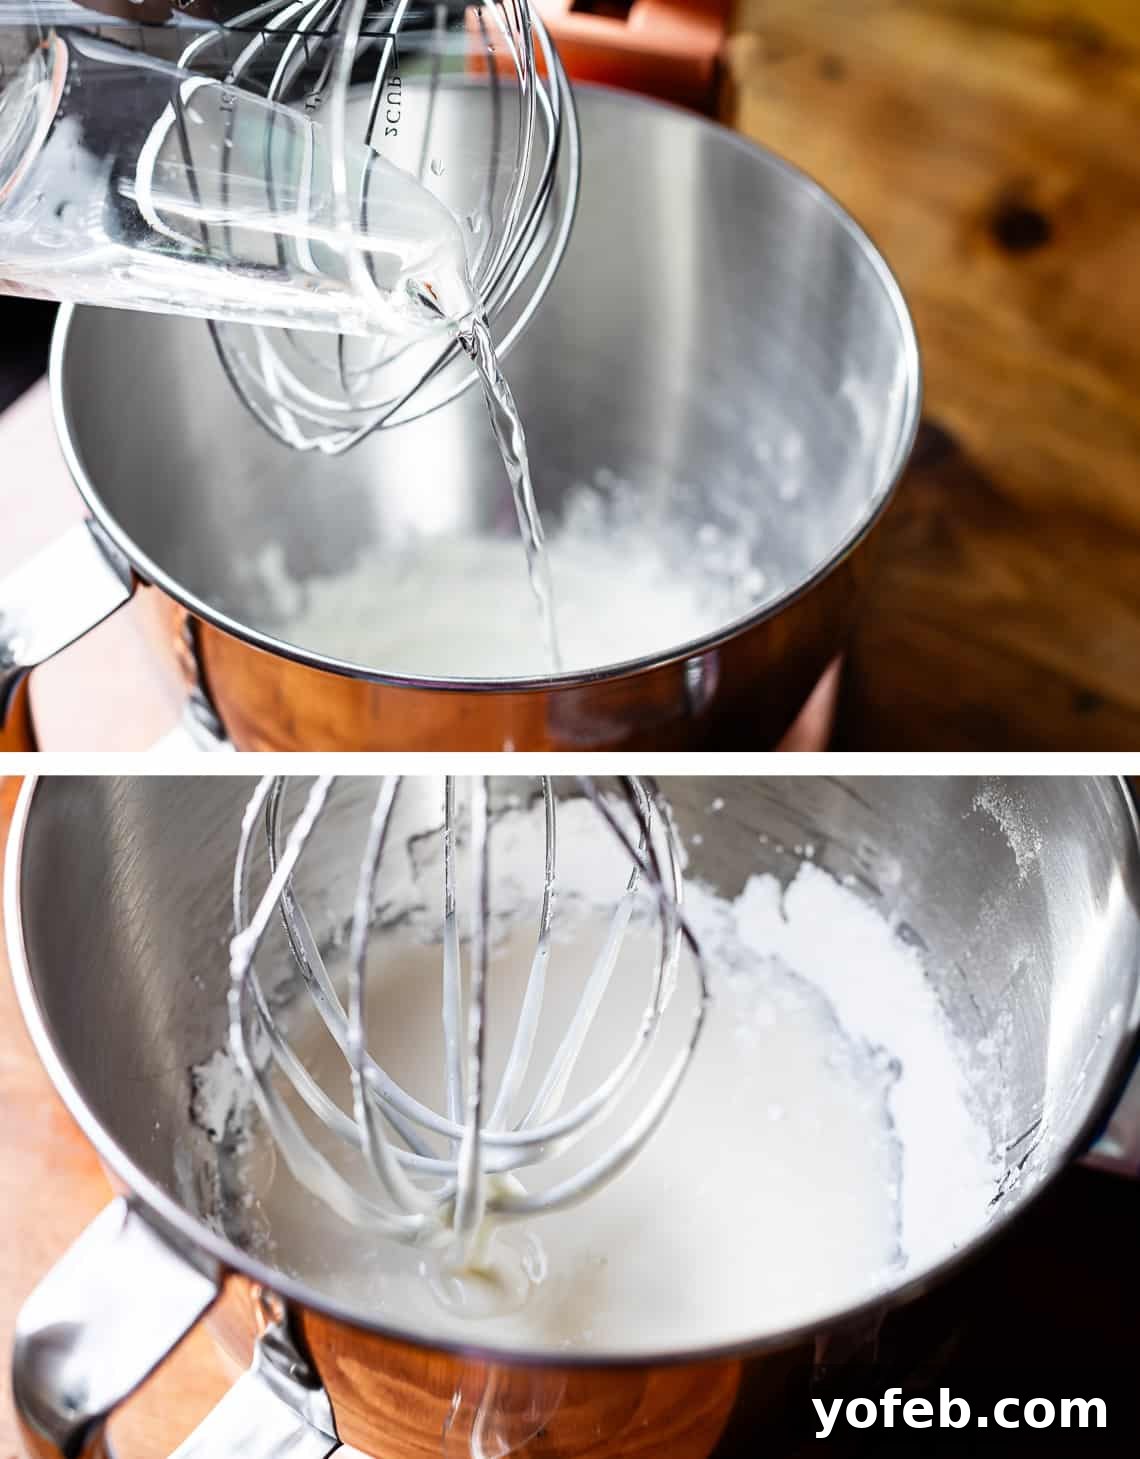
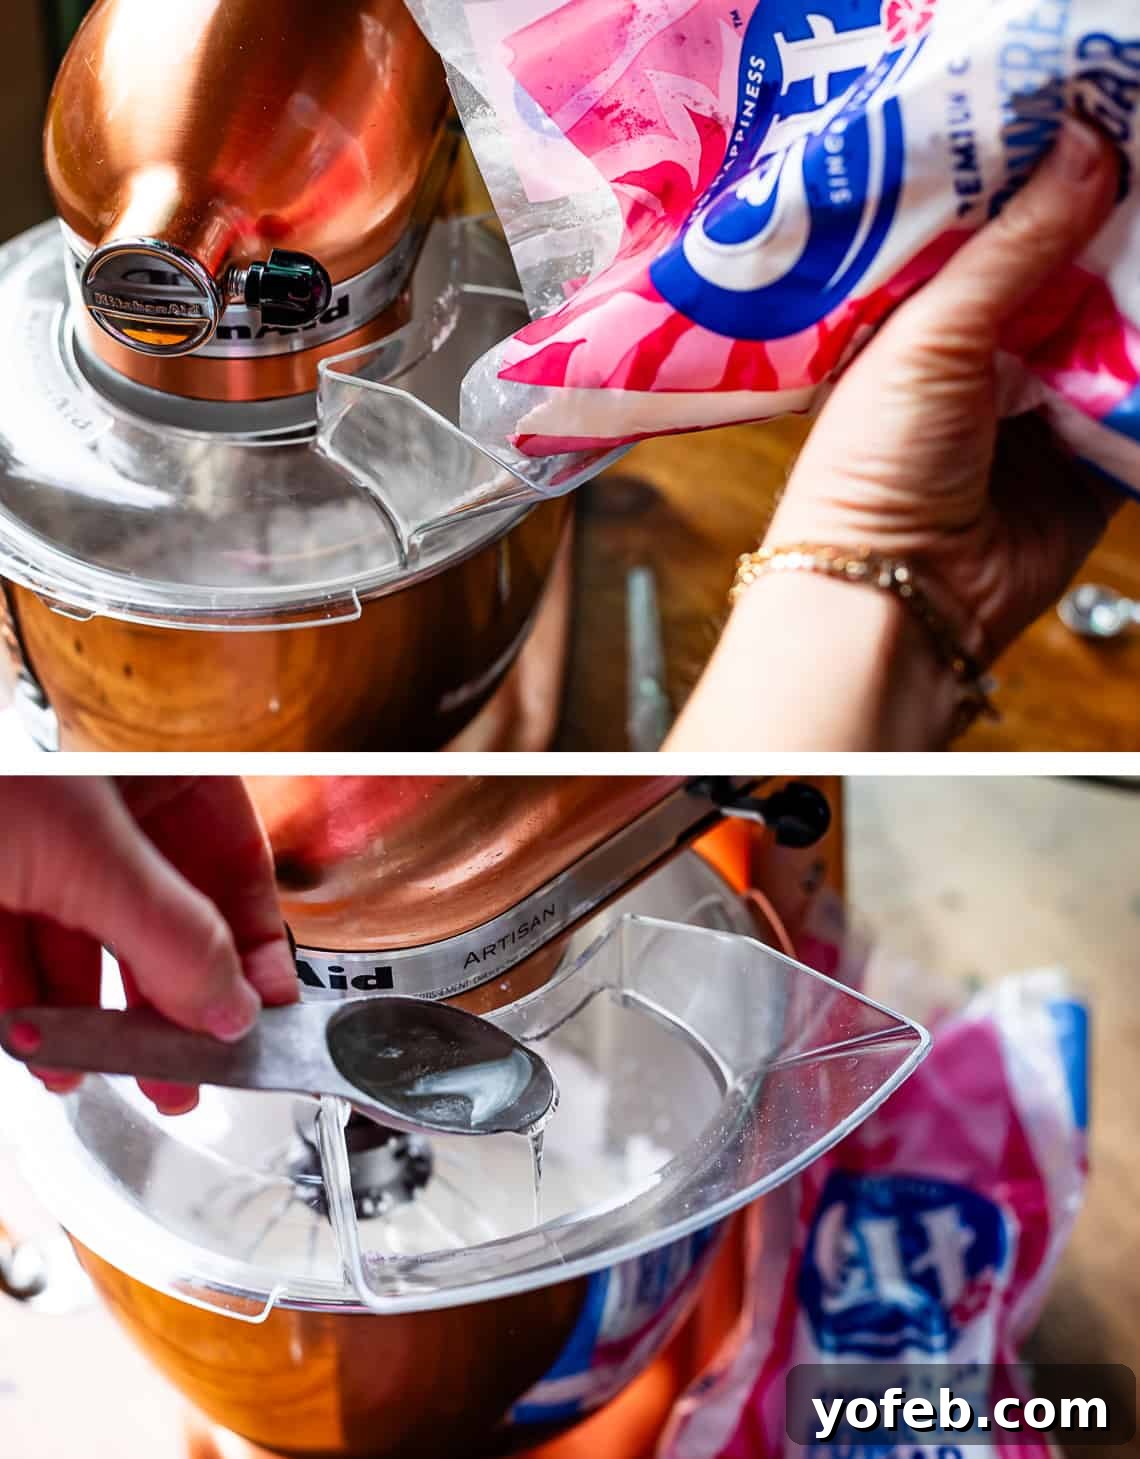
Pour the flavored water mixture into the bowl with your dry ingredients, then add the tablespoon of corn syrup. Begin whisking them together until just combined. Now, gradually start incorporating the powdered sugar. I find it easiest to pour it directly from the bag; sifting is generally unnecessary unless you notice significant clumps. Continue adding the powdered sugar slowly, allowing each addition to fully incorporate before adding more, until all two pounds are mixed in. At this stage, the mixture will be extremely thick, almost paste-like.
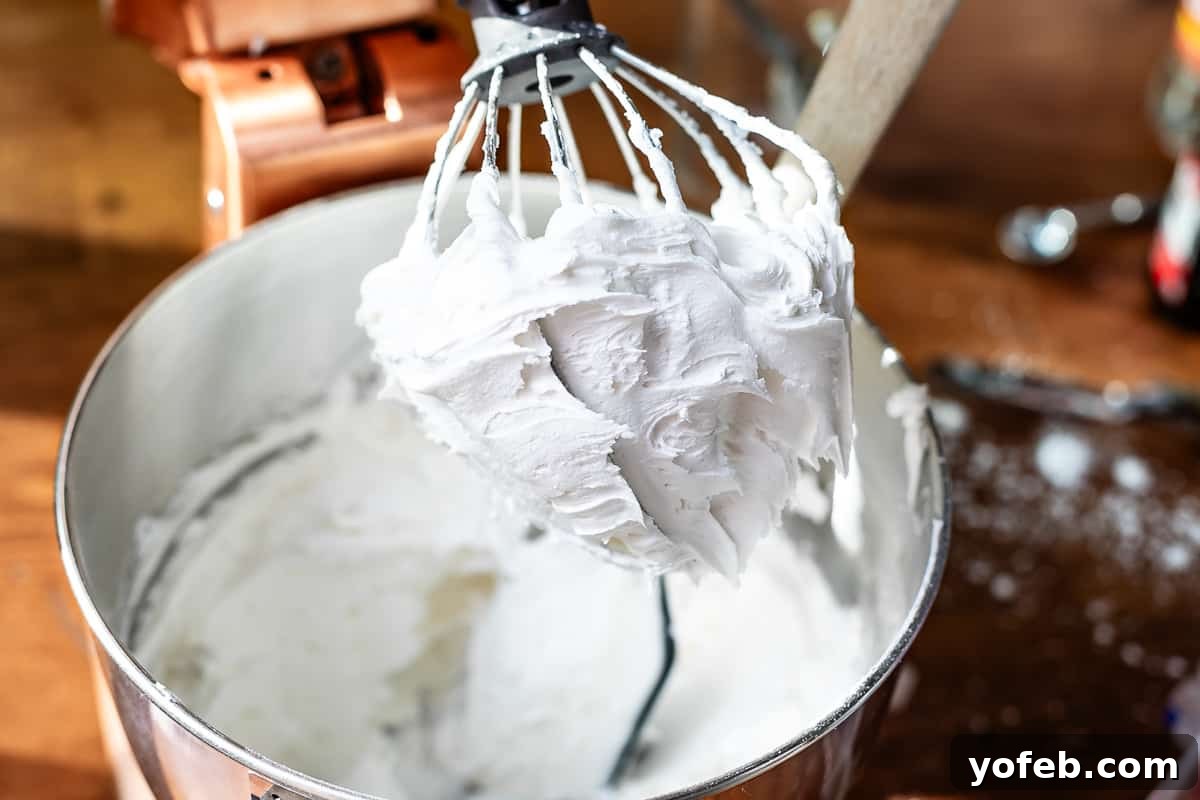
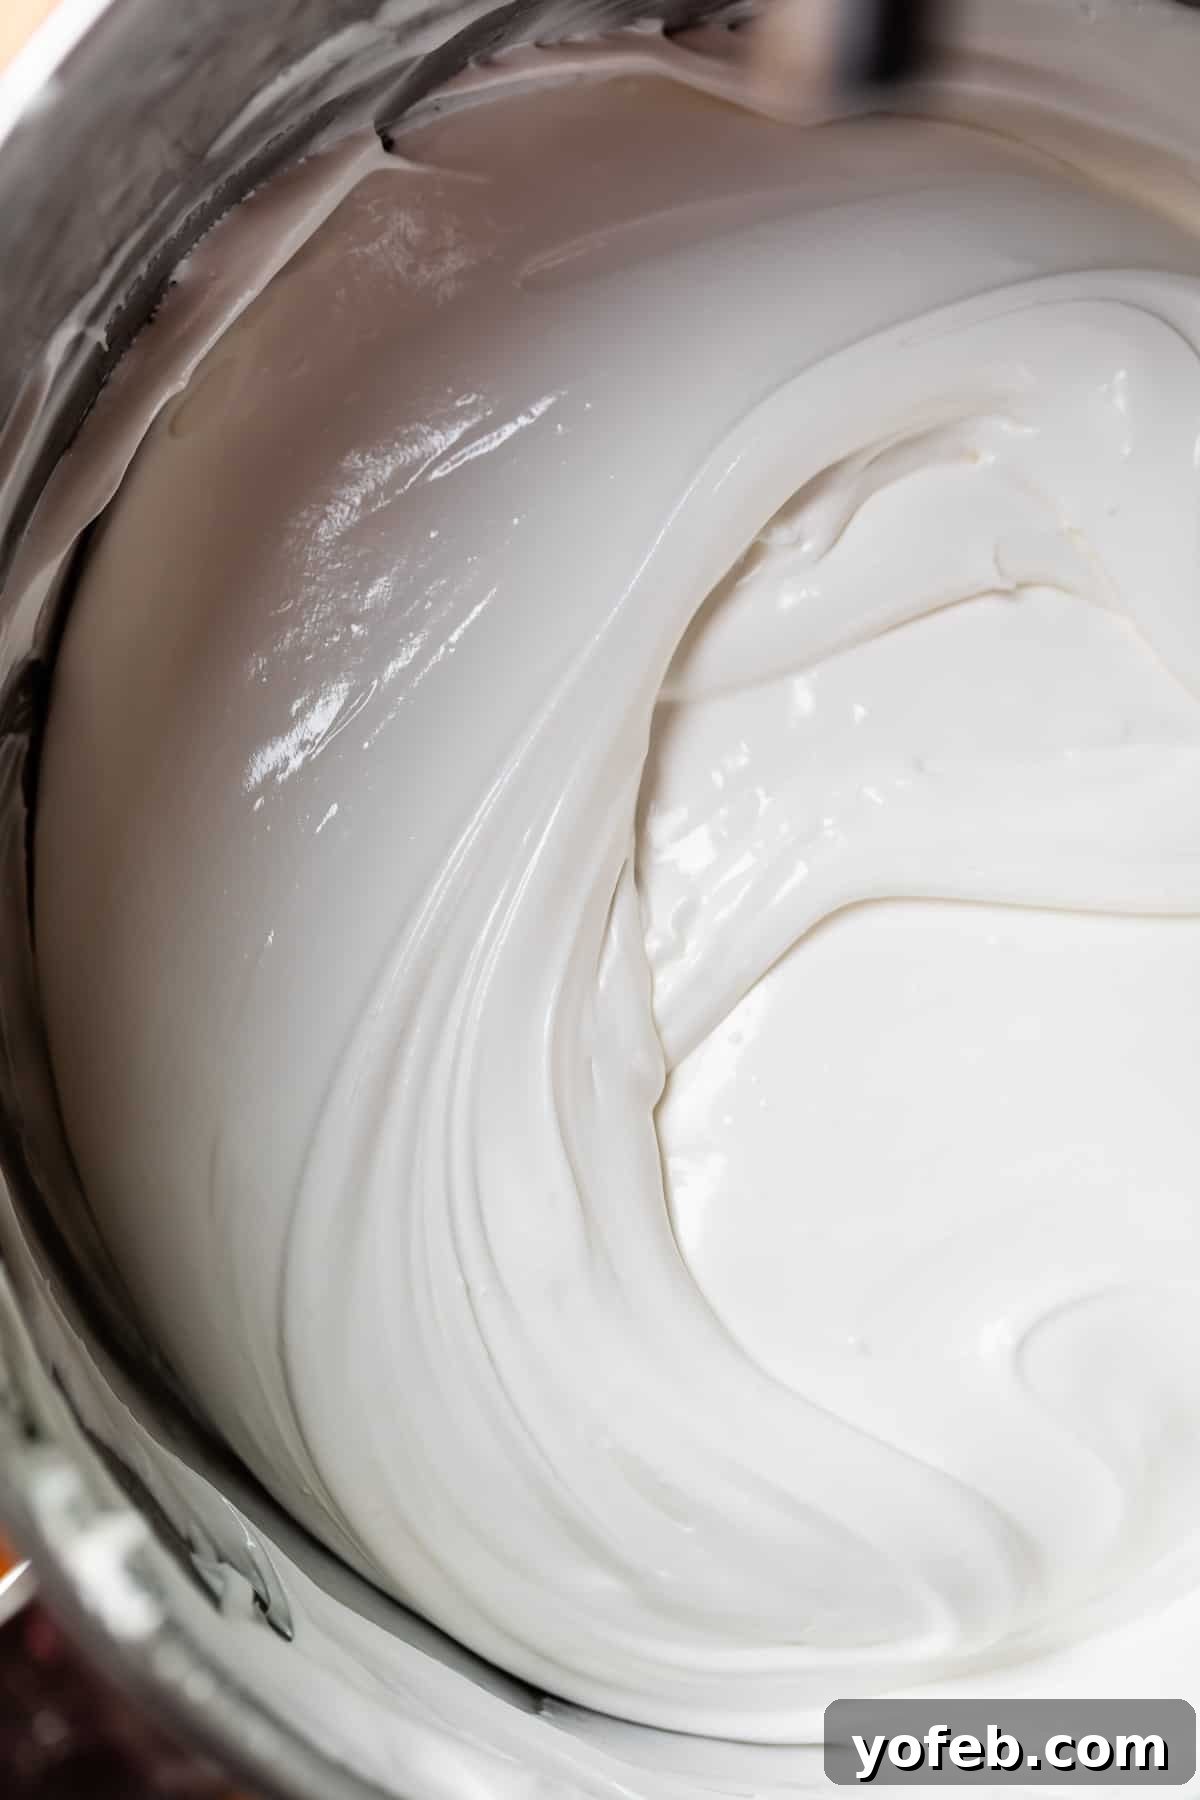
Continue mixing. Eventually, the icing will reach a very thick, almost cement-like consistency, as shown in the picture below.
This is where precision becomes paramount, so pay close attention! You’ll need to add more water, but proceed with extreme caution – not too much, and very slowly. The goal is to thin the icing to your desired consistency for decorating, but this must be done in small increments.
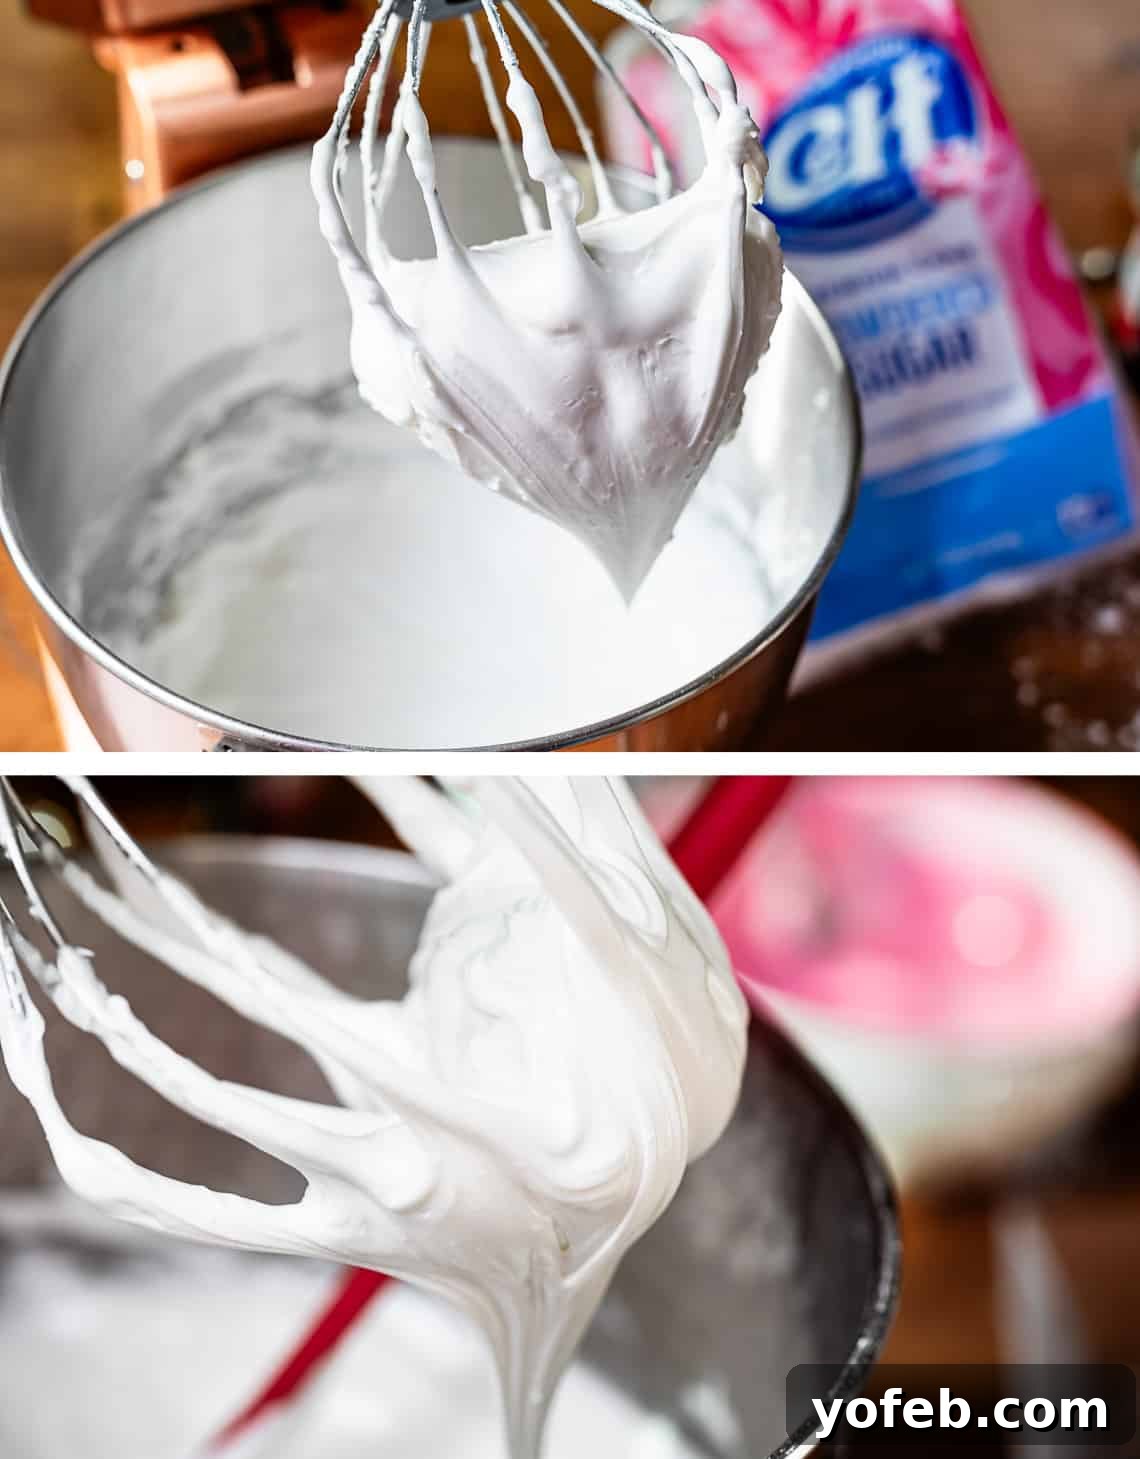
It’s getting closer to the perfect workable texture. Since I haven’t made a video for this yet, I’ll include many detailed photos. You want to bring this “base” icing to roughly the consistency of thick toothpaste – no thinner for now. This is a good starting point before you adjust for specific decorating needs.
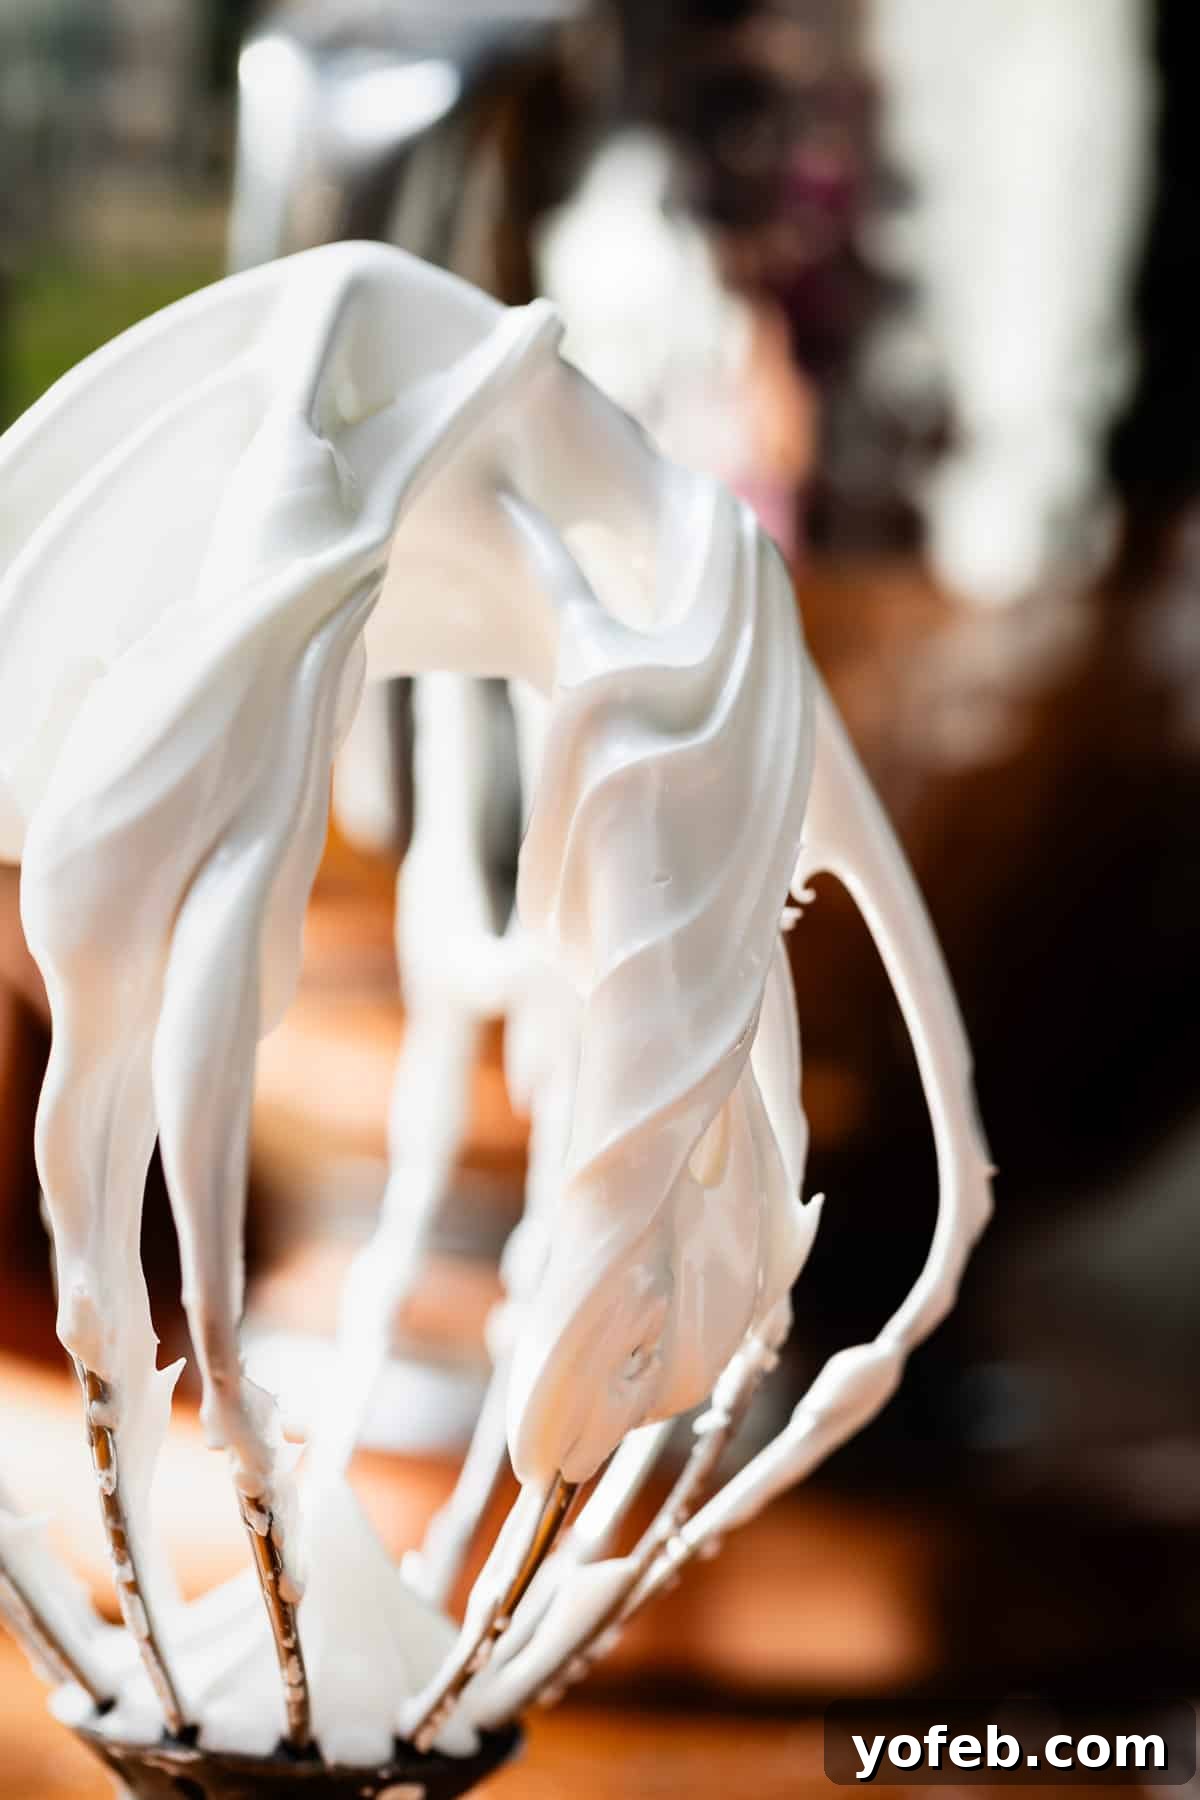
This toothpaste-like frosting will hold its shape reasonably well, but it will eventually settle and smooth out into itself. A good test for “piping consistency” (which is what this thicker icing will become) is to drag your spatula through it. The mark you make should remain visible for approximately 25-30 seconds before slowly disappearing and melting back into the surface. This thicker consistency is what you’ll need for outlining designs, creating intricate details, and perfect lettering. When in doubt, always err on the side of having icing that’s slightly too thick rather than too thin. I made this recipe multiple times, and the photo here shows an icing that’s even a little thicker than typical toothpaste, which is perfectly acceptable for the base.
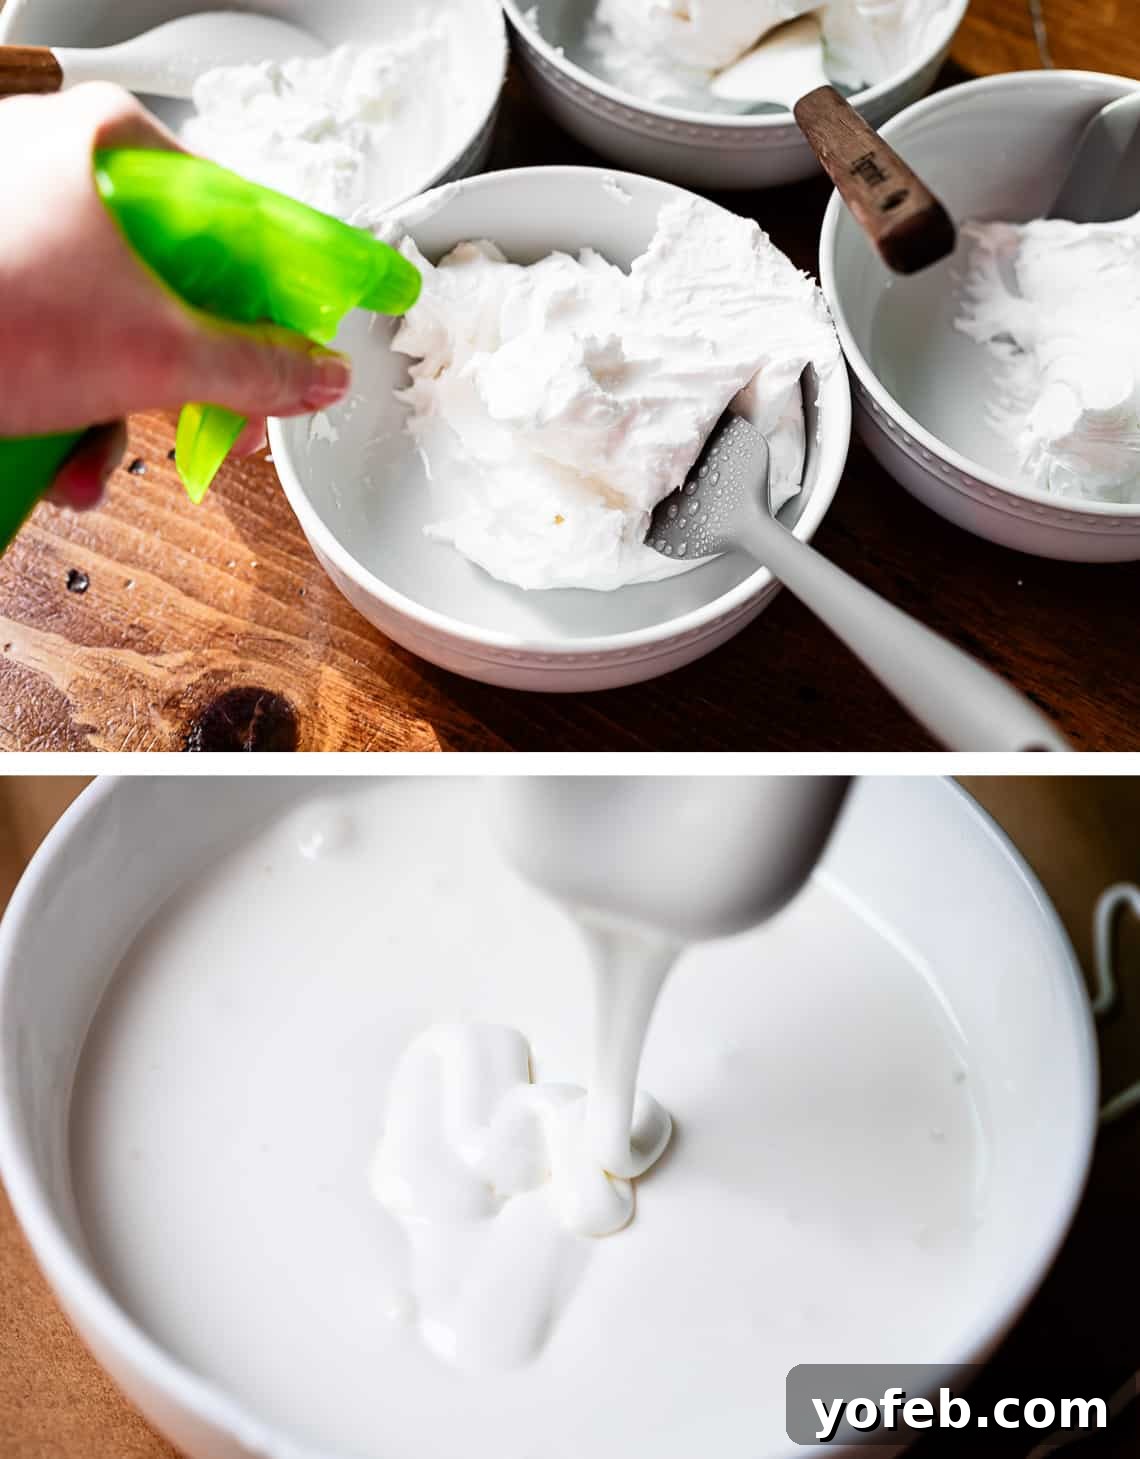
Once you have your thick base icing, you’ll divide it into separate bowls for coloring. At this point, the base consistency is excellent for piping. However, for filling larger areas of a cookie, you’ll want a thinner “flood consistency.” I often transfer a portion of the base icing to a separate bowl and then, very carefully, add small sprays of water from a spray bottle until it reaches a flood consistency. This thinner icing typically has a “disappearing mark” point closer to 15 seconds, meaning a drizzled line will disappear faster, ideal for smooth, even coverage.
Now, let’s talk about coloring your icing. Divide your base frosting into as many bowls as you need different colors. Remember, it’s always better to make more icing than you think you’ll need!
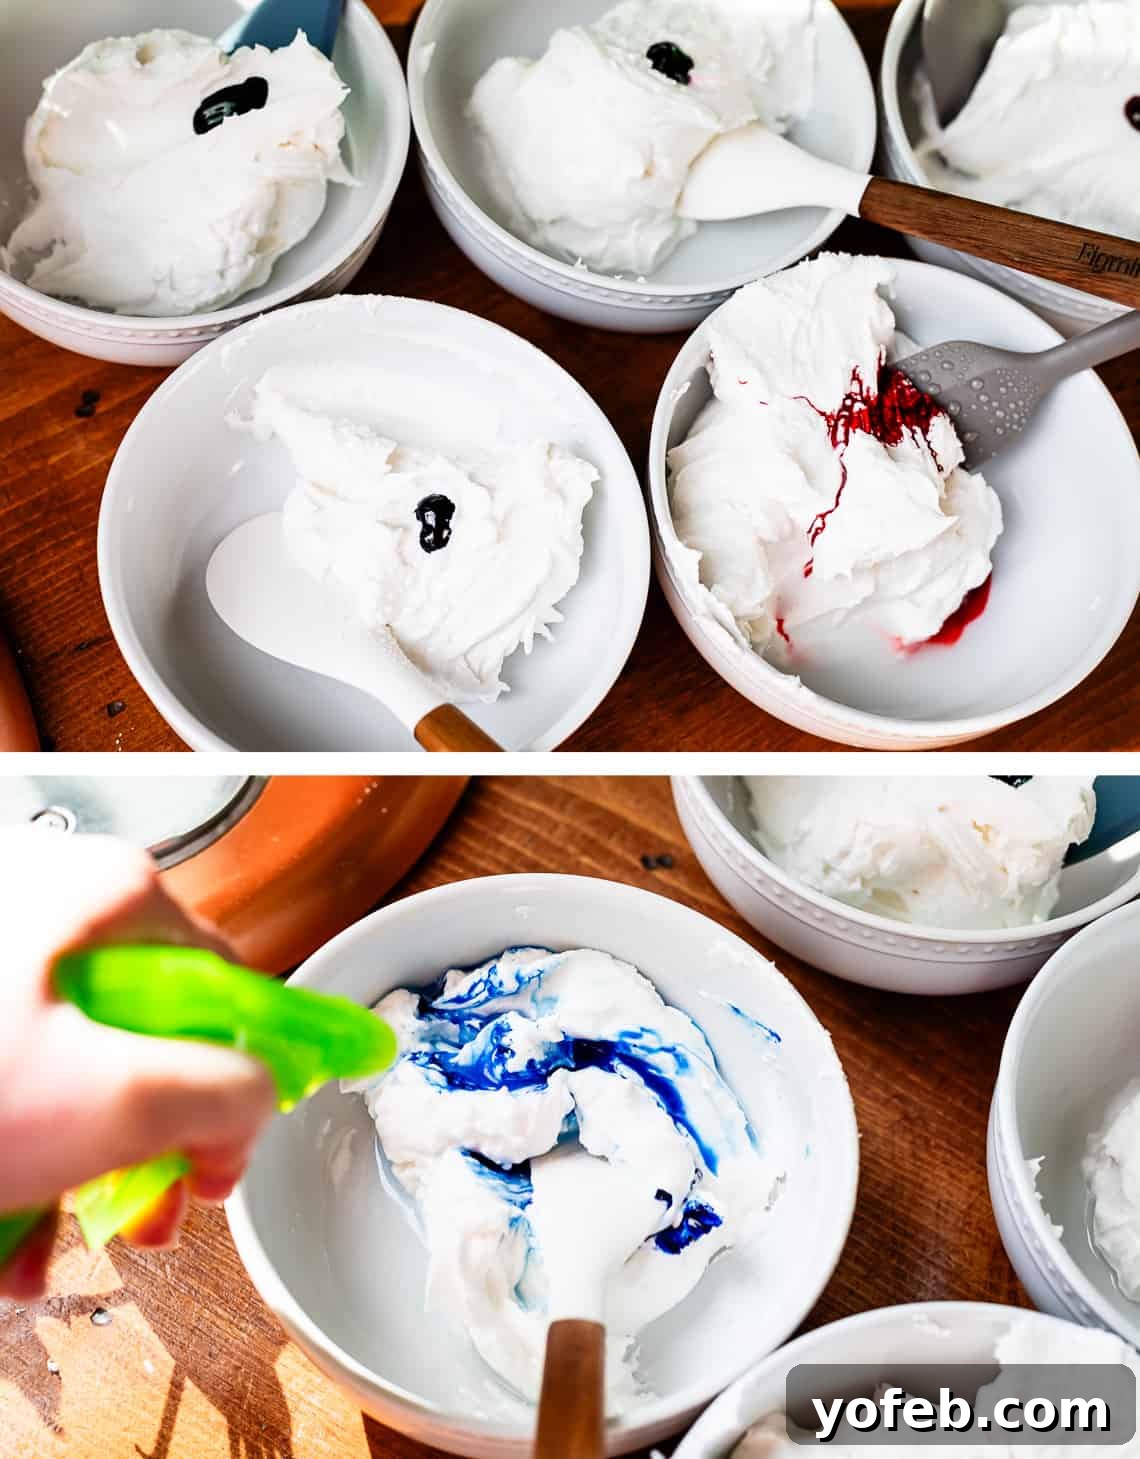
As you can see, this base icing was a little thicker than it strictly needed to be. I could have added another tablespoon or two of water to the main mixing bowl. But no worries, you can always add water to individual bowls too. Use your spray bottle and proceed very carefully, mixing in the color and tiny sprays of water until you achieve both the desired hue and consistency. Colors deepen over time, so if you’re aiming for a dark red, for instance, start with a dark pink and let it sit for an hour to develop.
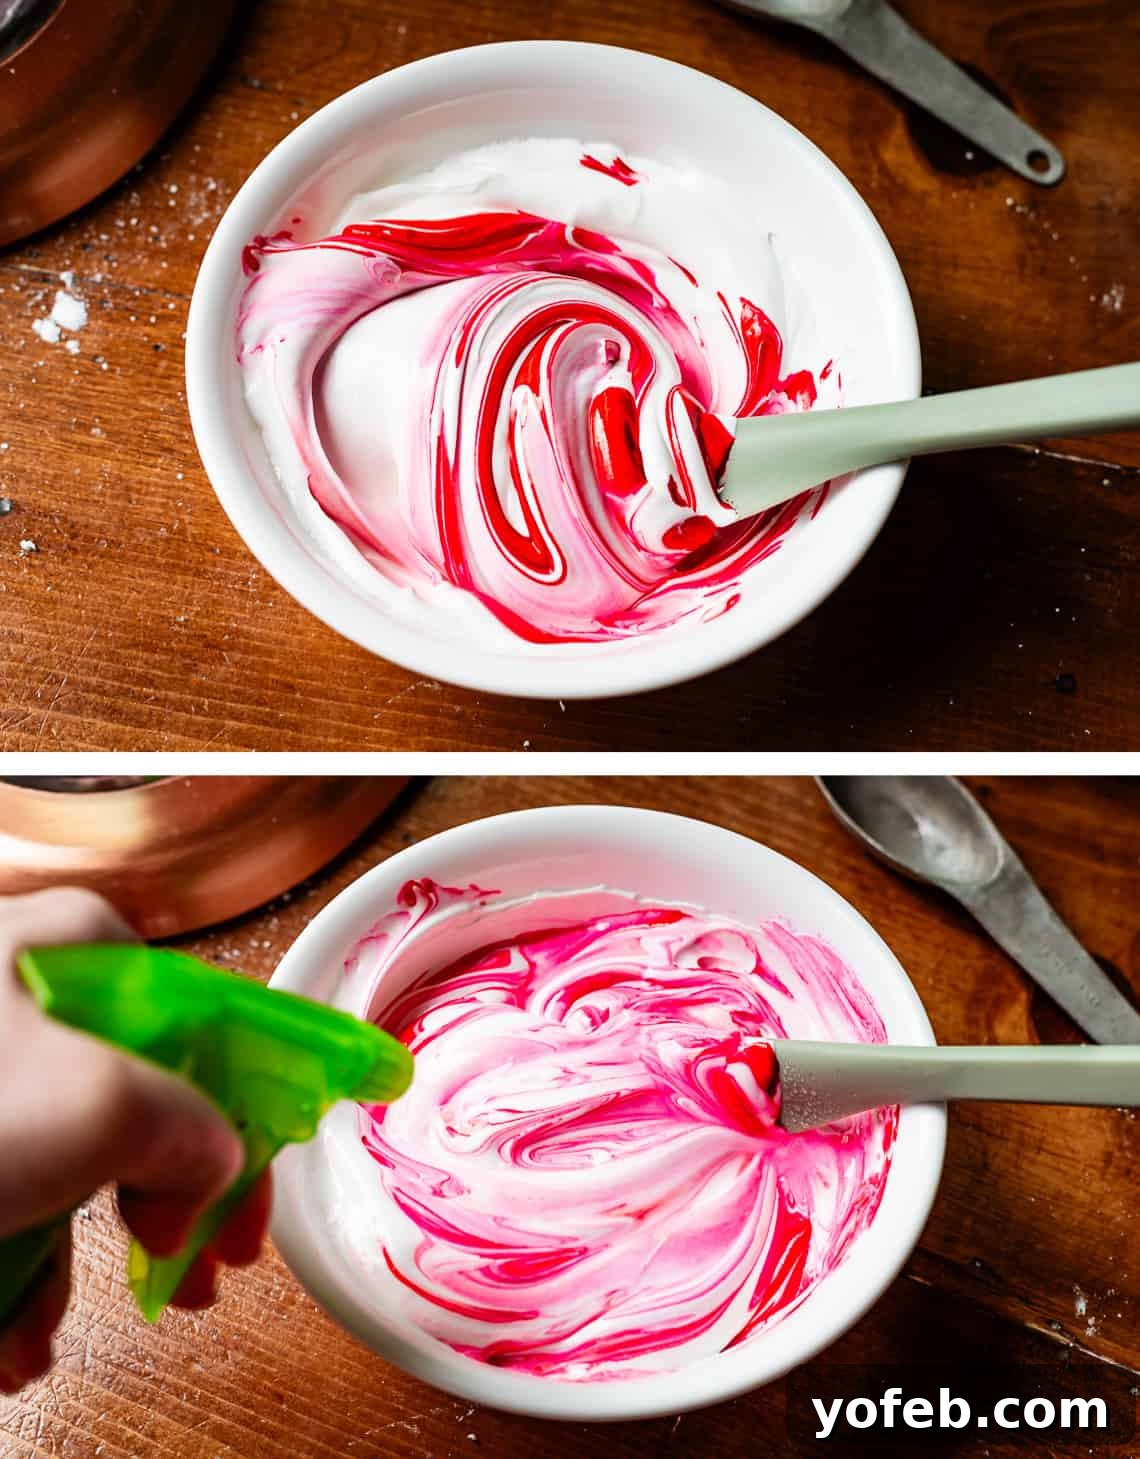
Here’s what the red color looks like. It starts as a pretty pink, but as it sits, the color deepens and develops into a richer red.
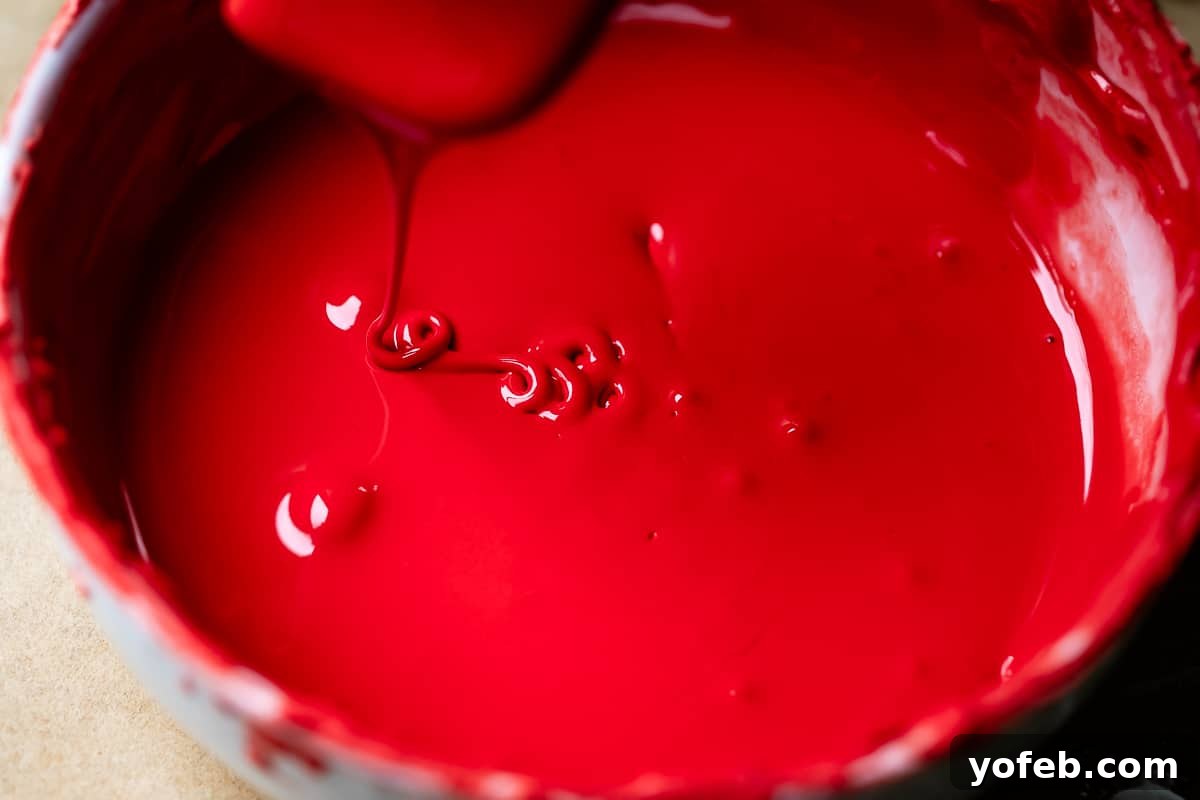
This photo vividly illustrates what I mean by the “disappearing point.” Notice on the right where I began to drizzle, the lines are already fading even as I moved towards the left. This is closer to a “flood consistency,” ideal for smoothly filling large areas. This particular consistency has a disappearing point of about 5-10 seconds. For a complete breakdown of how to achieve various consistencies (piping, medium, flood) and when to stop adding water for each, please refer to the recipe card below.
At this stage, you might choose to divide each color into two separate bowls: one for “piping consistency” (thicker, for outlines and details) and one for “flood consistency” (thinner, for filling). Alternatively, you can opt for a single “medium consistency” that works well for both outlining and flooding, which simplifies the process for beginners. The recipe card details how to achieve each.
Now, it’s time to transfer your perfectly prepared icing into piping bags. For intricate outlining, delicate lettering, and fine detail work, I highly recommend using piping tips #1 or #2, which are the smallest sizes available. Here, you can see tip sizes 1 through 5, arranged from left to right, giving you a visual reference:
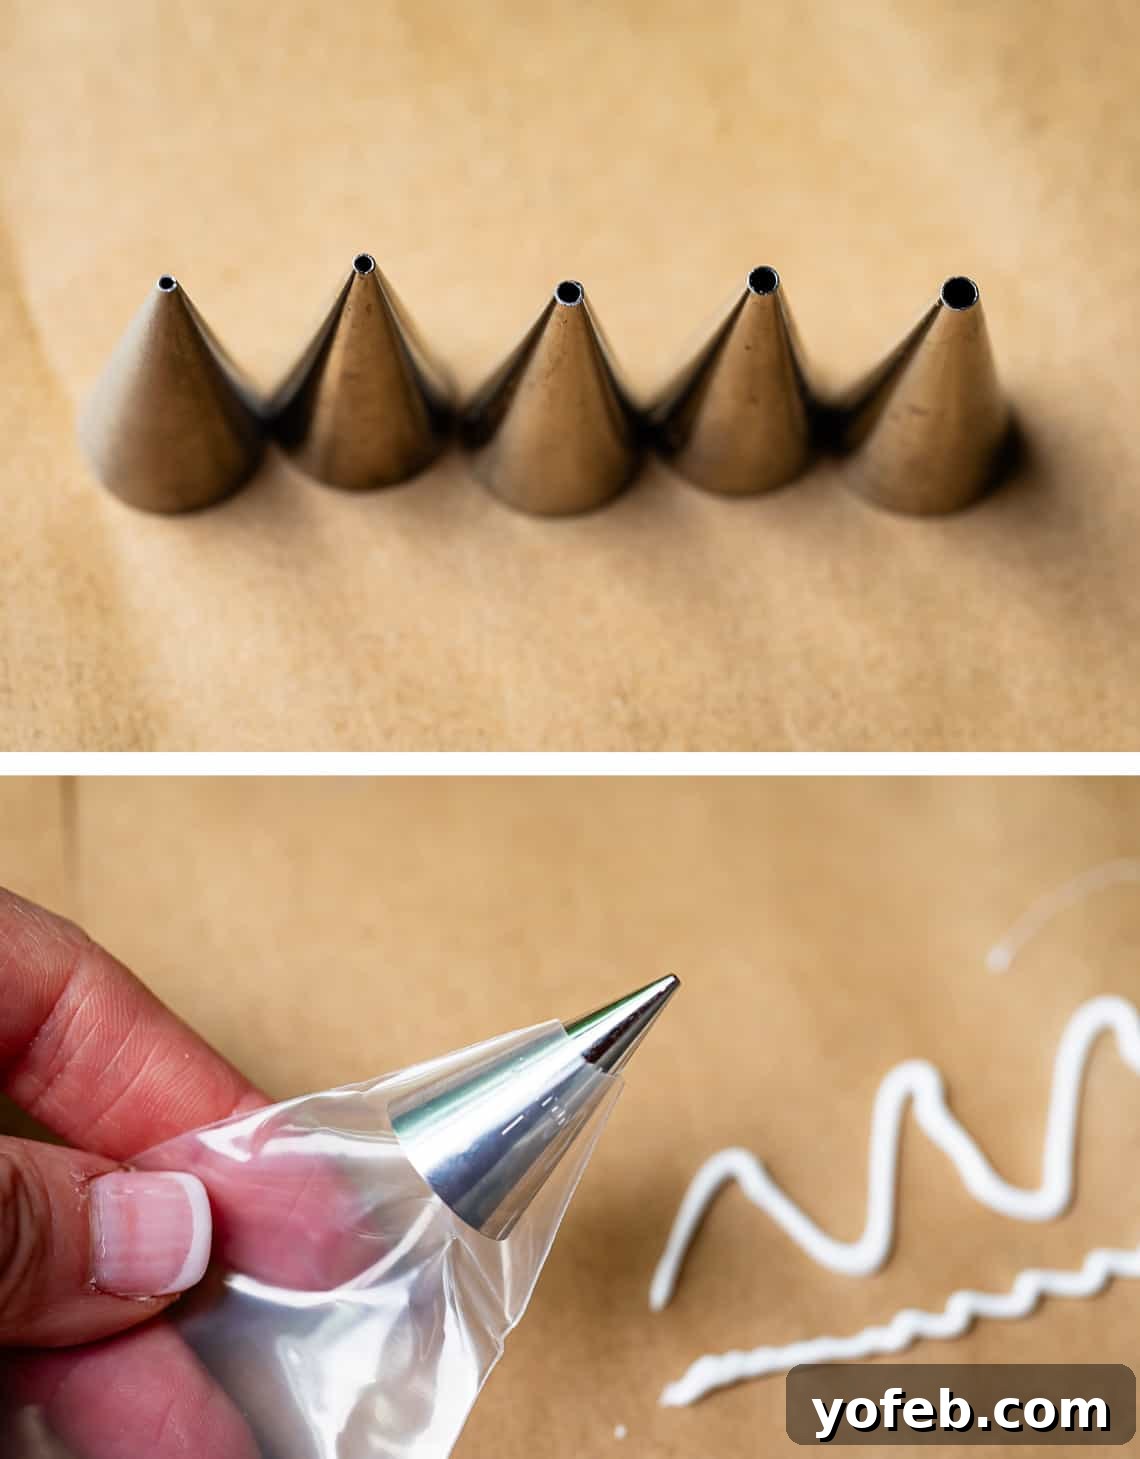
For your flood bags, you don’t necessarily need a piping tip. Since flood consistency icing is designed to fill large areas quickly and easily, you can simply snip a small opening at the end of the piping bag for efficient flow.
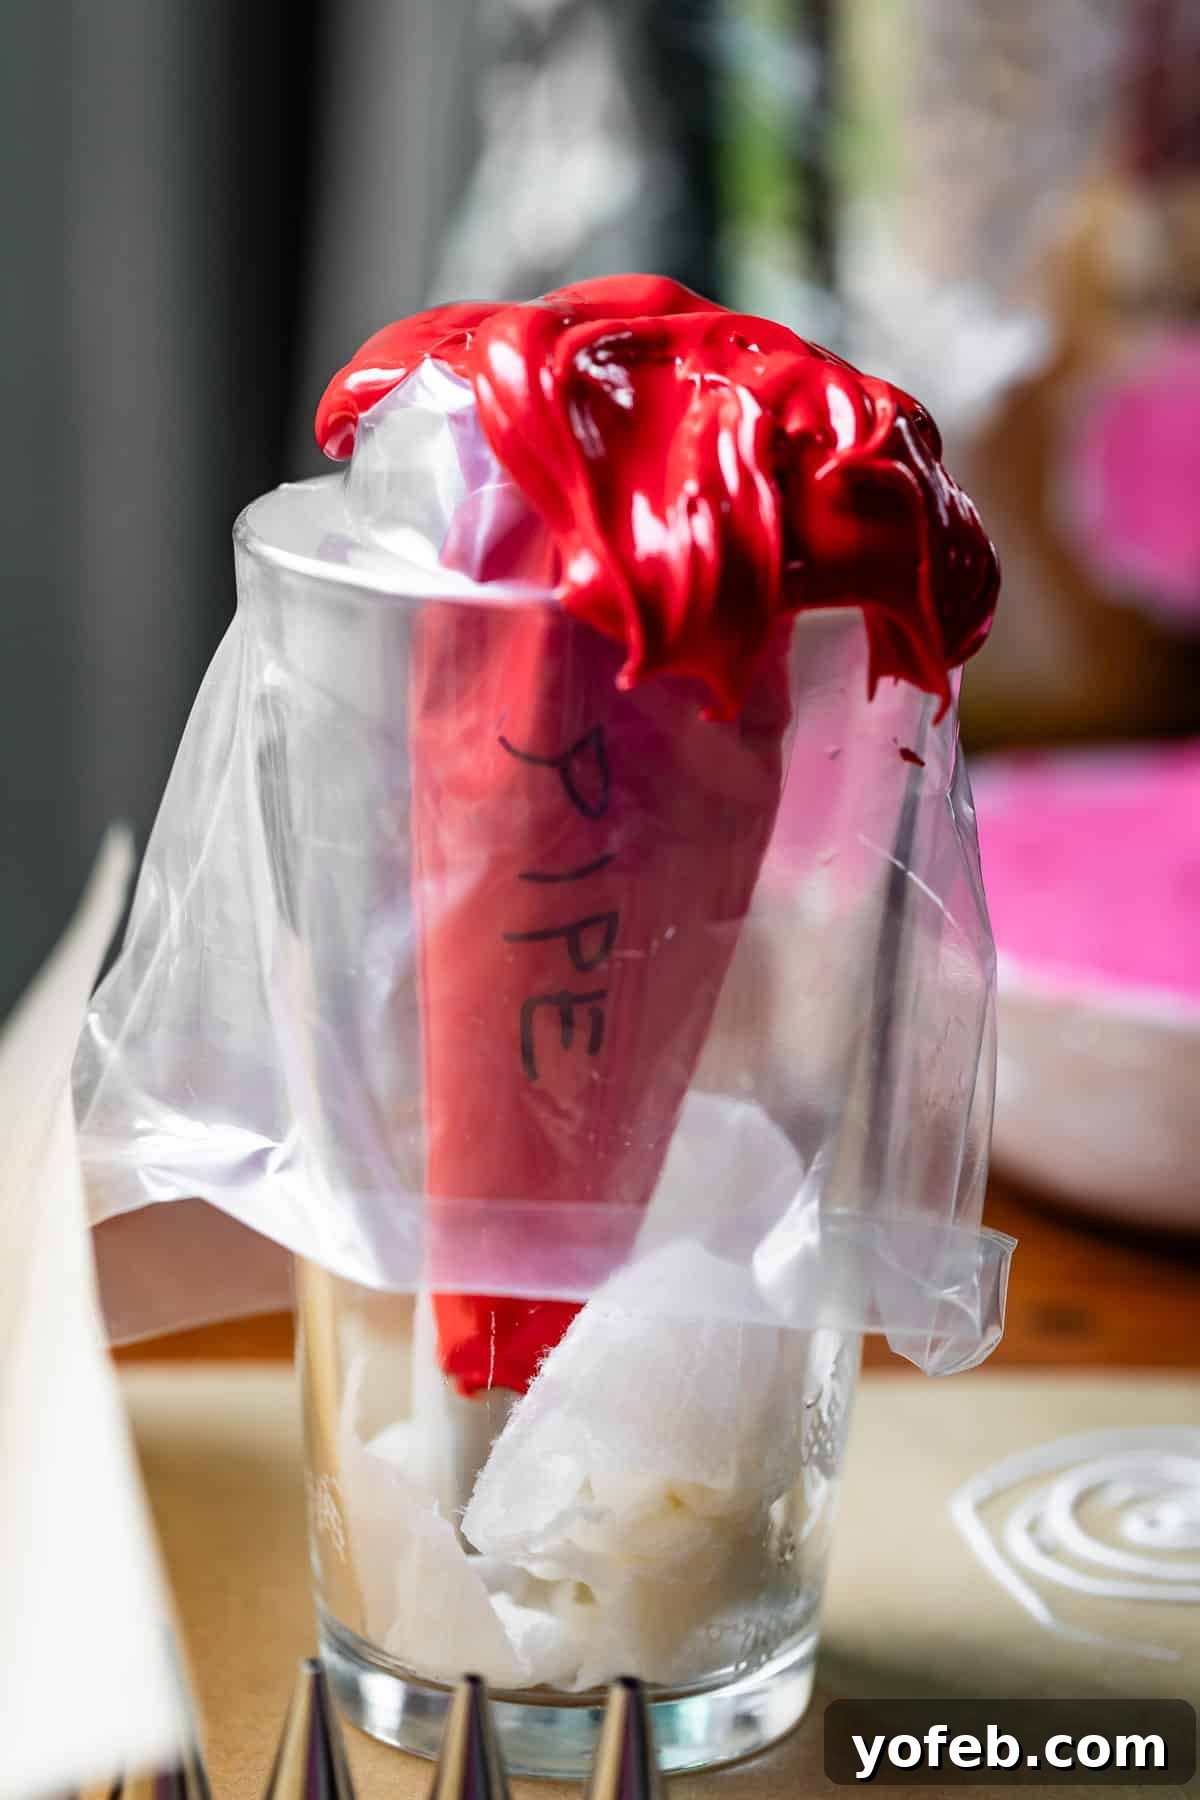
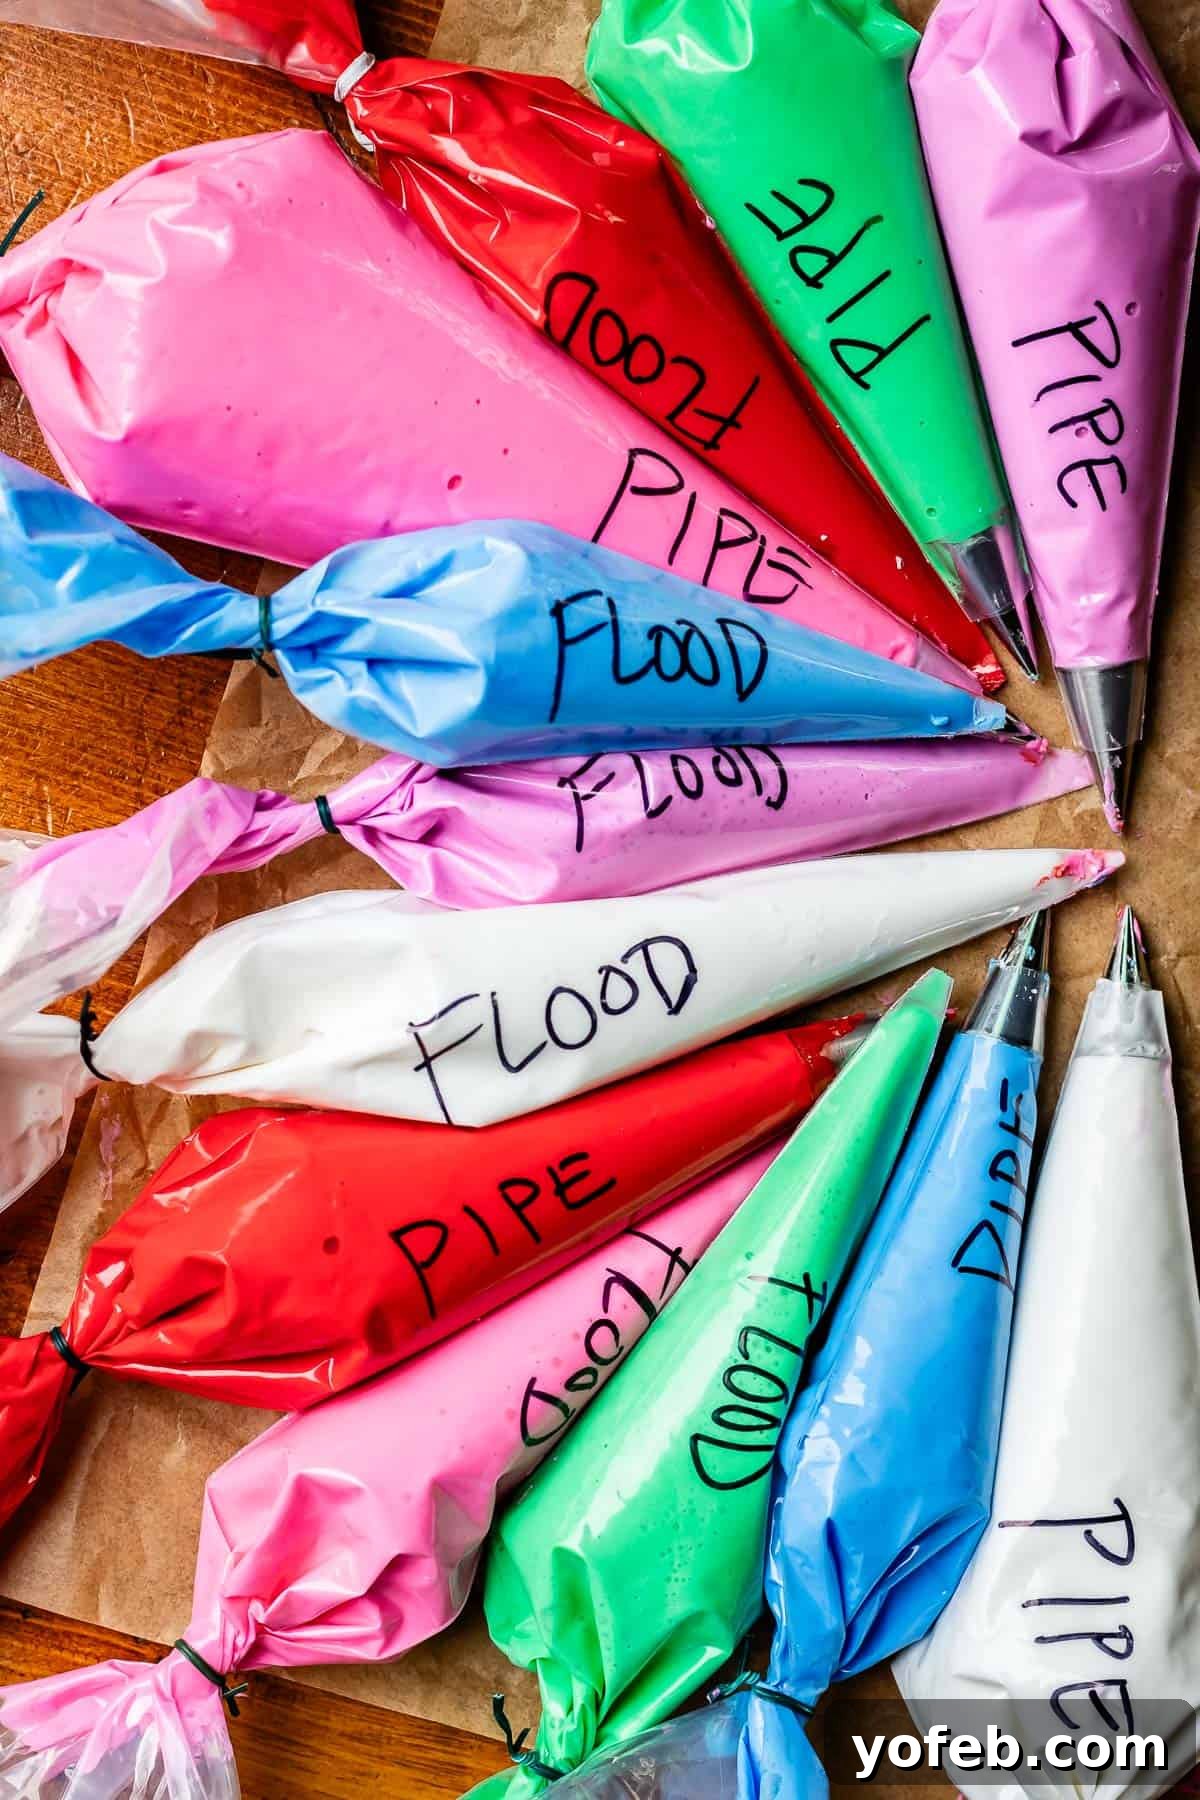
As you can see here, I use a tall glass to help stabilize my piping bag while I fill it, making the process much easier and less messy. At the bottom of the glass, I place a damp paper towel; this is a crucial trick to prevent the tip of the bag from drying out and clogging with hardened icing. Notice how thick this particular frosting is – this is the thicker piping consistency, resembling slightly thinned-out toothpaste, distinct from the thinner flood consistency shown earlier with the 5-second drip. Properly labeling your bags, perhaps with “pipe” or “flood” and the color, is a great way to stay organized.
Now, the real fun begins: decorating! My biggest piece of advice for outlining detailed shapes is to hold your piping tip slightly above the cookie, rather than directly touching it.
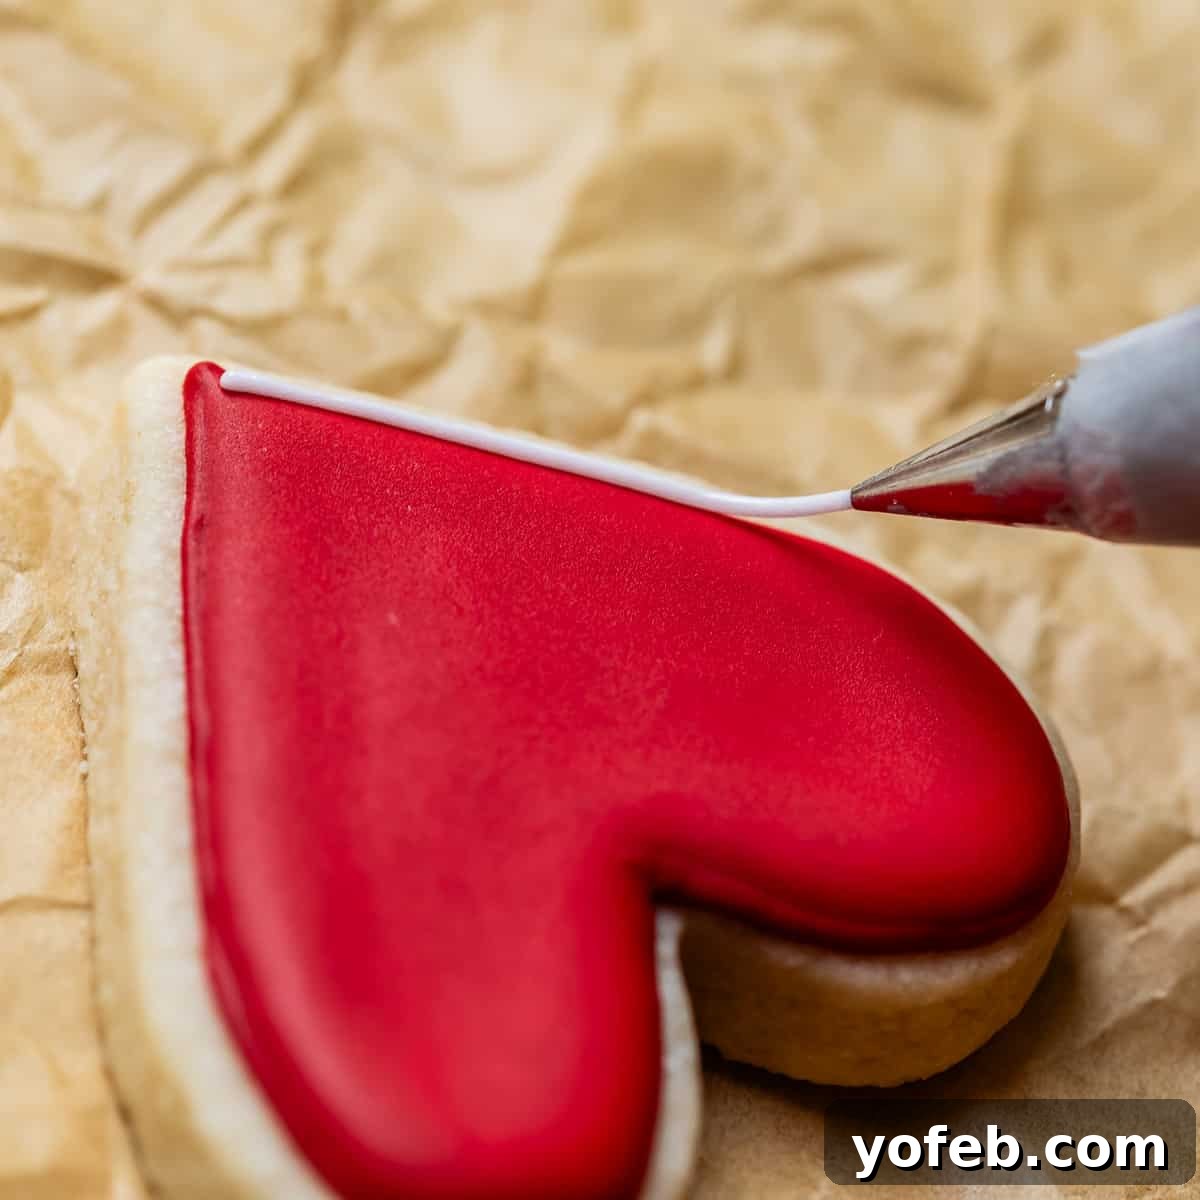
You want the icing to “fall” gently out of the tip and smoothly onto the cookie’s surface. This technique allows gravity to assist in creating clean, crisp lines. Notice the slight gap or “drag” between the tip, the flowing icing, and the cookie? That’s precisely what you’re aiming for. This particular skill requires some practice and a steady hand. I often use my non-dominant arm to help stabilize my working hand. Don’t worry if it’s not perfect right away; this is a learned skill!
That being said, I haven’t practiced extensively, and I certainly don’t have the steadiest hand – and yes, I absolutely freaked out a few times during decorating! That’s why I rely heavily on toothpicks to fix almost everything. They are your best friend for minor adjustments and corrections.
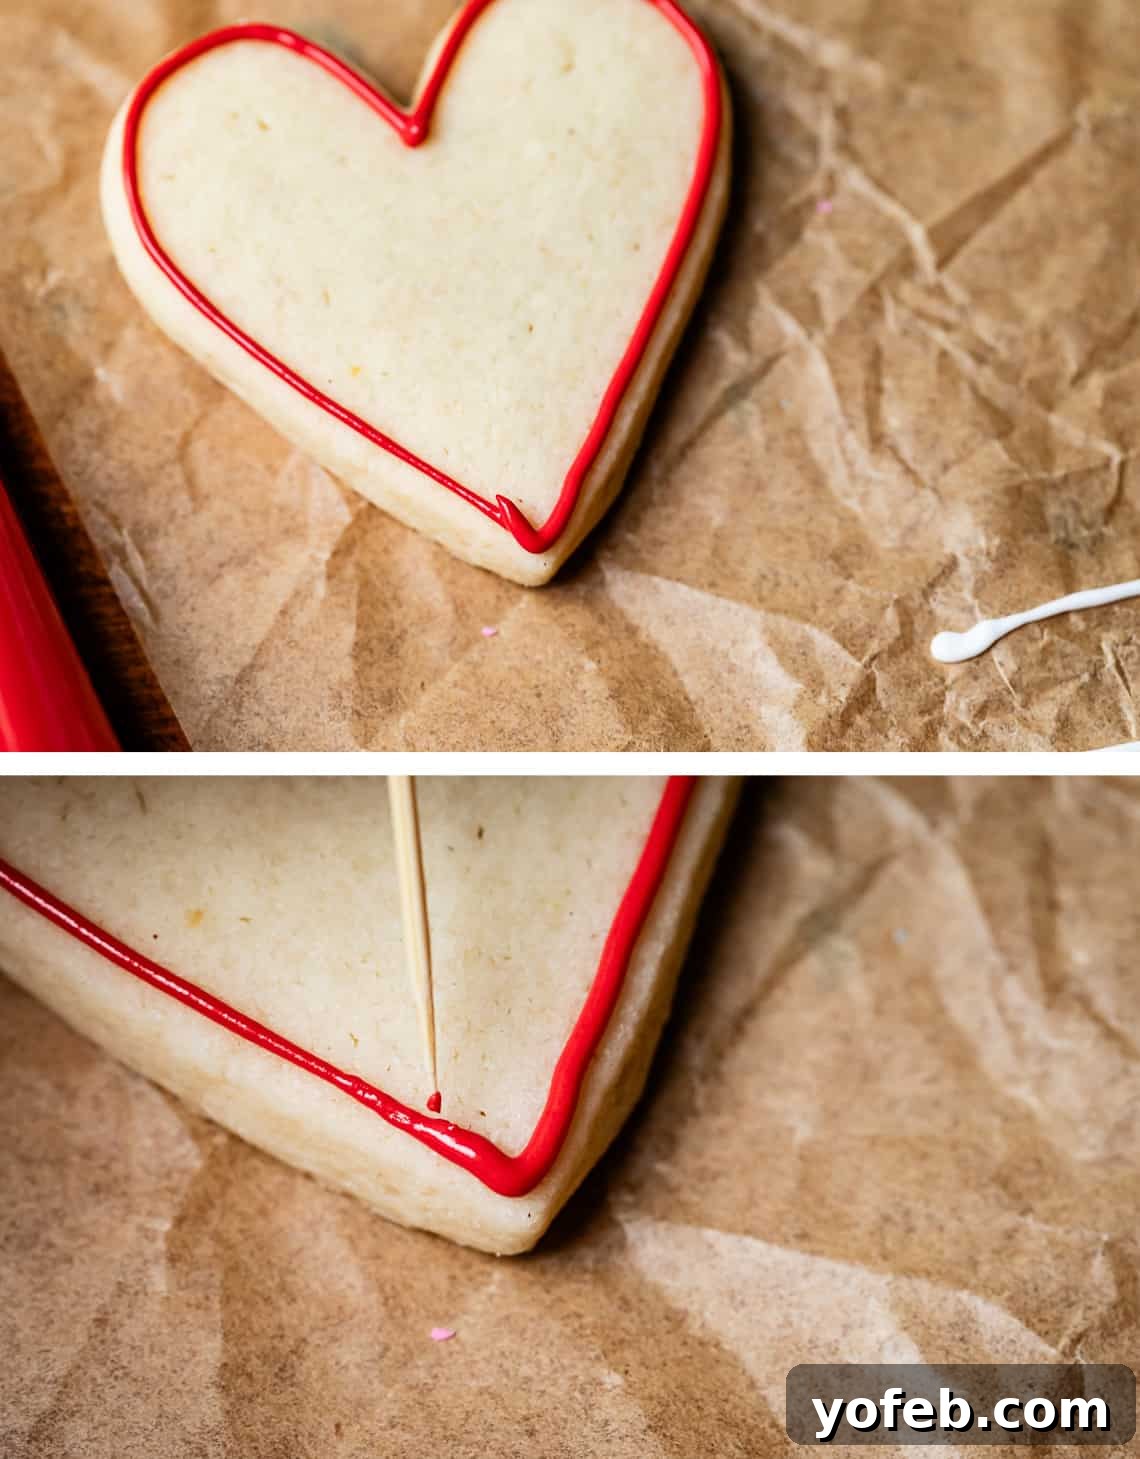
As you can see here, with piping-consistency frosting, if you act quickly before it starts to set, you can gently nudge and reshape it to your liking (within reason, of course). This forgiving nature is wonderful for beginners!
I also want to remind you that this recipe yields a generous amount of icing. So, if you’re just starting to decorate a cookie and you make a “royal” mess (see what I did there? I amuse myself!), don’t hesitate. Simply use your fingers or a damp paper towel to wipe off the icing from the cookie and start fresh. It’s absolutely okay! You’re not a professional; you’re here to have fun and explore your creativity.
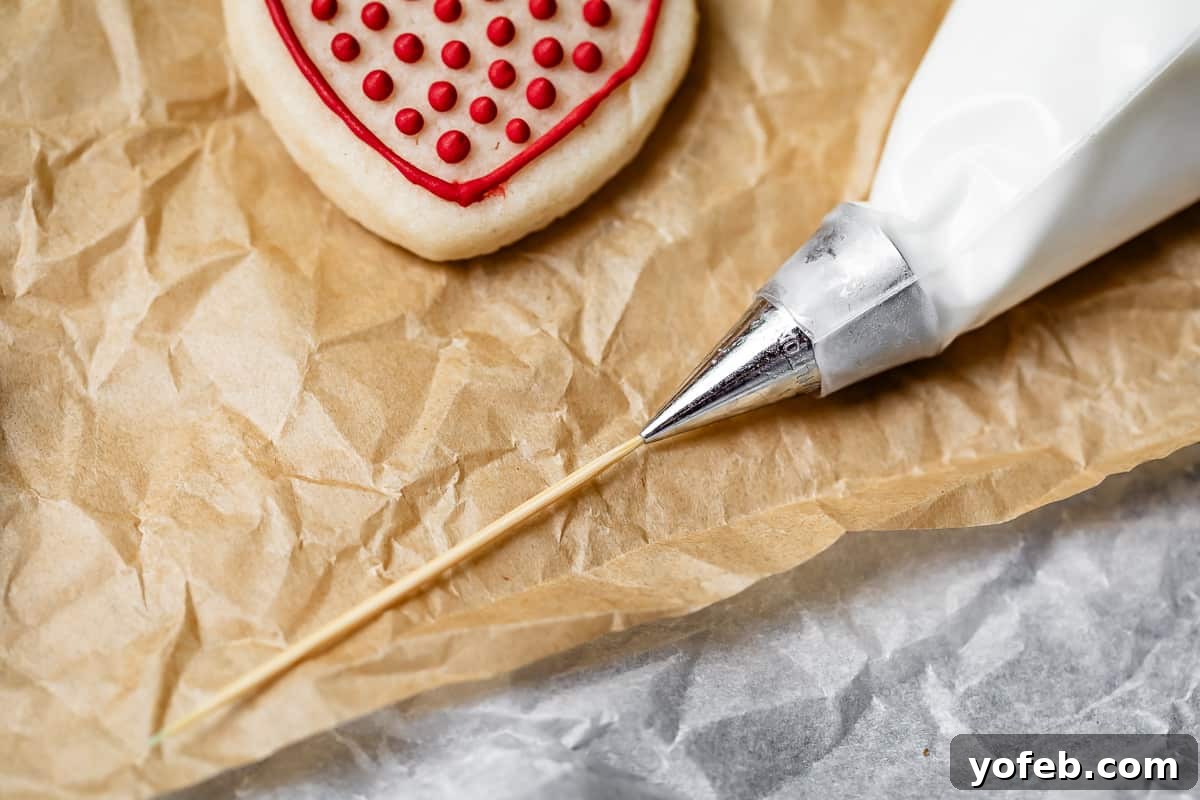
Here’s another handy toothpick trick: if you accidentally forget to place your piping bags back into the glass with the damp paper towel (which is supposed to prevent tips from clogging with dried icing), or if you simply have too many bags to manage, just use a toothpick to gently clean out any hardened icing from the tip. It works wonders!
For filling larger areas, I start by outlining with piping-consistency icing. Then, as shown here, I use piping-consistency icing to create a zigzag pattern across the interior of the heart before flooding.

Then, I use the flood-consistency red icing to fill in over the top of the zigzag. The primary reason for this initial zigzag is to prevent “cratering.” Cratering occurs when you fill a very large area with flood icing, and air becomes trapped underneath. As the icing dries, it can collapse, resulting in an uneven, cratered surface instead of a perfectly smooth finish.

Here’s another heart where I didn’t initially zigzag. In my experience, all of mine turned out fine and didn’t collapse, but it’s always a good practice to prevent it. Just be diligent about popping any visible air bubbles with your toothpick as you fill! After flooding these hearts, I let them dry completely overnight to ensure a firm, set surface for the next layers of decoration.

I learned how to make these adorable doily-style cookies from Little Penelope’s Cookie Boutique. It’s such a charming idea and incredibly simple to execute! The technique looks impressive but is surprisingly forgiving, which is exactly my kind of decorating method.

To create this delicate lace effect, first use white piping icing to outline the heart with small, even scallops. Immediately after piping each scallop, use a fine paintbrush to gently drag the icing from the tip of the scallop towards the center of the cookie. Let this initial layer dry for a short while (it doesn’t take long, as the icing is thin), then add a second heart outline slightly inside the first. After that second outline dries completely, you can either leave it as is for a minimalist look or fill the inner space with more red, pink, or any color icing you desire.
Here’s how I decorated the star-shaped cookie to resemble an American flag:

First, apply the white icing to the appropriate sections and allow it to dry completely. Then, fill in the blue section and let that dry thoroughly. Finally, add the red piping stripes. I must admit, achieving perfectly straight lines can be quite challenging! The dots, however, were significantly easier to execute and offered a charming contrast. The key with multi-layered designs is patience and allowing each layer to dry fully before adding the next.

I want to emphasize that sometimes, simple designs are the most impactful and beautiful. Don’t let the elaborate creations on Instagram intimidate you. When you’re just starting, choose easy designs you feel confident replicating. Avoid attempting a highly detailed Santa Claus face on your very first try! Remember, the goal is to have fun. And if your cookies still look like a child decorated them, that’s perfectly fine – I promise they will still taste absolutely delicious! Happiness in baking comes from the joy of creation, not just perfection.

Pro Tips and Tricks for Royal Icing
Many of these invaluable tips are sprinkled throughout this post, but for your convenience, I’ve gathered them here as a quick reference to ensure your royal icing experience is as smooth and successful as possible:
- Effortless Bag Cleanup: For a super quick cleanup, you can line your piping bags with plastic wrap. Simply place a sheet of plastic wrap inside the bag, add your icing to the center, fold it over, then insert the plastic-wrapped icing into the piping bag. Snip the end of the plastic wrap that pokes through the tip. When you’re done, just discard the plastic wrap, and your piping bag is clean! While I often use disposable bags for convenience, this trick is fantastic for reusable bags or if you run out of disposable ones.
- Preventing Clogs: Always keep a damp paper towel handy to cover the tips of any piping bags you’re not actively using. This prevents the icing at the opening from drying and hardening, which can lead to frustrating clogs. If you do forget (and let’s be honest, it happens to the best of us!), simply use a toothpick to gently clear the obstruction, and you’ll be back in action.
- Color in Abundance: When mixing colors, always prepare more of each color than you think you’ll need. It is incredibly difficult, almost impossible, to precisely match an exact shade later if you run out. Preparing a bit extra saves a lot of stress and ensures color consistency throughout your project.
- Don’t Skimp on Quantity: Make a generous batch of frosting! A two-pound bag of powdered sugar is relatively inexpensive, even in today’s economy. The main costs are quality gel coloring and meringue powder. Having plenty of icing on hand allows you to relax, experiment, and be truly creative without the added pressure of running out. It significantly enhances the fun factor!
- Choose Quality Gel Food Coloring: Invest in high-quality gel food coloring brands like Americolor or Chefmaster. Liquid food coloring is too diluted and won’t produce vibrant, rich colors. Furthermore, the excess liquid can drastically alter the carefully balanced consistency of your royal icing, making it runny and difficult to work with.
- Fixing Consistency Issues:
- If your icing is too thin: Accidentally added too much water? Don’t panic! Gradually add spoonfuls of your thick base icing (the un-thinned portion) to the too-thin icing until it reaches a workable consistency. If you’ve already separated your colors, try to use a spoonful of the *same color* base to maintain color matching. If you have no thick base left, you can attempt to add a tiny amount of sifted powdered sugar, but this is less ideal as it can sometimes introduce lumps.
- If your icing is too thick: This is easier to fix! Simply add water, drop by drop or using a fine spray bottle, mixing well after each addition until you reach the desired consistency.
- Patience is Key: Achieving the perfect icing consistency is an art that comes with practice. Don’t get discouraged if it’s not absolutely perfect on your first attempt. Royal icing is an advanced decorating technique that requires time and patience to master. Embrace the learning process!

I’ve included this photo of the Christmas tree cookie to illustrate a point: it’s definitely not my finest work. The lines on the tree are too thick and somewhat uneven. However, by adding simple white dots and a sprinkle of sugar, I transformed it into something charming and appealing. It might not be Instagram-level perfection, but it’s certainly cute enough to gift to neighbors! Remember, sometimes a few simple additions can elevate an imperfect design beautifully.
Creative Ways to Use This Easy Royal Icing Recipe
Sugar cookies are undoubtedly the most popular canvas for royal icing, and for good reason! But its uses extend far beyond. It’s also the traditional “glue” for constructing intricate gingerbread houses and an excellent choice for decorating classic Gingerbread Man Cookies. Beyond cookies, you can use it for elegant cake and cupcake decorations (it’s especially useful for making royal icing transfers – a technique where you create designs on parchment paper, let them dry, then transfer them to your baked goods), or even for making your own custom sprinkles! How fun is that?
- Thick & SOFT Sugar Cookie Recipe (That Holds Its Shape) >> Truly the best sugar cookies you’ll ever taste, and they hold their shape perfectly for decorating.
- The Softest Chocolate Sugar Cookies (That Hold Their Shape) >> The same amazing softness and shape retention, but in a rich chocolate version. Yes, please!
- Unbelievably Soft and Chewy Gingerbread Man Cookies (No Spread!) >> A gingerbread cookie that’s both incredibly flavorful and perfect for intricate decorating without spreading.
- Royal Icing Transfers from Tiny Kitchen Treats >> A fantastic technique for creating delicate decorations in advance.
- Homemade Sprinkles from Royal Icing from Really Into This >> Customize your sprinkles for any occasion!
- Coating for Treats: Use royal icing as a smooth, hard coating for pretzels, Nutter Butters, or Oreos. Simply dip them in the icing, allow any excess to drip off, then lay them on parchment paper until completely dry.
- Cake and Cupcake Topping: While often associated with cookies, royal icing can also be used as a striking topping for cupcakes or cakes! To prevent the royal icing from drawing moisture out of your cake, it’s best to first coat the surface with a thin layer of something like simple syrup, marzipan, or a buttercream crumb coat.
How to Store Royal Icing for Sugar Cookies
Royal icing is quite forgiving when it comes to storage, primarily because its high sugar content acts as a natural preservative, preventing bacterial growth. This makes it a baker’s dream for preparing ahead!
To store your icing, transfer it to an airtight container. Crucially, press a layer of plastic wrap directly onto the surface of the icing, ensuring there are no air bubbles, then secure the lid tightly. This prevents the icing from drying out and forming a crust. Uncolored royal icing can be kept at room temperature for 2-3 days. For longer storage, move it to the refrigerator, where it will remain fresh for up to 3 weeks. Before using refrigerated icing, allow it to come to room temperature and give it a thorough stir to reincorporate any separated liquid.
When you’re ready to use stored icing, stir it carefully to blend any separated components. If needed, add small amounts of water, drop by drop, to achieve your desired consistency. You can add food coloring either before or after storing the icing.
Can You Freeze Royal Icing?
Absolutely, royal icing freezes exceptionally well, making it perfect for meal (or rather, cookie) prep! I like to store my royal icing in freezer-safe ziplock bags. If the icing is already in piping bags, you can place those directly into a larger ziplock bag for extra protection. It can be stored frozen for up to 3 months.
To thaw, simply transfer the frozen icing to the refrigerator overnight, or for about 6-8 hours. Once thawed, let it sit on the counter for approximately 30 minutes to reach room temperature. If it’s in a ziplock bag, gently massage the bag to ensure everything is well mixed before transferring it to a piping bag if necessary. If your icing is already in a piping bag, simply massage the bag thoroughly to re-emulsify the icing and ensure a smooth, consistent texture before use. A good massage helps eliminate any separation that might have occurred during freezing and thawing.

Royal Icing Frequently Asked Questions
Royal icing is a distinct type of icing, primarily composed of powdered sugar, meringue powder (or egg whites), and water, specifically engineered for elaborate decorating. Its unique characteristic is that it remains liquid and workable during application but then hardens completely to a solid, candy-like finish. This property makes it perfect for intricate details and allows decorated cookies to be stacked and transported without damage. “Regular icing” often refers to a simple glaze, typically a mix of powdered sugar and milk or another liquid. While it does harden, it tends to be more delicate and prone to cracking, making it less suitable for robust decorating. Buttercream frosting, on the other hand, is made with butter, powdered sugar, and milk or cream. It’s wonderfully rich and flavorful and can be used for decorating, but it remains soft and does not harden like royal icing, offering different decorative possibilities and limitations.
For vibrant and consistent colors in royal icing, you must use gel food coloring. Standard liquid food coloring is too watery, meaning you’d have to add a large amount to achieve a strong tint, which would then dilute and ruin the icing’s carefully balanced consistency. For truly bold colors, especially notoriously difficult shades like deep red or black, a fantastic tip is to tint your icing a few hours, or even a day, in advance. As the colored icing sits, the pigments will deepen and mature, resulting in a richer, more intense hue than what you initially mix. Be mindful not to over-color, as adding excessive amounts of gel coloring can sometimes interfere with the drying process of the icing.
The hardening property of royal icing is due to its primary structural component: egg product. In this recipe, we use meringue powder, which contains dried egg whites along with sugar and cornstarch. When egg whites are whipped, they create a stable foam. As the water in the royal icing evaporates (through air exposure), this egg white structure dries and solidifies, forming the characteristic hard shell. Thinner consistencies of icing contain more water, which means they require a longer drying time for all the moisture to evaporate and for the icing to set completely.
The time it takes for royal icing to fully set depends significantly on its consistency and the environmental conditions. Generally, for the icing to be completely dry and hardened, it typically requires about 6-8 hours. In humid environments or if the cookies are stored in a sealed container too soon, the drying process can extend up to 24 hours. For optimal drying, leave your decorated cookies exposed to air at room temperature, ideally on wire racks to allow for airflow on all sides. The refrigerator does not speed up the setting process and can sometimes even introduce condensation, potentially causing colors to bleed.
Discovering a small pool of yellowish liquid at the bottom of your stored royal icing can be alarming, but don’t worry – your icing has not gone bad! This is a perfectly normal phenomenon known as “separation,” where the liquids and solids in the icing naturally separate over time as it sits. All you need to do is give the icing a good, thorough stir until it’s completely reincorporated and returns to its smooth, desired consistency. It will be as good as new and ready for decorating.
More Sweet Treats You’ll Love!
I am an absolute sucker for making cookies and cakes for people, regardless of how imperfectly decorated they might be. It’s truly my love language to share homemade treats! Here are some more delightful ideas that you (and anyone lucky enough to share with you) are sure to adore.
- The BEST Buttercream Sugar Cookie Frosting Recipe >> Incredibly fluffy, smooth, and bursting with amazing flavor.
- Buckeye Candy Recipe >> The classic chocolate and peanut butter combination, presented in an easy-to-make (and fun-to-decorate, if you wish) candy form.
- The Absolute Best Rice Krispies Treats Recipe >> These are the gooiest, softest treats imaginable, and wonderfully easy to personalize with sprinkles or food coloring.
- Soft and Chewy Sugar Cookie Bars >> Just as delicious as frosted sugar cookies, but without the hassle of cutting individual shapes.
- The BEST Snickerdoodle Recipe (Perfectly Soft and Chewy) >> Who can resist a Snickerdoodle? This recipe delivers the perfect soft and chewy texture.
- The BEST Cinnamon Roll Cookies >> Essentially a dream come true for any cinnamon lover, combining two beloved treats.
- Decorated Chocolate Covered Strawberries from Studio Delicious >> An elegant and easy-to-decorate treat perfect for any occasion.
Facebook | Pinterest | Instagram

Royal Icing Recipe For Beginners

Equipment
- piping bags
- Piping tip #1 I like to have several on hand for different colors and icing consistencies
- Piping tip #2 I like to have several on hand for different colors and icing consistencies
- toothpicks at least 100. just kidding. kinda.
- spray bottle full of water, optional
Ingredients
- white vinegar, for degreasing; do not add to icing
- 5 tablespoons meringue powder*
- 1/8 teaspoon kosher salt
- 1/2 teaspoon cream of tartar
- 1/2 cup warm water (not hot) , plus an extra 4-5 tablespoons, go slow
- 1 teaspoon clear vanilla extract, dark vanilla will tint your icing
- 1/2 teaspoon almond extract**
- 1/2 teaspoon coconut extract**
- 1 tablespoon corn syrup
- 2 pounds powdered sugar, 7 and 1/2 cups
- gel food coloring, use a decent brand
- drops of water, use a spray bottle, you need tiny baby amounts
Instructions
- Prepare Your Tools (Degreasing is Key). Begin by thoroughly degreasing your mixing tools. Dampen a paper towel with white vinegar (or lemon juice) and meticulously wipe down the inside of your mixing bowl and all parts of your whisk attachment. This crucial step removes any trace of grease or oil, which can prevent the icing from whipping properly and, consequently, from drying and hardening correctly. Allow all tools to dry completely from the vinegar before proceeding.
- Combine Dry Ingredients. In your now sparkling clean and dry mixing bowl, add 5 tablespoons of meringue powder*, 1/8 teaspoon of kosher salt, and 1/2 teaspoon of cream of tartar. Whisk these dry ingredients together briefly to ensure they are well combined.
- Prepare and Add Liquids. In a separate glass measuring cup, combine 1/2 cup of warm (not hot) water, 1 teaspoon of clear vanilla extract, 1/2 teaspoon of almond extract, and 1/2 teaspoon of coconut extract. Pour this fragrant liquid mixture into the mixing bowl with the dry ingredients. Then, add 1 tablespoon of corn syrup. Begin beating with your whisk attachment on low speed to gently combine everything.
- Incorporate Powdered Sugar. Gradually begin pouring in the 2 pounds (approximately 7 1/2 cups) of powdered sugar into the bowl while the mixer is running on low speed. Add it slowly, allowing each batch of sugar to fully incorporate into the mixture before adding more. Sifting the powdered sugar is generally not necessary unless you observe large, stubborn clumps. Continue this process until all the powdered sugar has been added and incorporated. The mixture will be very thick at this point.
- Adjust to Base Consistency. Now comes the crucial step of thinning the icing. With your mixer on medium speed, carefully add additional warm water, 1 tablespoon at a time. Allow each tablespoon of water to fully incorporate before adding the next. I typically add about 4 tablespoons of additional water in total (beyond the initial half cup), though you might need up to 5 tablespoons depending on your meringue powder and environment.
- Whip to Stiff Peak. Continue beating the icing for at least 3-5 minutes. The goal is to achieve a thick, sturdy icing that is completely smooth and unseparated. Scrape down the sides of the bowl midway through to ensure everything is evenly mixed. When you lift the beater, the icing should hold a stiff peak when turned upside down. Continue adding tiny bits of water until the icing reaches the consistency of thick toothpaste. To test, lift your spatula and drizzle some icing over itself; the lines should completely disappear in about 30 seconds. This firm texture is your “base frosting”***, ready to be divided and colored.
- Divide and Prepare for Coloring. Determine how many colors you intend to use. Transfer a cup or two of your thick base icing into separate bowls for each color. It’s always wise to use more icing than you anticipate needing for each color, especially if you plan to further divide each color into both piping and flood consistencies.
- Color the Icing. Use a reputable brand of gel food coloring to tint your icing. Add a small squirt or a few drops of your desired color to each bowl, depending on the intensity you’re aiming for. Stir it in thoroughly to assess the color. Add more gel coloring if needed, keeping in mind that gel colors tend to intensify over time. For best results, allow the tinted frosting to sit for at least an hour to let the colors fully develop. For vibrant reds, start with a dark pink and let it deepen. Be cautious not to add excessive amounts of food coloring, as this can affect the icing’s consistency and drying time.
- The reason we tint the frosting while it’s still thick is to ensure that all subsequent batches of a particular color, even if thinned to different consistencies, will be an exact match in shade.
- Achieving Different Consistencies (Piping vs. Flood). (You can skip this step if you choose to use only a medium consistency, see the next step.) You should now have bowls of thick, colored base icing. For each color, you can create two distinct consistencies:For Piping Consistency (Outlining or Lettering): This should be about the thickness of rich toothpaste. You might not need to add much, if any, additional water to your base icing if it’s already at this point. When you draw a line in the icing with a spatula, it should hold its shape for approximately 25-30 seconds before slowly disappearing.For Flood Consistency (Filling Large Areas, Wet-on-Wet Designs): Continue to add small sprays or drops of water until the icing resembles the consistency of honey or shampoo. When drizzled over itself, a line of this icing should disappear within 6-8 seconds. This consistency takes longer to dry but results in a perfectly smooth, flat, and beautiful finish.
- Medium Consistency Frosting (The All-Rounder): If you prefer to simplify, you can use a single “medium” consistency for both outlining and filling. To achieve this, use a spray bottle to add water a tiny bit at a time, mixing well after each spray, until the icing is slightly thinner than piping consistency. A spray bottle is highly recommended for precise control, as adding too much water too quickly is difficult to reverse. (If you do accidentally make it too thin, add a spoonful of your thick base icing to thicken it back up.)Medium consistency icing is comparable to ketchup, ranch dressing, or Elmer’s glue. It should be thin enough to flow smoothly but not so thin that it’s difficult to control. When tested with a spatula, a line drawn in this icing should disappear in about 15 seconds.Always remember to cover any bowls of icing with plastic wrap (pressed directly onto the surface) while you’re working on another color or consistency to prevent it from drying out.
- Fill Piping Bags. To prepare your piping bags, insert a piping tip (size #1 or #2 are excellent for detail) into a disposable piping bag. Snip the end of the bag just enough for the tip to peek through, then push the tip firmly into place. I find disposable piping bags (or even ziplock bags in a pinch) to be the most convenient. You can line the bag with plastic wrap to avoid cleaning, but I often just toss the disposable ones! Fold the top of the bag back on itself and place it into a tall drinking glass, tip-down, for stability. Use a spatula to carefully fill the bag with your prepared icing. I highly recommend labeling each bag with its color and consistency (e.g., “Red – Flood,” “White – Piping”) to avoid confusion.While tips offer greater control for intricate designs, you don’t *have* to use them. For simpler designs or flooding, you can simply snip a small hole at the end of the bag. Always start with a very tiny snip; you can always cut more, but you can’t undo a large hole!For flood consistency icing, tips are generally not essential, as your primary goal is to fill large areas quickly and smoothly.
- Test Your Icing. If you’re at all unsure about your icing’s consistency, always perform a quick test before decorating your actual cookies. Squeeze a small amount of icing onto a piece of parchment paper or a plate. Practice piping a few lines or a small design to see how it holds its shape and flows. If it’s too thick, add a tiny bit more water to your main bowl; if it’s too thin, stir in a spoonful of your thick base frosting (if available) or a tiny bit of sifted powdered sugar. Adjust and re-test until you’re confident in the consistency.
- Begin Decorating. Now, let the fun truly begin! Especially if you are a beginner, I strongly recommend finding a picture of a design you admire and using it as a guide to copy. This provides a clear goal and helps build confidence.Typically, you’ll start by outlining your design with piping-consistency icing to create a barrier, then switch to a flood consistency to fill in the enclosed center. Use toothpicks as your magic wand: to gently smooth the icing, pop any bothersome air bubbles, and carefully shift the icing around if you make a slight mistake.Unless you’re intentionally creating a “wet-on-wet” design (where colors marble together), you must allow each layer of icing to dry for several hours before applying subsequent layers. For the heart cookies featured in this post, I outlined them with piping icing, filled them with flood icing, and then let them dry overnight. Only then did I add the delicate lace embellishments. You can leave icing in piping bags at room temperature overnight, just be sure to cover the tips with a damp paper towel to prevent them from drying out.
- Allow Icing to Dry Completely. Once decorated, spread your cookies out in a single layer to dry at room temperature. I typically place them on wire racks or baking sheets. Ensure there is ample airflow around the cookies and avoid covering them for the first several hours. Proper airflow is crucial for the icing to harden. While this open-air drying might typically concern you for sugar cookies (as it can make them dry out and contribute to the “cardboard-ish” reputation royal icing cookies sometimes have), my Sugar Cookies remain incredibly moist due to a secret ingredient (cream cheese!). Similarly, my Gingerbread Man recipe, with its high molasses content, stays wonderfully soft even after sitting out overnight.
- Storage of Decorated Cookies. Once your beautifully decorated cookies are completely dry and hard to the touch, you can stack them to your heart’s content without fear of smudging! I prefer to store them in an airtight container on the counter, where they’ll stay fresh for a good while. If you plan to ship your cookies, wrap individual cookies carefully in parchment paper for added protection.
- Freezing Decorated Cookies. Yes, you can absolutely freeze cookies decorated with dried royal icing! To do so, place a single layer of cookies in a large airtight container, then add a sheet of parchment paper, and continue layering cookies and parchment paper. This separation prevents the colors from potentially transferring to the cookie above. To thaw, transfer them to the refrigerator overnight, or let them come to room temperature on the counter. If thawing at room temperature, it’s a good idea to remove them from the container and spread them out so they aren’t touching; this minimizes the risk of condensation causing any color transfer.
Notes
- 2 1/2 tablespoons meringue powder
- Pinch of kosher salt
- 1/4 teaspoon cream of tartar
- 1/4 cup warm water, plus an additional 2-3 tablespoons (added slowly)
- 1/2 teaspoon clear vanilla extract
- 1/4 teaspoon almond extract
- 1/4 teaspoon coconut extract
- 1 pound powdered sugar (approximately 3 3/4 cups)
- 1/2 tablespoon corn syrup