
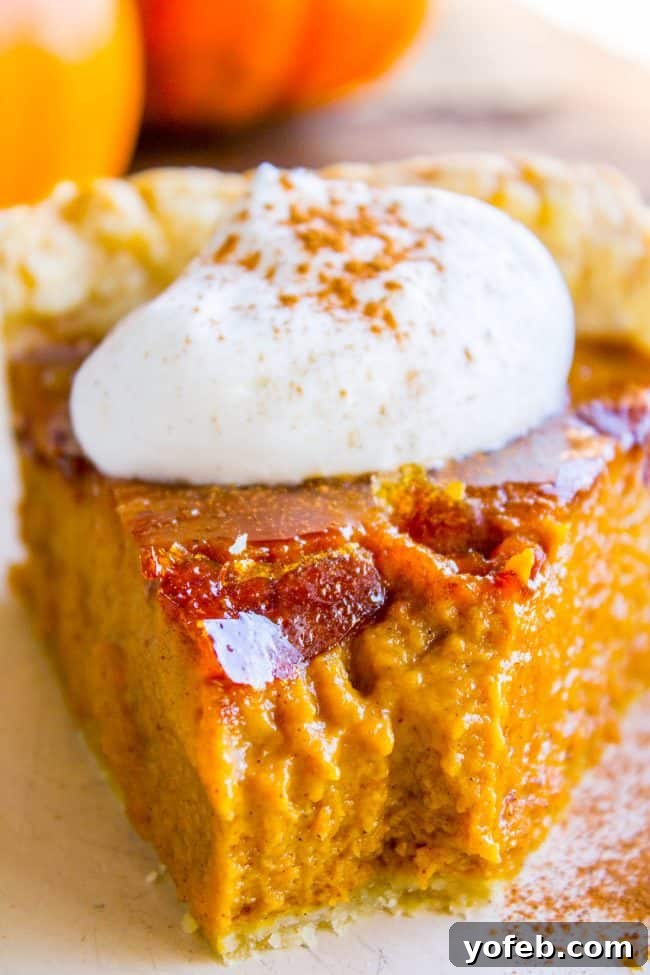
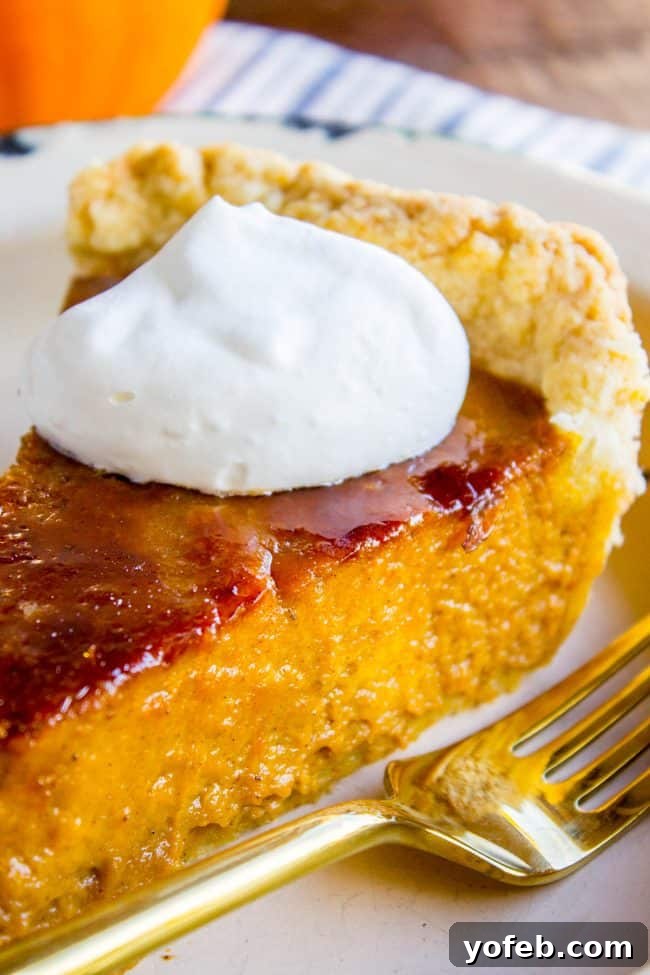
Welcome to the ultimate pumpkin pie experience! Forget everything you thought you knew about pumpkin pie, because this recipe is about to change your world. It starts with a perfectly balanced, incredibly creamy pumpkin custard, and then we elevate it to an art form with a dazzling, crackly crème brûlée topping. Yes, you read that right – a torched sugar crust that shatters with every bite, creating an irresistible contrast of textures. I once believed I wasn’t a pumpkin pie person, but I was spectacularly wrong! This isn’t just dessert; it’s a showstopper, a conversation starter, and quite possibly, the best pumpkin pie you will ever make. Originally published November 15, 2017, this timeless recipe continues to captivate and convert pumpkin pie skeptics into passionate devotees.
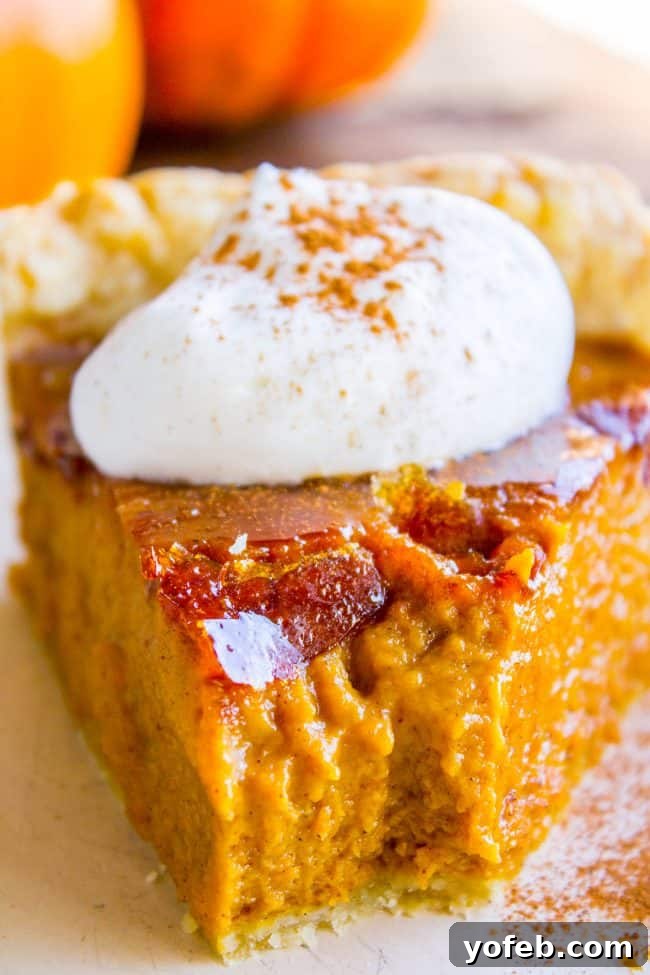
Table of Contents
- Why You’ll Adore This Homemade Pumpkin Pie Recipe
- Amplify Your Holiday Celebrations with This Pumpkin Pie Recipe from Scratch
- The Secret Ingredients for an Unforgettable Pumpkin Pie
- Choosing the Best Pumpkin Puree for Your Pie
- How to Make Crème Brûlée Pumpkin Pie from Scratch
- How to Tell if Your Pumpkin Pie is Perfectly Baked
- Expert Tips for the Best Pumpkin Pie Recipe
- Pumpkin Pie Recipe Substitutions and Variations
- Serving Your Exquisite Crème Brûlée Pumpkin Pie
- The Ultimate Topping for Pumpkin Pie
- Creative Uses for Leftover Pumpkin Pie Filling
- How to Properly Store Your Pumpkin Pie
- Does Pumpkin Pie Require Refrigeration?
- Shelf Life of Pumpkin Pie in the Refrigerator
- Unrefrigerated Pumpkin Pie: How Long Is It Safe?
- Can You Freeze Pumpkin Pie?
- More Decadent Desserts for Thanksgiving and Beyond
- Crème Brûlée Pumpkin Pie Recipe
As the days grow shorter and the air turns crisp, there’s a certain magic that fills our homes. For me, it’s the season of cozy comforts, nostalgic movies (yes, Miss Congeniality, I’m looking at you!), and the irresistible urge to start the holiday baking a little early. My friend already has her Christmas tree up, and honestly, I can’t blame her. There’s something undeniably uplifting about twinkling lights, festive tunes, and the promise of delicious treats that makes this time of year so special.
And before anyone points out Thanksgiving’s feelings, rest assured, this pie is equally perfect for both holidays! Besides, as a friend from overseas once highlighted, many countries don’t observe Thanksgiving, making an early dive into Christmas festivities perfectly natural. It seems Europeans have a knack for getting the important things right: croissants, exquisite cheese, and embracing the joy of Christmas. What more could one truly ask for?
Speaking of traditions, have you ever wondered if pumpkin pie is a uniquely American phenomenon? I’m not entirely sure, but for most of my life, pumpkin pie was never my first choice on the dessert table. Growing up, Thanksgiving dessert often featured classics like Lemon Meringue Pie, Blackberry Pie, and indulgent Mint Brownies. How could a humble pumpkin pie compete with the allure of chocolate or vibrant fruit? My palate has evolved since childhood, and while I’ve grown to appreciate pumpkin pie, I always felt it needed an extra spark, a touch of something extraordinary to truly shine. And then, the revelation hit: a crackly crème brûlée topping!
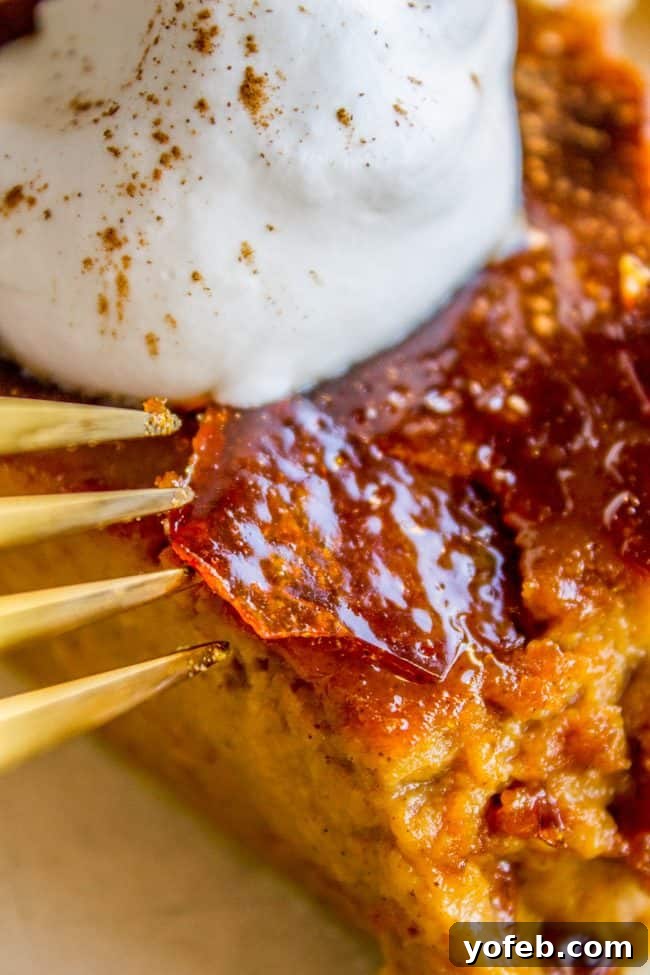
If you’ve ever tried my acclaimed Crème Brûlée Cheesecake, you’ll understand the magic of a torched sugar crust. It transforms any dessert, adding a delightful crunch and a sophisticated caramelized flavor that is simply unmatched. Pumpkin pie is no exception. This simple addition turns a classic into an absolute masterpiece, making it so incredibly good, you’ll wonder why you ever settled for anything less.
Why You’ll Adore This Homemade Pumpkin Pie Recipe
This isn’t just another pumpkin pie. It’s an experience. The filling is unbelievably soft and creamy, boasting an almost melt-in-your-mouth custard texture that’s perfectly spiced. But what truly sets it apart and makes it an instant favorite is the magnificent crackly crème brûlée topping. This delicate, caramelized sugar crust adds a delightful crunch and a hint of smoky sweetness that provides an unparalleled contrast to the silky pumpkin beneath. Once you savor this unique combination of textures and flavors, every other pumpkin pie will simply pale in comparison. It’s a game-changer that promises to elevate your holiday dessert spread and leave your guests utterly amazed.
Amplify Your Holiday Celebrations with This Pumpkin Pie Recipe from Scratch
While this recipe provides a perfectly classic pumpkin pie base, the real magic happens when you embrace the crème brûlée topping. You could, of course, opt for a traditional pie, but why settle for ordinary when you can create something truly extraordinary? Investing in a simple kitchen torch for around $20 will transform your dessert into a dazzling spectacle. Imagine the delight and awe of your guests as you skillfully caramelize the sugar right before their eyes! The pumpkin pie filling itself is a rich, tender custard, and adding a crème brûlée twist to the top provides the perfect textural counterpoint without making the entire pie too soft. It’s about enhancing a beloved classic, not reinventing its core.
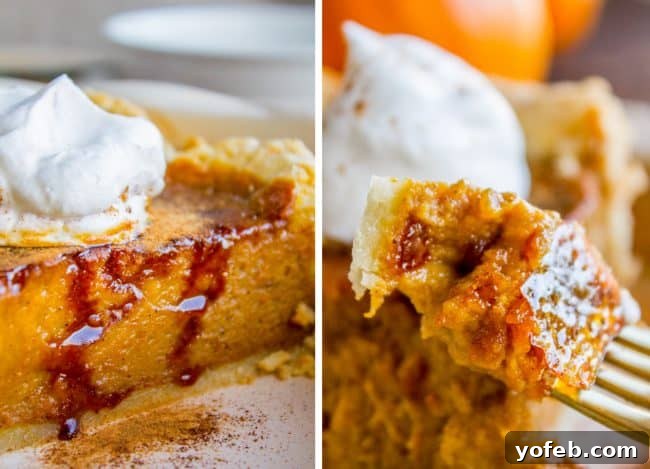
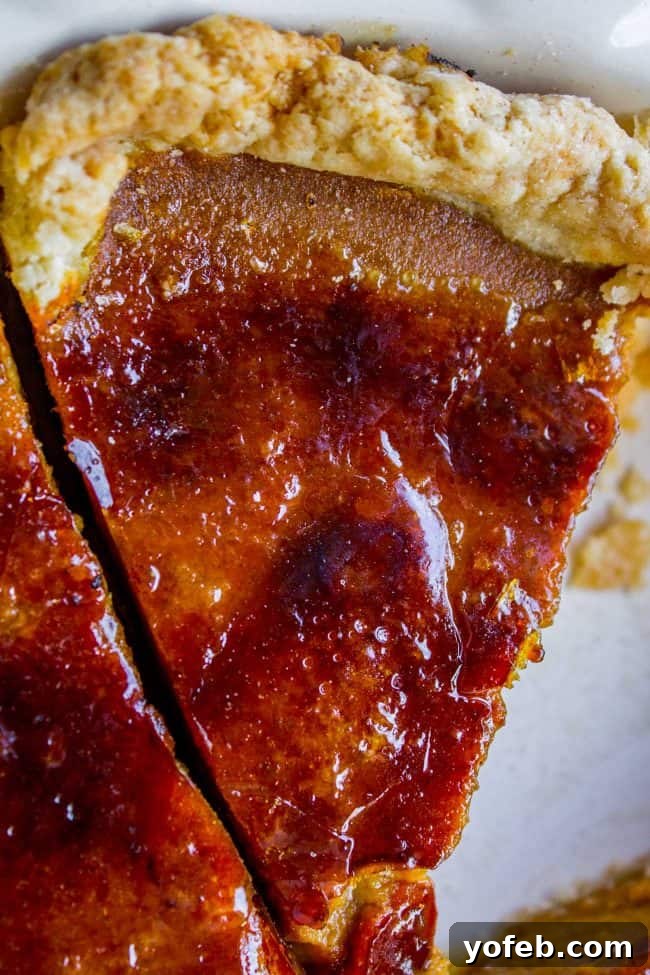
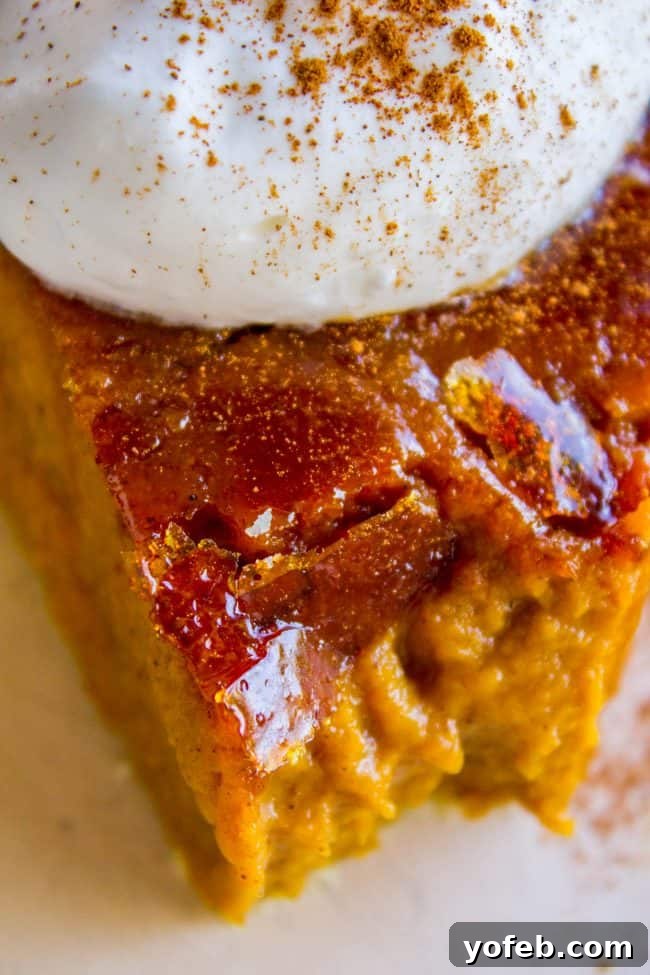
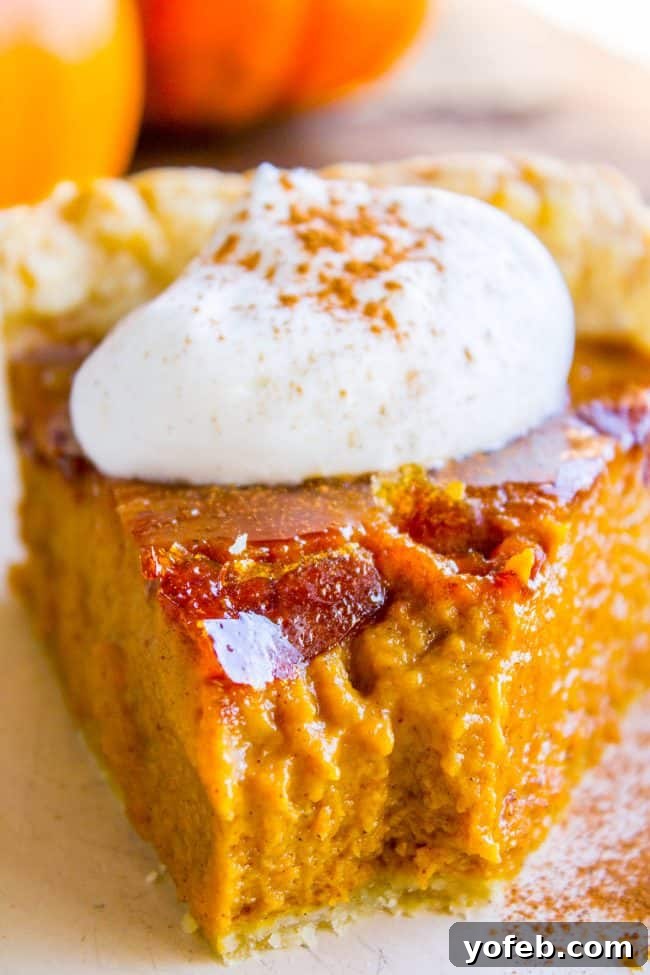
Pictured left, you can see how the brûlée topping, if not eaten quickly, can soften and melt down the side of the pie. It’s a race against time for peak deliciousness!
Observe the photos, and you’ll notice the distinct characteristic of this pie: it falls on the softer, creamier side of the pumpkin pie spectrum. This luscious texture is achieved primarily by preventing over-baking, allowing the custard to retain its delicate, tender consistency. The result is a sumptuously creamy pumpkin custard that is never, ever dry. You know that unpleasant, sometimes crumbly, “overcooked” texture that can plague some pumpkin pies? This recipe actively avoids that pitfall, ensuring a perfectly smooth and enjoyable experience with every forkful. It’s all about achieving that ideal balance of tenderness and subtle firmness.
The Secret Ingredients for an Unforgettable Pumpkin Pie
Did you spot the black pepper in the ingredient list? Don’t be alarmed! I promise you, this pie will not taste like pepper. Instead, a touch of black pepper acts as a subtle flavor enhancer, much like salt amplifies the flavors in savory dishes. In this recipe, it works harmoniously with a robust blend of traditional warming spices: ginger, cinnamon, nutmeg, cloves, and cardamom. This combination creates a truly fantastic and complex flavor profile. The black pepper simply helps to bring out the inherent warmth and depth of the other spices, resulting in a perfectly balanced, aromatic pie that is neither too spicy nor savory. Trust me on this – it offers a far more nuanced and exquisite flavor than a generic “pumpkin pie spice” blend ever could.
To help you prepare, here’s a quick shopping list. Refer to the detailed recipe card below for precise measurements and full instructions:
For the crust:
- All-purpose Flour
- Granulated Sugar
- Salt
- Cold Butter
- Butter-flavored Crisco
- Egg & Ice Water
For the filling:
- Granulated Sugar
- Brown Sugar
- All-purpose Flour
- Ground Ginger
- Ground Cinnamon
- Ground Nutmeg
- Ground Cloves
- Ground Cardamom
- Salt
- Black Pepper
- Pure Pumpkin Puree (Crucially, NOT pumpkin pie filling!)
- Large Eggs
- Heavy Cream
- Fine Sugar (for brûlée topping)
- Whipped Cream (for serving)
Choosing the Best Pumpkin Puree for Your Pie
When selecting your pumpkin, it’s absolutely vital to reach for pure pumpkin puree, not pumpkin pie filling. While brand preference is secondary, ensuring there are no added ingredients like spices or sweeteners is paramount. If you attempt to add our carefully measured spices and sugars to an already seasoned and sweetened pumpkin pie filling, the resulting flavors will be overwhelming and excessively sweet, completely throwing off the delicate balance of this recipe. The distinction is crucial for achieving the perfect flavor.
You might wonder, “Why not just use pumpkin pie filling for convenience?” The reason is simple: different brands of pre-mixed pumpkin pie filling vary widely in their sugar and spice levels. What works for one brand might lead to a dessert disaster with another. While it’s unlikely to “ruin Thanksgiving” (I’m just being dramatic!), it certainly won’t deliver the exceptional taste and texture we’re aiming for. By starting with pure pumpkin puree, you gain complete control over the sweetness and spice, allowing you to tailor the flavors to perfection every single time, far surpassing the taste of any pre-mixed option.
How to Make Crème Brûlée Pumpkin Pie from Scratch
Embark on the journey to create this magnificent crème brûlée pumpkin pie. Here’s a streamlined overview of the process; for comprehensive, detailed instructions and precise measurements, please refer to the recipe card below.
- Begin with the Pie Crust: Start by measuring 1/4 cup of water and placing it in the freezer to chill thoroughly.
- Prepare Dry Ingredients for Crust: In a spacious bowl, whisk together the flour, sugar, and salt. This ensures even distribution of flavor.
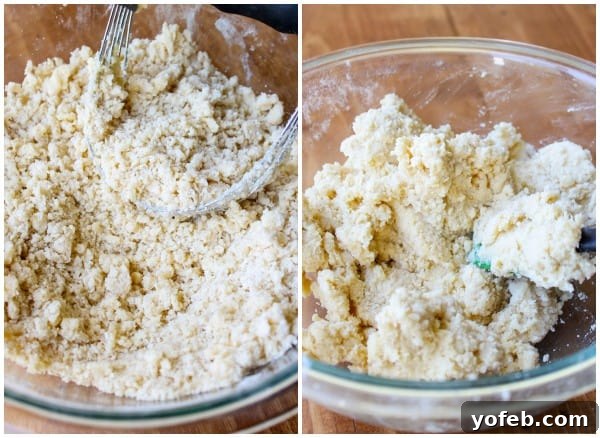
- Incorporate Fats: Add cold butter chunks and butter-flavored Crisco to the dry mixture. Using a pastry cutter, work the fats into the flour until the mixture resembles coarse crumbs. Avoid overworking the dough to keep it tender.
- Add Liquid to Crust: In a separate small bowl, lightly beat one egg. Pour out half of the beaten egg (you can simply eyeball this for approximation; it helps create a more tender crust!). Combine this half-beaten egg with the chilled water from the freezer. Mix well, then add this liquid mixture to your coarse crumb mixture.
- Form the Dough: Stir the dough until it just begins to come together. Then, use your hands to gently knead it once or twice – just enough to form a cohesive ball. Divide the dough in half. Shape one half into a disk, wrap it, and store it in a ziplock bag in your freezer for a future pie or another delightful pastry.
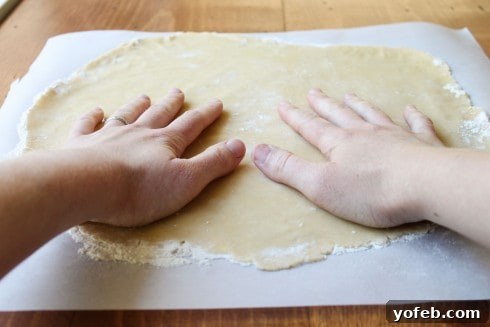
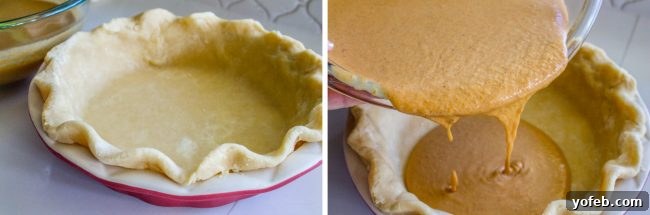
- Roll and Shape Crust: On a well-floured surface, roll out the remaining dough. Carefully transfer the rolled dough into a 9-inch pie pan. Fold the edges under and crimp or shape the crust to your preference. Place the prepared crust into the refrigerator to chill while you prepare the filling. This prevents shrinking during baking.
6. Preheat Oven: Preheat your oven to 425 degrees F (220 degrees C).
7. Prepare Dry Filling Ingredients: In a large mixing bowl, whisk together the white sugar, brown sugar, flour, salt, ginger, cinnamon, nutmeg, cloves, cardamom, and a pinch of black pepper. Ensure all spices are evenly distributed for a balanced flavor.
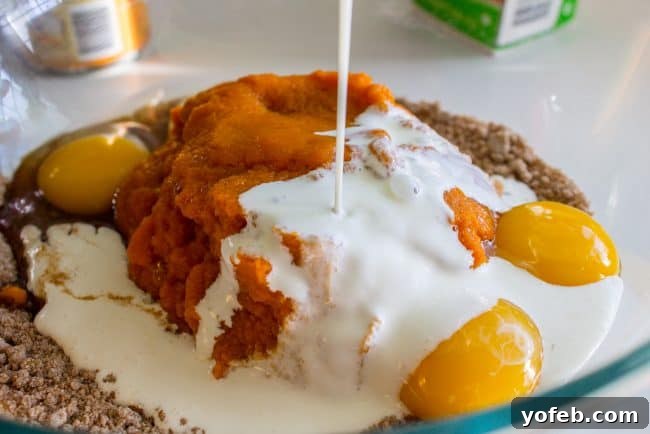
8. Combine Wet Filling Ingredients: Add the pumpkin puree, whole eggs, additional egg yolks, and heavy cream to the dry ingredients. Whisk thoroughly until the mixture is smooth and completely free of lumps, creating a silky custard base.
9. Fill and Initial Bake: Carefully pour the pumpkin filling into your chilled, prepared pie crust. Bake at 425 degrees F for an initial 12 minutes.
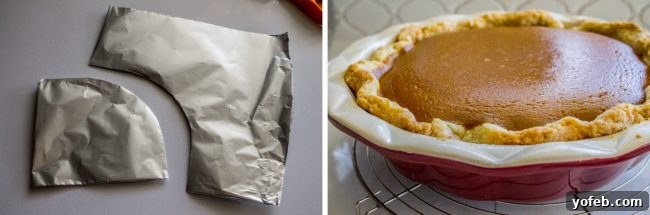
10. Reduce Temperature and Continue Baking: After 12 minutes, lower the oven temperature to 350 degrees F (175 degrees C). To prevent the crust from over-browning, gently cover the pie crust edges with aluminum foil or a pie shield. Continue baking for approximately 35-40 minutes. The pie’s center will still be slightly jiggly, which is exactly what we want for a creamy texture.
11. Slow Cooling Process: Crucially, do NOT immediately remove the pie from the oven after baking. Turn off the oven and prop the oven door fully open for at least 5 minutes. This gradual cooling prevents cracking. After 5 minutes, you can shut the door, but if possible, leave it slightly ajar. This slow, controlled cooling is essential for a beautiful, uncracked custard.
12. Chill Thoroughly: Once the pie has cooled completely to room temperature on your countertop, transfer it to the refrigerator. Allow it to chill for at least 2-3 hours, or until it is thoroughly cold throughout. This chilling period is crucial for the custard to fully set and achieve its ideal creamy consistency.
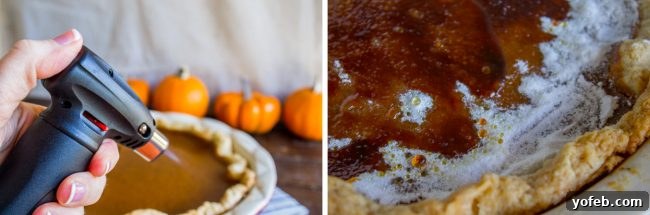
13. The Crème Brûlée Topping: Just before serving, sprinkle a thin, even layer of fine sugar over the entire surface of the chilled pie. Using a kitchen torch, carefully brûlée the sugar. Keep the flame moving constantly to ensure even caramelization and prevent burning. You’ll see the sugar begin to bubble and turn a beautiful golden brown. For a thicker, more robust crackle, you can repeat this process with additional thin layers of sugar, as multiple thin layers yield a superior result compared to one thick layer. Be mindful not to let the flame touch the pie crust, as it will burn instantly. The crackly topping will set within a minute or two, ready to impress.
How to Tell if Your Pumpkin Pie is Perfectly Baked
Over-baking a pumpkin pie is an absolute culinary sin that leads to a dry, unappealing texture. To achieve that coveted creamy, custardy consistency, it’s essential to pull the pie from the oven at precisely the right moment. When your pie is done, the very center will still exhibit a slight jiggle. Don’t be alarmed by this; it’s a sign of a perfectly cooked custard! The outer 2 inches of the pie, closest to the crust, should be set and firm, showing no movement when you gently shake the pan. This indicates that the edges are fully cooked while the center retains its delicate tenderness. Remember, you won’t be slicing into a warm pie (at least, I hope not!). Once thoroughly chilled, the entire pie will firm up to that ideal custardy texture, making it perfectly sliceable and supremely delicious.
Expert Tips for the Best Pumpkin Pie Recipe
Achieving pumpkin pie perfection is easier than you think with these essential tips:
- Prevent Cracks with Slow Cooling: Pumpkin pie is essentially a custard, and custards naturally puff up during baking. As they cool, they contract, often pulling away from the edges and forming unsightly cracks. To prevent this, dramatic temperature changes are a big no-no. Once your pie has finished baking, turn off the oven but do not remove the pie. Instead, open the oven door fully for at least 5 minutes to allow the temperature inside to gradually decrease. After this initial period, you can close the oven door, but ideally, leave it slightly ajar. This slow, gentle cooling process is key to a smooth, uncracked surface.
- Embrace Homemade Filling: If you’re looking for a shortcut, prioritize buying a pre-made crust over a pre-made filling. The significant drawback of store-bought fillings is their fixed spice and sugar levels. You lose the ability to fine-tune these crucial elements to your palate. Homemade filling, on the other hand, is surprisingly quick and simple to prepare, giving you complete control to achieve the perfect balance of flavors and spices tailored to your taste. The difference in taste is truly remarkable.
- Master the Crème Brûlée Topping: This is the star of the show! A crackly, caramelized topping transforms an ordinary pumpkin pie into an extraordinary dessert. Once your pie is chilled, generously sprinkle a layer of fine sugar over the surface. Then, using a kitchen torch, carefully caramelize the sugar until it forms a crisp, golden crust. The contrast between the crunchy topping and the creamy filling is what makes this pie utterly unforgettable.
- Avoid Over-baking at All Costs: The hallmark of an exceptional pumpkin pie is its smooth, creamy, custard-like texture. If you bake the pie until the very center is completely firm and no longer jiggles, you’ve likely overshot the mark. The ideal doneness means the outer 2 inches of the pie (the area closest to the crust) should be set, but the center should still have a slight, gentle wobble. This ensures a moist, tender filling that melts in your mouth, rather than a dense, dry one.
Pumpkin Pie Recipe Substitutions and Variations
While I strongly advocate for making this pie from scratch for an unparalleled experience, I understand that sometimes time is a luxury we don’t have. In a genuine time crunch, a quick hack to elevate a store-bought pumpkin pie would be to generously sprinkle its top with fine granulated sugar and torch it to create that delightful crackly crust. It’s a decent way to significantly improve a pre-made dessert! However, if you have the time, even just a little, please, please make this pie from scratch. The depth of flavor and the creamy texture of the homemade filling combined with the brûléed top are truly incredible and incomparable.
For those feeling adventurous, consider infusing your fine sugar with fresh ginger before torching. Simply thinly slice a few pieces of fresh ginger and mix them with the fine sugar destined for the topping. Let this mixture sit for several hours to allow the ginger’s aromatic oils to infuse the sugar. Remove the ginger slices before sprinkling and torching as usual. This subtle variation adds a layer of warm, zesty complexity that complements the pumpkin beautifully, taking your pie to an even more sophisticated level.
Serving Your Exquisite Crème Brûlée Pumpkin Pie
The hallmark of our crème brûlée pumpkin pie is its magnificent crackly topping, which unfortunately doesn’t retain its crispness indefinitely. To experience this pie at its absolute peak, it is crucial to serve it immediately after torching the sugar. You have a window of about 15-20 minutes before the delicate caramelized crust begins to soften and lose its signature crunch. Don’t fret, however, if you have leftover slices whose topping has softened! The beauty of this dessert is its adaptability. Whenever you’re ready to enjoy another piece, simply sprinkle a little more fine sugar over the top and re-torch it to revive that perfect crackle. Each slice can be a fresh, crunchy delight!
The Ultimate Topping for Pumpkin Pie
Unquestionably, the star topping for this pumpkin pie is the sweet, crackly crème brûlée crust created with fine sugar and a kitchen torch. It adds an unparalleled textural dimension and a rich caramelized flavor. However, a very close second, and an almost mandatory accompaniment, is a generous dollop of fresh whipped cream. While homemade whipped cream offers a superior freshness and delicate sweetness, quality canned whipped cream is also perfectly acceptable. The creamy, airy lightness of whipped cream beautifully complements the rich, spiced pumpkin filling, creating a harmonious and utterly satisfying mouthful. Honestly, can you even imagine pumpkin pie without it?
Creative Uses for Leftover Pumpkin Pie Filling
This recipe is designed to yield precisely the right amount of filling for a single 9-inch pie, so it’s unlikely you’ll find yourself with an excess. However, on the rare occasion that you do have some pumpkin pie filling that won’t fit into your prepared crust, don’t let it go to waste! I highly recommend baking it in a smaller ramekin or oven-safe dish. While it won’t have a crust, you can still achieve a delicious crustless pumpkin custard. Once baked and chilled, top it with a generous swirl of whipped cream, and for an extra layer of texture and flavor, consider sprinkling some crushed graham cracker crumbs over the top. It’s a delightful deconstructed treat! Just to clarify: this advice applies to the homemade pumpkin pie filling you’ve just prepared with fresh eggs and cream, not the pre-canned “pumpkin pie filling” that merely contains sugar and spices. Baking the latter on its own will simply result in heated, spiced pumpkin mush, lacking the luscious custardy texture we achieve with our fresh ingredients.
How to Properly Store Your Pumpkin Pie
Does Pumpkin Pie Require Refrigeration?
Yes, absolutely. Pumpkin pie is a custard-based dessert, and like all custards, it is perishable and must be kept refrigerated. The eggs and cream in the filling make it susceptible to bacterial growth at room temperature. While it’s generally safe to leave it out on the counter for up to two hours for serving, it should be promptly returned to the refrigerator after this period to ensure its safety and maintain its freshness and quality.
Shelf Life of Pumpkin Pie in the Refrigerator
When properly stored in the refrigerator, your homemade pumpkin pie will remain fresh and delicious for 3 to 4 days. Beyond this timeframe, while it might still be technically safe to eat, its quality, texture, and flavor will begin to diminish. If you find yourself with an abundance of leftovers after a few days, it might be an excellent excuse to invite the neighbors over! They’ll surely appreciate a slice, especially if they’re down to just turkey legs and cranberry sauce.
Unrefrigerated Pumpkin Pie: How Long Is It Safe?
Due to its custard base, pumpkin pie should not be left unrefrigerated for extended periods. As a general food safety guideline, perishable foods should not remain at room temperature for more than two hours. Beyond this, there’s an increased risk of harmful bacteria multiplying. Since pumpkin pie is traditionally best served chilled anyway, it’s always best practice to pop it back into the fridge as soon as you’re finished actively serving it, ensuring both safety and optimal enjoyment.
Can You Freeze Pumpkin Pie?
Yes, you certainly can! Freezing is a fantastic option for making your holiday preparations less stressful. For best results, I highly recommend freezing the pie *before* you add the sugar and torch it for the crème brûlée topping. Once your baked pie has cooled completely to room temperature, wrap it very tightly in several layers of plastic wrap, then an additional layer of aluminum foil. This double wrapping helps to prevent freezer burn and keeps it fresh. Properly wrapped, you can store your pumpkin pie in the freezer for up to a month. Imagine the satisfaction of pulling out a pre-baked pie the day before Thanksgiving, allowing it to defrost overnight in the refrigerator, and then adding that spectacular crackly topping just before serving! It’s a level of planning ahead that will make you feel like a culinary genius.
I genuinely hope you take the opportunity to try this incredible pumpkin pie for your next holiday gathering. I promise it will be a showstopper, dazzling everyone with its unique texture and exquisite flavor! Don’t forget to share your amazing creations with me – tag #TheFoodCharlatan on Instagram, I can’t wait to see them!
More Decadent Desserts for Thanksgiving and Beyond
Looking for more dessert inspiration to complete your holiday feast or simply satisfy your sweet tooth? Here are some other fantastic options:
Crème Brûlée Cheesecake << An unbelievably rich and creamy dessert, truly incredible and absolutely no regrets!
Easy Pumpkin Pie Cake << Perfect for those who crave pumpkin pie flavors without the fuss of making a crust!
Chocolate Cream Pie << This recipe was tested countless times to achieve absolute perfection – a true chocolate lover’s dream.
Best Dutch Apple Pie << There’s just something magical and utterly flawless about the combination of warm apples and a crunchy streusel topping.
Apple Custard Pie with Cinnamon Streusel << Everyone who tries this delightful creation falls in love with its unique texture and cozy flavors!
Pumpkin Pie Crunch from Spend with Pennies << This layered dessert sounds incredibly inviting and delicious!
Pressure Cooker Pumpkin Pie from Pressure Cooking Today << An innovative way to enjoy your favorite fall pie with modern cooking techniques.
Mini Pumpkin Pies from A Family Feast << Adorable and perfectly portioned individual pies, ideal for gatherings.
Facebook | Pinterest | Instagram

Crème Brûlée Pumpkin Pie from Scratch
Rate this Recipe
Print Recipe
Ingredients
For the crust
- 2 cups all purpose flour, spooned and leveled
- 1 & 1/2 tablespoons granulated sugar
- 1 teaspoon salt
- 1/2 cup butter, COLD, cut into chunks (1 stick)
- 6 tablespoons butter-flavored Crisco
- 1/2 beaten egg
- 1/4 cup ice water
For the filling
- 1/2 cup granulated sugar
- 1/2 cup brown sugar
- 2 & 1/2 tablespoons all purpose flour
- 1/2 teaspoon salt
- 1 teaspoon ginger
- 1 teaspoon cinnamon
- 1/2 teaspoon nutmeg
- 1/8 teaspoon cloves
- 1/8 teaspoon cardamom
- 1/8 teaspoon black pepper
- 2 cups pumpkin puree, not pumpkin mix!
- 2 large eggs
- 2 large egg yolks
- 1 & 1/4 cups heavy cream
- 2-3 tablespoons fine sugar**
- whipped cream, to garnish
Instructions
-
First, prepare the pie crust.* This recipe yields enough dough for two crusts, but you’ll only need one for this pie. You can freeze the other half for later use or make a delicious Cheesecake Pecan Pie with it!
-
Measure 1/4 cup of water into a glass measuring cup and place it in the freezer to get very cold.
-
In a large bowl, whisk together the flour, granulated sugar, and salt for the crust.
-
Add 1/2 cup (one stick) of cold butter, cut into small chunks, and 6 tablespoons of butter-flavored Crisco to the flour mixture. Using a pastry cutter, cut the fats into the flour until the mixture resembles coarse crumbs with some pea-sized pieces of fat remaining. Be careful not to overmix!
-
In a small bowl, beat one egg. Pour out half of the beaten egg (into the sink, another container, or even a frying pan for a quick scramble!). You can simply eyeball this. While it may seem a bit finicky, this step contributes significantly to an incredibly tender crust.
-
Combine the half-beaten egg with the cold water from the freezer and mix gently. Add this liquid mixture to the butter-flour mixture. Stir until the dough just begins to come together. Then, using your hands, gently knead it once or twice, just enough to form a cohesive dough. Divide the dough in half. Shape one half into a flat disk, wrap it well, and place it in a ziplock bag in your freezer for future use.
-
On a lightly floured surface (a pastry cloth works wonderfully here), roll out the remaining dough into a large circle.
-
Carefully roll the dough loosely onto your rolling pin to easily transfer it to a 9-inch pie pan. Gently fit the dough into the pan, then fold the edges under and crimp or shape the crust as desired. Place the formed crust in the refrigerator to chill while you prepare the filling.
-
Preheat your oven to 425 degrees F (220 degrees C).
-
Make the filling: In a large bowl, whisk together the 1/2 cup white granulated sugar, 1/2 cup brown sugar, 2 and 1/2 tablespoons all-purpose flour, 1/2 teaspoon salt, 1 teaspoon ginger, 1 teaspoon cinnamon, 1/2 teaspoon nutmeg, 1/8 teaspoon cloves, 1/8 teaspoon cardamom, and 1/8 teaspoon black pepper. This blend of spices creates a rich, complex flavor.
-
Add the 2 cups of pure pumpkin puree (ensure it’s not pie filling!), 2 large eggs, 2 large egg yolks, and 1 and 1/4 cups heavy cream to the spiced sugar mixture. Whisk vigorously until the mixture is completely smooth and no lumps remain.
-
Pour the prepared pumpkin filling into your chilled pie crust.
-
Bake the pie at 425 degrees F for 12 minutes. This initial high heat helps to set the crust.
-
After 12 minutes, reduce the oven temperature to 350 degrees F (175 degrees C). To prevent the pie crust from over-browning, carefully cover the edges of the crust with aluminum foil or a reusable pie crust shield, leaving the center of the pie uncovered. (Refer to photos for guidance.)
-
Continue baking at 350 degrees F for approximately 35-40 minutes. It’s crucial to understand that the pie will NOT be completely set in the middle when it’s done. A slight jiggle in the center is perfectly normal and desired for a creamy texture. When gently shaken, the outer 2 inches of the pie (closest to the crust) should be set and firm. Over-baking is the primary culprit behind dry, crumbly pumpkin pie, so trust the jiggle and resist the urge to bake longer!
-
Once baking is complete, do not remove the pie from the oven immediately. Turn off the oven and prop the oven door completely open for at least 5 minutes to allow the pie to cool down slowly. If leaving the door wide open is inconvenient, after the initial 5 minutes, you can close the door but leave it slightly ajar if possible. Pumpkin pie is a custard, and custards tend to puff up while baking, then shrink as they cool, which can cause cracks. A slow, gradual temperature change helps prevent these unsightly cracks.
-
After the pie has cooled to room temperature on your countertop, transfer it to the refrigerator. Chill for a minimum of 2-3 hours, or until it is completely cold and the custard is fully set.
-
When you are ready to serve the pie, evenly sprinkle a thin layer of fine sugar over the entire top surface. A thin, uniform layer works best for optimal caramelization. Use a kitchen torch to brûlée the sugar. Keep the flame moving constantly over the sugar; do not leave it in one spot, as this can cause burning. The sugar will begin to bubble, melt, and turn a beautiful golden-brown. Be extremely careful not to let the flame touch the pie crust, as it will burn instantly.
-
If you desire a thicker or more pronounced crackly topping, you can sprinkle with a bit more fine sugar and repeat the torching process. Remember, just like painting a wall, multiple thin layers of sugar yield a much better, more even, and delightful crackle than one thick layer. The sugar will harden and become perfectly crackly within 1-2 minutes after torching.
-
Since you’ll want to avoid torching the delicate pie crust, you may find a small ring of untorched sugar around the perimeter of your pie. For a pristine presentation, you can use a clean pastry brush to gently sweep this untorched sugar toward the center and then torch it. Alternatively, you can slightly dampen the brush and gently brush the very edge of the crust to blend it, removing any visible white sugar residue. This step is purely for aesthetic perfection and is optional.
-
The delightful crackle on top of the pie typically lasts for about 15-20 minutes before it starts to soften. Therefore, the torching process truly is a last-minute step to be performed right before serving. The wonderful news is that you can always refresh the topping! For leftover slices, simply add a fresh sprinkle of sugar and torch again, as many times as you like. I often find myself re-torching individual slices throughout the week to enjoy that fresh crunch every time.
-
Serve your magnificent crème brûlée pumpkin pie with a generous dollop of fresh whipped cream and, if desired, a light dusting of cinnamon for an extra layer of aroma and flavor!
Notes
**If you don’t have super fine sugar on hand, you can easily make your own. Simply blend regular granulated sugar in a food processor or blender for just a few seconds. Be careful not to over-blend, or it will turn into powdered sugar.
Many hope to find a shortcut by broiling the pie to get the crunchy topping, but I must caution you: it simply won’t be the same, and you’ll likely end up with a burned crust. Trust me on this, a dedicated kitchen torch is a worthwhile investment for achieving that perfect, professional-grade crème brûlée finish.
One more crucial note: this pie is ideally suited for making in advance. Prepare and bake the pie a day ahead of time, then chill it thoroughly in the refrigerator. Perform the exciting torching step just minutes before serving, allowing you to impress your guests with your fire-wielding skills and deliver maximum crunch! If you plan to make it two days in advance, an extra tip for a perfectly flaky bottom crust is to lightly beat an egg white and brush it onto the bottom of the pie crust before adding the pumpkin filling. This creates a barrier that helps prevent the crust from becoming soggy.
Source: While this recipe is my own creation, the brilliant idea for the crème brûlée topping was inspired by my brother Eric, who experimented with a similar version last year. He suggests mixing a few thin slices of fresh ginger with the fine sugar destined for the brûlée topping. Let it sit for several hours to allow the ginger to infuse the sugar with its aromatic essence. Then, remove the ginger slices and proceed with torching as usual. This sounds absolutely amazing, and it’s definitely next on my list to try!