

Happy Friday, fellow food enthusiasts! I’m absolutely craving a generous slice of pie right now, and perhaps the entire thing, if we’re being honest. Has anyone else had one of those weeks where only a truly magnificent dessert can provide the solace you need?

My days recently feel like a continuous cycle of reaction: a baby’s cry, sitting down to feed, a toddler waking up, setting the baby down to change a diaper, more cries, demands for milk, then food, and just when you think you’ve caught a breath, the cycle begins anew. It’s a beautiful chaos, but undoubtedly exhausting. My husband asked me what I accomplished today, and my honest answer was, “We slept, we ate, and not much else.” Yet, amidst this delightful pandemonium, the thought of a perfect Lemon Meringue Pie often brings a moment of serene anticipation.

Now, don’t mistake my musings on busy parenting for a complaint that implies I magically found time to whip up an elaborate pie in the midst of it all. Oh no, this particular masterpiece came to life when my mom was still here, when a semblance of calm reigned and extra hands were on deck. Lemon Meringue Pie isn’t just a dessert in our household; it holds a revered, almost royal, status. My mom, a true culinary legend in our family, has likely crafted a hundred of these pies over the years – no exaggeration. It’s an indispensable part of our holiday celebrations, gracing our tables every Thanksgiving and Christmas. With such a large family, we often find ourselves baking two pies, and still, the battle for the very last sliver is fiercely waged!
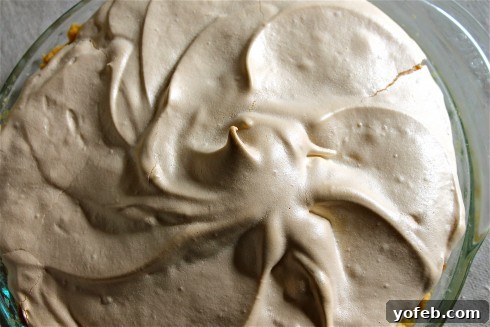
This time, we embarked on a little meringue adventure, experimenting with a longer bake at a slightly lower temperature. Initially, I confess, I was disheartened. The meringue, instead of its usual soft, pillowy texture, had formed a crackly, almost delicate shell on top. My first thought was, “It’s ruined!” But then, I took a bite, and my world shifted. Both my mom and I unanimously agreed: this was, without a doubt, the best Lemon Meringue Pie we had ever tasted. I found myself repeatedly sneaking off to chip away at little bits of that irresistible, crackly topping for days. There’s no going back for me; this is the new gold standard. If the idea of a crispy meringue doesn’t immediately appeal to you, fear not; I’ve included instructions for a traditional, soft meringue below as well. But truly, I implore you to give this crackly version a try – it’s a revelation!

One crucial detail about this particular recipe: it’s not dubbed “Lemon Meringue Pie for Lemon Lovers” without good reason. I believe a true lemon pie should deliver a bold, exhilarating tang, a vibrant burst of citrus that truly awakens the senses. This pie, with its generous lemon content, might just make your taste buds do a happy dance – and perhaps your nose, too! If you find yourself leaning towards a milder lemon experience, you can easily adjust the tartness by replacing a portion of the lemon juice with water and reducing the amount of lemon zest. However, for those who adore that intense, zesty punch, you’re in for an absolute treat.
I understand that the recipe below might appear quite lengthy, stretching over what feels like ten years of instructions. However, while Lemon Meringue Pie can be a touch finicky in its precision, it is genuinely not difficult to master. I promise! My aim was simply to provide an abundance of detail and reassurance, ensuring every step is clear and accessible, even for first-time pie makers. Baking should be an enjoyable journey, and with these comprehensive guidelines, you’ll be creating a show-stopping Lemon Meringue Pie that will impress everyone fortunate enough to get a slice. Here’s to a wonderful, delicious weekend, filled with the aroma of freshly baked pie!

Lemon Meringue Pie for Lemon Lovers
30 minutes
25 minutes
2 hours
2 hours 55 minutes
8 Servings

Ingredients
For the pie crust: (You can of course use a pre-made crust if you like)
- ¼ cup very cold water
- 2 cups flour
- ¾ cup + 2 tablespoons butter-flavored shortening
- 1 & ½ tablespoons sugar
- 1 teaspoon salt
- ½ beaten egg
For the meringue:
- 3 egg whites, at room temperature
- ¼ teaspoon cream of tartar
- ½ teaspoon vanilla
- ½ cup plus 2 tablespoons caster sugar, if you have it; regular sugar will work fine too
For the lemon filling:
- 1 & ½ cups sugar
- 3 tablespoons cornstarch
- 3 tablespoons flour
- dash salt
- 1 cup hot water
- ½ cup fresh squeezed lemon juice
- 3 egg yolks, slightly beaten (reserve whites)
- 2 tablespoons butter
- 4 teaspoons lemon zest, or to taste
- ⅓ cup fresh squeezed lemon juice
Instructions
-
Begin by taking 3 eggs out of the fridge to allow them to come to room temperature. Carefully separate the eggs, placing the whites into the bowl of your stand mixer (or another clean metal bowl) and the yolks into a small, separate bowl. Set both aside.
For the crust:
-
Measure out ¼ cup of water and place it in the freezer to get very cold. In a medium bowl, combine the flour, sugar, and salt. Using a pastry cutter or a fork, cut in the butter-flavored shortening until the mixture resembles fine crumbs. Crack an egg into a small bowl, beat it thoroughly, and then divide it in half (a visual estimate is fine; you can save the other half for another use or discard it).
-
Retrieve the chilled ¼ cup of water from the freezer and mix it with the ½ beaten egg. Add this egg-water mixture to the flour mixture, combining until a cohesive ball of dough forms. Gently knead the dough once or twice with your hands to bring it together. Divide the dough in half. You can wrap one half and store it in the freezer for up to 3 days, perfect for when the craving for this pie strikes again!
-
Generously flour a clean surface. Place one half of the dough onto the floured surface, dust the top with more flour, and carefully roll the dough into a circular shape. Use your 8 or 9-inch pie pan to gauge the necessary size, remembering to account for the depth of the pan and a slight overhang for the edges.
-
Once your dough is rolled to the desired size, gently roll it onto your rolling pin and carefully transfer it to the pie pan. This technique might require a bit of practice. Alternatively, you can fold the dough into quarters and then unfold it directly into your pan, though I prefer the rolling method to minimize cracks. Remember, if you make a mistake, you can always gather the dough back into a ball, perhaps give it a few therapeutic bangs on the counter (we’ve all been there!), and roll it out again. Baking, especially pie crusts, is a journey of patience and fun! You’ll master it in no time.
-
Cut a circle of aluminum foil or parchment paper that fits snugly into the bottom of your pie crust. Place it in the pan and then fill it with pie weights, dry beans, marbles, or rice – anything heat-resistant to prevent the crust from puffing up. This step, known as blind baking, ensures a beautifully even crust free of air bubbles. Bake at 425°F (220°C) for 8 minutes. Remove from the oven, carefully lift off the foil and weights, and bake for an additional 5 to 6 minutes, or until the edges achieve a lovely golden-brown hue. Set the baked crust aside; it doesn’t matter if it’s cooled or still warm when you add the filling.
For the meringue:
-
Important note: The meringue must be prepared immediately before the lemon filling. It is crucial to spread the meringue onto the filling while the filling is still piping hot. This immediate contact helps to set the meringue, ensuring it begins to cook properly and significantly reduces the chance of shrinking, giving you that perfect, voluminous topping.
-
By now, the 3 egg whites you separated earlier should be at room temperature in your stand mixer bowl. Add the vanilla and cream of tartar to the bowl. Using the whisk attachment, beat the egg whites on medium-high speed until they form soft, billowy peaks. Gradually incorporate the ½ cup plus 2 tablespoons of sugar (caster sugar is ideal for a finer texture, but regular granulated sugar works perfectly well). Continue beating until the peaks are stiff, glossy, and all the sugar has completely dissolved. Scrape down the sides of the bowl to ensure everything is well combined, and then set the meringue aside, ready for immediate use.
For the lemon filling:
-
In a medium saucepan, whisk together the 1½ cups sugar, cornstarch, flour, and a dash of salt. Stir in the hot water and ½ cup of fresh lemon juice. Place the saucepan over high heat, stirring constantly with a whisk, until the mixture comes to a full boil. Once boiling, reduce the heat to medium-low (or whatever temperature maintains a gentle boil without splattering) and continue to stir vigorously for 2 minutes. Remove the saucepan from the heat.
-
Now, it’s time for the egg yolks you set aside earlier. To temper the yolks, add a few tablespoons of the hot lemon mixture to the bowl with the beaten yolks, whisking constantly to prevent the eggs from scrambling. This gradually raises the temperature of the yolks. Pour the tempered yolks back into the saucepan with the remaining lemon filling, whisking briskly to fully combine. Return the mixture to a boil and cook for another 2 minutes, stirring continuously, until it thickens further. Remove from heat. Stir in the 2 tablespoons of butter and the lemon zest. Finally, slowly stir in the remaining ⅓ cup of fresh lemon juice.
-
Without delay, pour the hot lemon filling into your pre-baked pie crust. Immediately, using a spoon, dollop small portions of the meringue evenly across the surface of the hot filling. Once distributed, gently spread the meringue smooth with the back of the spoon, creating appealing peaks and swirls. Ensure the meringue touches the crust all around the edges to prevent shrinkage during baking.
-
For a traditional, soft, and fluffy meringue: Bake the pie at 350°F (175°C) for 12 to 15 minutes, or until the meringue peaks are beautifully golden. For the distinctive crisp-shell meringue, like the one featured in the photos: Bake at a lower temperature of 325°F (160°C) for 25-30 minutes, or until the meringue achieves a light tan color and forms a delicate, crackly crust.
-
Allow the pie to cool completely at room temperature for at least 2 hours. This crucial cooling time allows the filling to set properly, ensuring clean slices. For the neatest cuts, dip a sharp knife in cold water before each slice. This pie is truly at its best when served on the day it’s made. To store any leftovers, simply cover the pie with an inverted bowl on the counter; avoid refrigerating, as the meringue can “weep” and become watery.
Notes
Nutrition
Calories: 639kcal |
Carbohydrates: 90g |
Protein: 6g |
Fat: 30g |
Saturated Fat: 9g |
Polyunsaturated Fat: 7g |
Monounsaturated Fat: 12g |
Trans Fat: 3g |
Cholesterol: 87mg |
Potassium: 111mg |
Fiber: 1g |
Sugar: 59g |
Vitamin A: 196IU |
Vitamin C: 11mg |
Calcium: 22mg |
Iron: 2mg