

The Ultimate Scone Recipe: Crispy Edges, Tender Center & Pure Breakfast Bliss
Forget everything you thought you knew about scones, especially those dry, crumbly imposters often found in coffeehouses! A truly exceptional scone is a revelation—a masterpiece of baking that boasts perfectly crispy edges, a wonderfully tender, flaky interior, and a rich, buttery flavor that melts in your mouth. This isn’t just a recipe; it’s a guide to unlocking breakfast perfection, surprisingly simple to achieve with a few crucial techniques. If you’ve ever dismissed scones as “not for you,” prepare to have your mind, and your taste buds, transformed. This is the scone recipe you’ve been waiting for!
Originally posted on February 13, 2012, this timeless recipe continues to delight bakers and breakfast lovers alike, proving that the secret to an amazing scone lies in understanding a few fundamental principles.

Table of Contents
- The Scone Revelation: Say Goodbye to Dry, Crumbly Disasters
- What Exactly is a Scone? A Culinary Overview
- Essential Ingredients for the Perfect Scone
- Mastering the Art of Scone Making: Step-by-Step Guide
- Pro Tips for Unforgettable Scones
- Unleash Your Creativity: Scone Mix-In Inspirations
- The Sweet & Savory Scone Spectrum: A Quick Guide
- Scone vs. Biscuit: A Delicious Debate
- Storing, Freezing, and Making Ahead: Your Scone Prep FAQs
- Perfect Pairings: What to Serve with Your Scones
- More Delights from the Kitchen
- Best Recipe for Scones (Sweet or Savory) Recipe
Just this morning, my friend Sarah, ever the early bird, texted me about the satisfying hum of her dishwasher and washing machine running simultaneously. She loves the feeling of productivity they bring, making her mornings feel like a scene from The Jetsons with a personal robot chef handling all the chores. Meanwhile, my own mornings typically involve a slower, more deliberate crawl out of bed, far from such bustling efficiency. We truly are the odd couple, much like our college days when she’d use a broom handle to push my ever-piling laundry back to my side of the room!

Sarah is currently navigating a major transcontinental move, returning to the States after three years in Japan with the military. I can’t express how thrilled I am to be back in the same time zone as my best friend! It means no more accidentally calling her at 4 AM her time. These little everyday joys, and the anticipation of new beginnings, are what make life sweet, much like a perfectly baked scone.

As summer draws to a close and the thought of school starting (or not, as the case may be this year, cue the collective sigh!) weighs on our minds, there’s no better antidote to life’s uncertainties than the comforting ritual of baking. And what better to bake than scones? If the very mention of scones doesn’t fill you with culinary excitement, it’s likely because you’ve only encountered the overly dry, sadly neglected versions often found behind glass cases. Starbucks, you have a lot to answer for, tarnishing the reputation of classic British baked goods globally!
My own recent foray into scone making was inspired by an “Anne of Green Gables” viewing party for my 9-year-old daughter, Charlotte, who devoured the book and its many sequels. What treat could be more fitting for an early 20th-century Canadian-themed gathering than a batch of warm, homemade scones?

The Scone Revelation: Say Goodbye to Dry, Crumbly Disasters
For too long, the scone has suffered an undeserved reputation, often relegated to the dry, flavorless realm of forgotten coffee shop pastries. But a warm, homemade scone, generously slathered with butter and homemade jam, is truly one of life’s simplest yet most profound pleasures. My own journey to scone enlightenment began after years of lackluster encounters. Growing up, my mother rarely made them, so my only exposure was through the often-stale offerings of cafes. The thought of those crumbly, dense baked goods, sitting for hours, still makes me reach for a glass of milk!
The game-changer came during a High Tea experience with my husband, Eric, at a luxurious hotel in Victoria. The setting was exquisite, complete with delicate cucumber sandwiches and a magnificent three-tiered serving platter. But the true stars were the scones. They were utterly divine—perfectly moist and tender on the inside, with a beautiful golden crispness on the edges, bursting with rich, buttery flavor. Topped with luxurious clotted cream and freshly made jam, it was a moment of pure culinary heaven. That experience taught me that a scone isn’t just a simple baked good; it’s an art, and one that is entirely achievable in your home kitchen.

What Exactly is a Scone? A Culinary Overview
At its heart, a scone is a single-serving baked good, closely related to American biscuits, but with distinct characteristics. Typically made from a dough containing flour, leavening (usually baking powder), fat (butter or cream), and liquid (milk, cream, or buttermilk), scones are known for their delightful crumb and tender texture. The origin of scones can be traced back to Scotland, evolving from a quick bread that was baked on a griddle and cut into triangular sections.
Today, there are two primary styles: the classic British scone and its American counterpart. Traditional English scones are often richer, made with softened butter or heavy cream, giving them a denser, slightly more cake-like texture, and are typically cut into rounds. They are the quintessential accompaniment to afternoon tea, served with clotted cream and jam.
American-style scones, like the ones in this recipe, lean towards a lighter, flakier structure, often achieved by incorporating cold butter into the flour, similar to pie crusts or biscuits. They utilize baking powder for a higher rise and are frequently cut into wedges or triangles. The result is a scone that is crispy on the outside and wonderfully moist and layered within—a far cry from a sad, dry heap of carbs. This recipe embraces that glorious, buttery, flaky American-style scone, perfected for maximum enjoyment.

Essential Ingredients for the Perfect Scone
Crafting perfect scones begins with a careful selection of ingredients, each playing a vital role in achieving that coveted flaky, tender texture and rich flavor. While the full detailed list is in the recipe card below, here’s a quick overview and explanation of what you’ll need and why it matters:
- All-Purpose Flour: The foundational structure of our scones. Spooned and leveled ensures accuracy, preventing a dense, dry outcome.
- Granulated Sugar: Provides sweetness and contributes to the golden-brown crust and tender crumb.
- Kosher Salt: Enhances all the flavors, balancing the sweetness and richness.
- Baking Powder: Our primary leavening agent. A generous amount is key for that signature high rise and light, airy texture.
- COLD Butter: This is a non-negotiable secret weapon! Cold butter, cut into small pieces, creates steam during baking, which separates the dough into those desirable flaky layers.
- Large Egg: Adds richness, helps bind the dough, and contributes to the scone’s structure.
- Vanilla Extract: Infuses sweet scones with a delightful aroma and warm flavor. Omit for savory variations.
- Heavy Whipping Cream: The primary liquid, adding richness and moisture without making the dough sticky. It also contributes to a beautiful brown crust.
- Sour Cream: A secret ingredient that adds incredible tenderness and a subtle tang, enhancing the overall flavor and ensuring a moist interior.
- Cream Cheese (Optional): For an indulgent twist, cold cream cheese chunks coated in sugar create pockets of creamy, sweet delight.
- Powdered Sugar (for the Glaze): Forms the base of our simple yet essential sweet topping.
- Milk (for the Glaze): Used to thin the glaze to the perfect drizzling consistency.
Every ingredient is chosen to create a scone that is far from dry or bland, ensuring a perfectly moist, flaky, and flavorful experience with every bite.
Mastering the Art of Scone Making: Step-by-Step Guide
Making scones is genuinely straightforward, but achieving that perfect balance of crispy edges and tender, flaky layers requires attention to a few critical details. Follow these steps carefully to avoid dense, dry, or cakey results and instead create scones that will make you a legend in your kitchen.
Step 1: Combine Dry Ingredients
In a large mixing bowl, whisk together your all-purpose flour, granulated sugar, kosher salt, and baking powder. Ensure these are thoroughly combined so that the leavening agent is evenly distributed, guaranteeing an even rise. Proper measurement, especially spooning and leveling the flour, is essential here.
Step 2: Incorporate Cold Butter
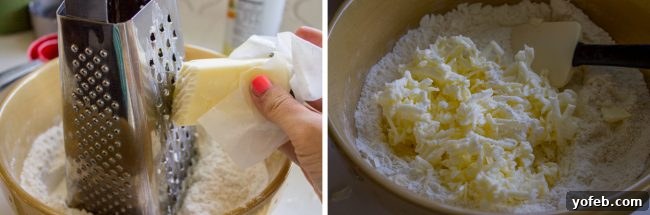
This is arguably the most crucial step for flaky scones. Take your very cold (or even frozen) butter and cut it into the dry ingredients. You can achieve this using a pastry cutter, which quickly breaks the butter into small pieces. Alternatively, a cheese grater is an excellent tool for grating frozen butter directly into the flour mixture, creating fine, cold butter shreds that are perfectly sized. Work quickly to prevent the butter from warming up. The goal is pea-sized pieces of butter, not a smooth mixture. These small pockets of cold butter will create steam in the oven, forming those irresistible layers.
Step 3: Add Wet Ingredients
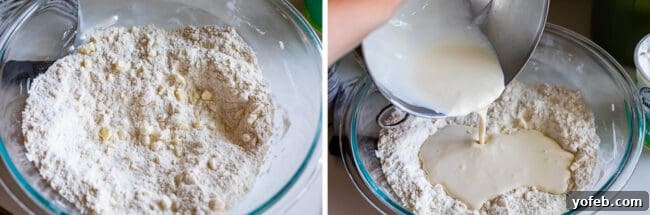
In a separate medium bowl, whisk together the egg, vanilla extract (if making sweet scones), heavy cream, and sour cream until well combined. The sour cream is a game-changer, adding tenderness and a subtle tang that elevates the flavor. Once mixed, pour these wet ingredients into your dry ingredients.
Step 4: Form the Dough (Gently!)
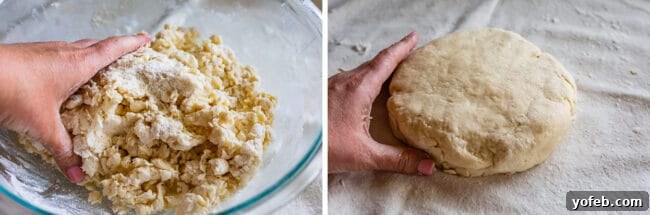
Using a wooden spoon, gently stir the mixture until it just begins to come together into a “shaggy” dough. At this point, switch to using your hands. Lightly flour your hands to prevent sticking. The key here is minimal handling. Fold the dough over itself in layers, working it just enough until all the dry flour is incorporated and the dough holds together. Aim for 5-8 gentle folds. Overworking the dough develops the gluten too much, resulting in tough rather than tender scones. If the dough seems too dry, you can add a tablespoon or two of ice-cold water.
Step 5: Incorporate Mix-ins (Optional)
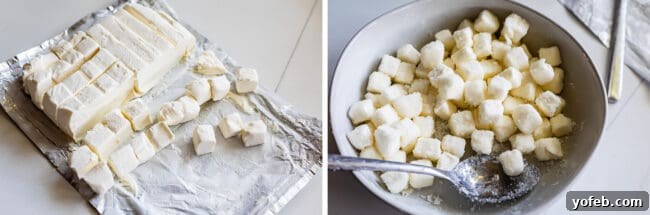
If you’re adding any mix-ins, gently fold them into the dough at this stage. For a truly decadent experience, chop an 8-ounce block of very cold cream cheese into ½-inch chunks, then toss them in ⅓ to ½ cup of sugar until fully coated. This prevents them from sticking together and adds a wonderful sweetness. Carefully fold these sugared cream cheese chunks (or any other mix-ins) into your dough with minimal handling.
This master scone dough is incredibly versatile. Whether you choose creamy cheese, bursting blueberries, or keep them plain, the foundation is perfect. A half cream cheese, half blueberry scone? Absolutely delicious.
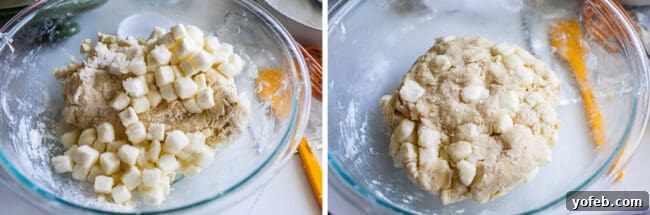
Step 6: Shape and Cut
Prepare a well-floured workspace (a pastry cloth works wonders). Transfer the dough and gently pat it into a thick 6- to 8-inch circle. The thicker your dough circle, the taller your finished scones will be. If you’ve added mix-ins, your circle might be slightly larger. Use a sharp knife or a pizza cutter to slice the circle in half, then cut each half into three equal triangles.
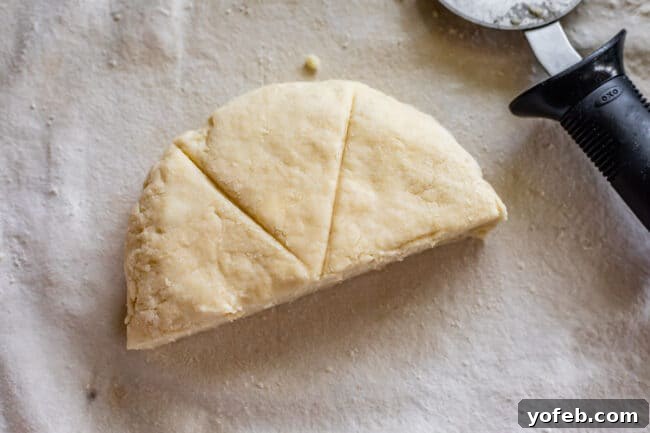
Notice the thickness and potential layers in the dough? This is the result of minimal handling and proper cold butter integration.
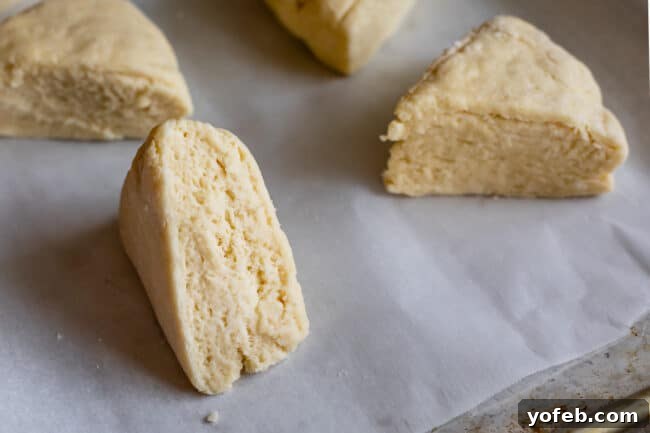
Step 7: The Critical Freeze
Arrange your scone triangles on a baking sheet lined with parchment paper or a silicone mat, ensuring they are at least 3 inches apart. Now, place the entire baking sheet in the freezer for a crucial 30 minutes. If freezer space is limited, you can place them on a plate, freeze for 30 minutes, then transfer them to a baking sheet. This freezing step is absolutely vital! Super cold butter hitting a screaming hot oven creates maximum steam, which gives your scones their signature high rise and wonderfully flaky, tender texture, preventing them from becoming tough and dry.

Step 8: Preheat and Bake
Preheat your oven to 400°F (200°C) about 15 minutes before your scones are done chilling. Brush the tops of the cold scones with a little extra heavy cream for a beautiful golden-brown finish. Sprinkle with coarse sugar for sweet scones or a touch of sea salt for savory ones.
Bake at 400°F for 10 minutes, then, without opening the oven door, reduce the temperature to 375°F (190°C) and continue baking for another 8-15 minutes, or until the tops are golden brown. Watch them carefully! Overbaking is the enemy of a moist scone. The high initial heat activates the baking powder, encouraging a big rise, while the lower temperature finishes them without burning. Check the bottoms—they should be nicely golden. Remove from the oven and let them cool on the pan for 10-15 minutes before transferring to a wire rack to cool completely.
Step 9: Prepare the Glaze
While the scones cool, prepare your simple glaze. In a small bowl, whisk or use an electric beater to cream 2 tablespoons of very soft butter. Add 1½ cups powdered sugar, ½ teaspoon vanilla, ¼ teaspoon kosher salt, and 1 tablespoon milk. Whisk until smooth, adding more milk a teaspoon at a time until you reach your desired drizzling consistency. Drizzle generously over the cooled scones and allow the glaze to set for 20-30 minutes.
Pro Tips for Unforgettable Scones
Achieving that perfect, bakery-quality scone is all about technique. Here are the golden rules to ensure your scones are always light, flaky, and unbelievably tender:
-
Embrace the Cold: The colder your butter, the flakier your scone. Frozen butter, grated into the flour, creates tiny pockets of butter that melt slowly in the oven, releasing steam and pushing apart the dough layers. This is the secret to a high rise and ethereal texture.
-
Don’t Overmix: Once wet and dry ingredients meet, handle the dough as little as possible. Overworking the dough develops gluten, leading to a tough, chewy scone rather than a tender one. Aim for a “shaggy” dough that just comes together.
-
The Power of Chilling: The 30-minute freeze before baking is non-negotiable. It re-chills the butter, ensuring it’s ice-cold when it hits the hot oven. This maximises the steam production and contributes significantly to both flakiness and height.
-
Hot Start, Gentle Finish: Beginning with a high oven temperature (400°F) gives the scones an initial burst of heat, rapidly activating the baking powder for maximum lift. Reducing the temperature to 375°F allows them to cook through without burning the edges, resulting in an even bake and a beautiful golden crust.
-
Don’t Overbake: This is a common pitfall. Scones can go from perfectly baked to dry and crumbly very quickly. Keep a close eye on them during the final minutes. They are done when the tops are golden brown and the bottoms are a nice, even golden hue. Trust your instincts, and when in doubt, it’s better to slightly underbake than overbake.
By following these tips, you’ll consistently produce scones that rival any professional bakery, proving that simple ingredients, handled with care, can yield extraordinary results.

Unleash Your Creativity: Scone Mix-In Inspirations
One of the most exciting aspects of making scones is the endless possibility for customization. This recipe provides a perfect base for almost any flavor combination you can dream up. While our default highlights the creamy goodness of sugared cream cheese, don’t hesitate to experiment! A good rule of thumb is to add about ¾ to 1 cup of total mix-ins for this dough quantity. Here are some ideas to spark your culinary imagination:
Sweet Scone Variations:
- Classic Berries: Fold in fresh or frozen blackberries, raspberries, or chopped strawberries. A tablespoon of lemon zest beautifully brightens their flavor.
- Chocolate & Nut Delight: Combine semi-sweet chocolate chips with toasted pecans for a rich, comforting treat.
- Cherry Almond Elegance: Dried tart cherries, a hint of almond extract, and a sprinkle of sliced almonds on top create a sophisticated scone.
- Cranberry Orange Zest: Dried cranberries paired with fresh orange or lemon zest offer a vibrant, tangy-sweet profile.
- Marzipan & Chocolate Magic: Grated marzipan, chocolate chips, and orange zest make for an indulgent, aromatic scone.
- Raspberry White Chocolate: The tartness of raspberries (frozen works wonderfully!) contrasts perfectly with the creamy sweetness of white chocolate chips.
- Apple Cinnamon Comfort: Finely diced apples and a generous pinch of cinnamon evoke classic autumnal flavors.
- Apricot Coconut Dream: Dried apricots and a touch of coconut extract transport you to a tropical paradise.
Savory Scone Sensations:
For savory scones, remember to reduce the granulated sugar in the main dough to about ¼ cup.
- Bacon & White Cheddar: A perennial favorite, offering smoky, cheesy goodness. (Similar to this overnight recipe).
- Parmesan & Rosemary: Earthy rosemary with sharp, salty Parmesan creates an aromatic and irresistible scone.
- Mediterranean Medley: Chopped sun-dried tomatoes, toasted pine nuts, and fresh basil bring a taste of the Mediterranean.
- Apple, Cheddar & Bacon: A delightful combination of sweet, sharp, and smoky flavors, perfect for brunch.
- Greek Inspired: Kalamata olives, sun-dried tomatoes, and crumbled feta cheese for a briny, flavorful bite.
- Pizza Scones: Mini pepperoni pieces and chopped mozzarella chunks make a fun, savory option, especially when dipped in warm marinara sauce.
Don’t be afraid to mix and match or invent your own unique combinations. The beauty of this scone recipe lies in its adaptability!
The Sweet & Savory Scone Spectrum: A Quick Guide
When venturing into the world of savory scones, a crucial adjustment is the sugar content. While it might seem counterintuitive to include sugar in a savory bake, it plays a vital role in both flavor balance and dough structure. For savory variations, reduce the granulated sugar in the main scone dough to about ¼ cup. This small amount helps with browning and provides a subtle, pleasing contrast to the savory mix-ins without making the scone taste sweet. It’s a little secret that often elevates savory baked goods from good to great.

(The lovely brown crystallized sugar you see in this photo comes from the sugar I coated the cream cheese chunks in. Regular sweet scones will develop a golden crust, but this extra step adds an irresistible sugary crunch. Who could resist a little extra crystallization?)
Scone vs. Biscuit: A Delicious Debate
The scone and the biscuit are often confused, and for good reason—they share many similarities, particularly in their preparation method of cutting cold fat into flour. However, subtle distinctions in ingredients, shaping, and cultural serving traditions set them apart. Visually, American scones are frequently cut into triangles, while biscuits almost exclusively adopt a round shape, often achieved with a biscuit cutter.
Beyond aesthetics, the key differences lie in composition and texture. Traditional British scones, as mentioned earlier, tend to be denser and crisper, historically relying on heavy cream rather than butter as the primary fat and resulting in a somewhat different crumb. This recipe, on the other hand, yields an American-style scone that is only crispy on the edges, with an interior that is remarkably light, flaky, and tender. We achieve this superior moisture and flakiness through a generous blend of cold butter, heavy cream, and sour cream, contributing both richness and a delicate tang.
Biscuits are typically less sweet, often savory, and emphasize a pronounced buttery flavor and an exceptionally fluffy, layered interior. They are commonly served as a side dish with gravies, fried chicken, or simply with butter. Scones, whether sweet or savory, tend to be richer and are often seen as a standalone breakfast pastry or a delightful accompaniment to tea, dressed with glazes, jams, and creams. If you love a good biscuit, be sure to try my favorite Flaky Buttermilk Biscuit Recipe!

Storing, Freezing, and Making Ahead: Your Scone Prep FAQs
These delicious scones are best enjoyed fresh, but thoughtful storage and preparation can extend their life and ensure you always have a quick treat on hand.
How to Store Scones:
Once baked and cooled, store your scones, covered, at room temperature for 2-4 days. For optimal crispiness, enjoy them on day one. After that, the edges will start to soften, though they’ll still be wonderfully tender. If you’ve included the cream cheese mix-in, it’s best to store them in the refrigerator due to the dairy content.
Do Scones Freeze Well?
Absolutely! Scones freeze beautifully, both baked and unbaked. For baked scones, allow them to cool completely, then wrap them individually in plastic wrap and place them in an airtight freezer bag. They can be frozen for up to 3 months. To enjoy, simply rewarm in the microwave on a low setting until just heated through (avoid over-microwaving, which can make them tough). You can also slice them in half and toast them for a lovely texture.
Can This Scone Recipe Be Made Ahead of Time?
Yes, and this is a fantastic time-saving trick! You can prepare the scone dough up to the point of cutting the triangles. Place the unbaked scone triangles on a plate or small baking sheet and freeze for the recommended 30 minutes. Once solid, transfer them to a freezer-safe ziplock bag, squeezing out as much air as possible, and store in the freezer for up to 3 months. This means you can have freshly baked scones on any random day with minimal effort.
When you’re ready to bake, simply take the frozen scones directly from the freezer and pop them into the preheated oven. They might require a few extra minutes of baking time (typically 2-5 minutes more), but the convenience is unmatched. This make-ahead method is also perfect for overnight guests—prepare the dough the night before, and in the morning, you’ll have warm, fresh scones ready to impress.

Perfect Pairings: What to Serve with Your Scones
While these scones are delightful on their own, especially with their sweet glaze, the right toppings can elevate them to an extraordinary culinary experience. For sweet scones, these accompaniments are where the magic truly happens:
- The Best Lemon Curd: If you’ve only ever tasted store-bought lemon curd, prepare for a revelation. Homemade lemon curd is a world apart—bright, tangy, and incredibly smooth.
- Cinnamon Honey Butter: Incredibly easy to whip up, this sweet, spiced butter is absolutely divine on warm scones, adding a cozy, fragrant touch.
- 2 Minute Maple Butter: A quick and effortless topping that brings a rich, autumnal sweetness to your breakfast or tea time.
- Easy Strawberry Jam from Dinner Then Dessert: The fresh, vibrant taste of homemade strawberry jam is a classic for a reason.
- Grape Jelly from A Baker’s House: Simple, sweet, and comforting, a good grape jelly is always a welcome addition.
- Clotted Cream: For a truly authentic British experience, clotted cream is the ultimate indulgence. Its thick, rich consistency is unparalleled.
- Fresh Berries: A simple bowl of fresh raspberries, blueberries, or sliced strawberries adds a burst of natural sweetness and color.
More Delights from the Kitchen
If you’re craving more sweet treats for breakfast, brunch, or an afternoon pick-me-up with your favorite beverage, explore some of these cherished recipes:
- The Best Chocolate Babka: Indulge in buttery brioche dough generously swirled with rich chocolate—pure bliss.
- Homemade Donuts: A labor of love, but undeniably worth every moment for warm, pillowy perfection.
- Glazed Lemon Loaf: Just like your favorite coffee shop, but arguably even better with its bright, zesty glaze.
- Swedish Cinnamon Buns with Cardamom: A fragrant delight for anyone who adores the warm, aromatic spice of cardamom.
- Easy Banana Bake with Cream Cheese Frosting: Banana bread’s more sophisticated and utterly delicious cousin, elevated with a luscious cream cheese frosting.
- Tea Sandwiches from Bounded by Buns: Perfect savory bites to accompany your sweet scones for a complete tea party spread.
- English Muffins from The View From Great Island: Craft your own nooks and crannies for a truly satisfying breakfast.
- Perfect Petit Fours from Rose Bakes: Tiny, elegant cakes that are perfect for special occasions.
Facebook | Pinterest | Instagram

Best Recipe for Scones (Sweet or Savory)

Ingredients
- 2 & 1/2 cups all purpose flour, spooned and leveled
- 1/2 cup granulated sugar
- 1/2 teaspoon kosher salt
- 1 & 1/2 tablespoons baking powder, yes really
- 1/2 cup butter, (1 stick) COLD butter, frozen butter is great too
- 1 large egg
- 2 teaspoons vanilla
- 1/3 cup heavy cream*
- 1/3 cup sour cream
- more cream, for brushing
Optional add in
- 1 (8-oz) package COLD cream cheese, chopped
- 1/3 to 1/2 cup sugar, for coating cream cheese
For the glaze
- 2 tablespoons butter, very soft
- 1 & 1/2 cups powdered sugar
- 1/2 teaspoon vanilla
- 1/4 teaspoon kosher salt
- 1-3 tablespoons milk
Instructions
-
Dry ingredients: In a large bowl, combine 2 and 1/2 cups flour, 1/2 cup sugar**, 1/2 teaspoon kosher salt, and 1 and 1/2 tablespoons baking powder.
-
Wet ingredients: In another medium bowl, add 1 egg, 2 teaspoons vanilla (omit for savory scones), 1/3 cup cream and 1/3 cup sour cream. Whisk it together. Set aside.
-
Cut in butter: Now back to the dry ingredients. Use a pastry cutter to cut in the COLD or frozen butter. You can also grate the butter using a cheese grater and mix it in that way. Cut the butter in until it is incorporated and there are still pieces of butter about the size of a pea. Don’t overdo it! See photos.
-
Add the wet ingredients to the dry ingredients. Use a wooden spoon to stir it together until it forms a shaggy dough.
-
Coat your hands with flour and finish kneading the dough in as few strokes as possible. (Overworking the dough makes for a tough scone.) Use your hands to fold the dough on top of itself, creating more and more layers until it has come together and all the flour is incorporated. You can add a tablespoon or two of ice cold water if you think it’s necessary. I try to get the dough to come together in 5-8 folds. Do your best and remember that you will get better with practice!
-
Mix-ins: At this point add in any mix ins you plan to use. (If you want to add cream cheese like you can see in the photos, chop an 8 ounce block of cream cheese into 1/2 inch chunks. Coat with 1/3 to 1/2 cup sugar in a bowl, making sure all the cream cheese is coated. Carefully fold into the dough.)
-
Prepare a work space with plenty of flour. I like to use a pastry cloth. Transfer the dough to the work place and use your hands to shape the dough into a 6 to 8 inch circle. I like really thick, tall scones. The thicker your circle of dough is, the taller your scones will be. If you added mix ins, your circle will be a bit larger.
-
Use a sharp knife or pizza cutter to cut the circle in half. Cut each half into 3 equal triangles.
-
Place on a baking sheet that has been lined with a silicone baking mat or parchment paper. Place the scones at least 3 inches apart from each other.
-
Freeze for 30 minutes.*** If you don’t have room in your freezer, you can put them in the fridge for 45 minutes. If you don’t have room to chill a whole baking sheet, place the scones on a plate and then transfer to the baking sheet when they are frozen/cold.
-
15 minutes before the scones are done freezing, turn your oven on to 400 degrees F.
-
Place the cold scones on a baking sheet if you haven’t done so yet.
-
Brush the top of each scone with cream. This will make the scones get nice and brown. Top each scone with coarse sugar if you like, or a bit of salt if you are doing savory scones.
-
Bake: Put the scones in the oven and bake for 10 minutes at 400 degrees.
-
Turn the heat down to 375 without opening the oven.**** Bake for another 8-15 minutes, until the tops are golden brown. DO NOT OVER BAKE. This is where the magic happens, so stay nearby. If you over bake your scones, they will be dry even if you did everything else right. If you are not sure, use a spatula to lift up one of the scones. If they are a nice golden brown on the bottom, they are done.
-
Remove from the oven and let set up on the pan for 10-15 minutes. Transfer to a wire rack to cool completely.
-
Make the glaze: in a small bowl, whisk or use an electric beater to cream 2 tablespoons of very soft butter. Add 1 and 1/2 cups powdered sugar, 1/2 teaspoon vanilla, 1/4 teaspoon kosher salt, and 1 tablespoon milk. Whisk together and add more milk until you have a consistency you like. Drizzle over the tops of the scones and let harden (it usually takes 20-30 minutes.)
-
Top your scones with butter and jam! They are great reheated in the microwave.
-
Store scones covered on the counter for 2-4 days. They are best eaten on day 1 so that you can get those crispy edges. After storing for a while it’s hard to avoid a bit of sogginess. (Starbucks solves this problem but leaving them out in the air, but then eventually the center gets dried out. So, pick your poison. Or just eat all 6 scones single handedly on day 1. No judgment here.)
Video
A video tutorial for this recipe would typically be embedded here, offering visual guidance for each step, from preparing the dough to achieving that perfect golden crust and delicate glaze.
Notes
**If you plan to make savory scones, use 1/4 cup sugar or less! But don’t take it all out. A little sugar in your savory baked goods is often the secret to success. Also the sugar provides structure when baking.
***At this point, you can transfer your shaped unbaked scones to a ziplock and freeze for up to 3 months. Pop them out of the freezer and put them in the oven frozen solid. They may take a couple more minutes to bake, but not much longer. Try it! You will love yourself when you can have a freshly baked scone in 25 minutes flat on a random Tuesday!
****About the baking time: I like to put muffins and scones (and other baked goods that use baking powder) in the oven at a high temperature for the first half of baking, then lower the temperature. The high temperature at the beginning activates the baking powder and makes the scones rise really high, but then you have to lower the temperature so they don’t burn on the edges.