

Unlock the secret to crafting breathtaking lattice pie crusts with this comprehensive, step-by-step guide. Elevate your homemade pies from simple to stunning, impressing everyone at the table with your newfound baking artistry. While it may seem intricate, the process is incredibly rewarding and, once you get the hang of it, surprisingly enjoyable! We’ll walk you through every critical stage, from perfecting your dough’s consistency to achieving those beautifully crimped edges, ensuring your pie-making journey is clear, confusion-free, and culminates in a masterpiece.
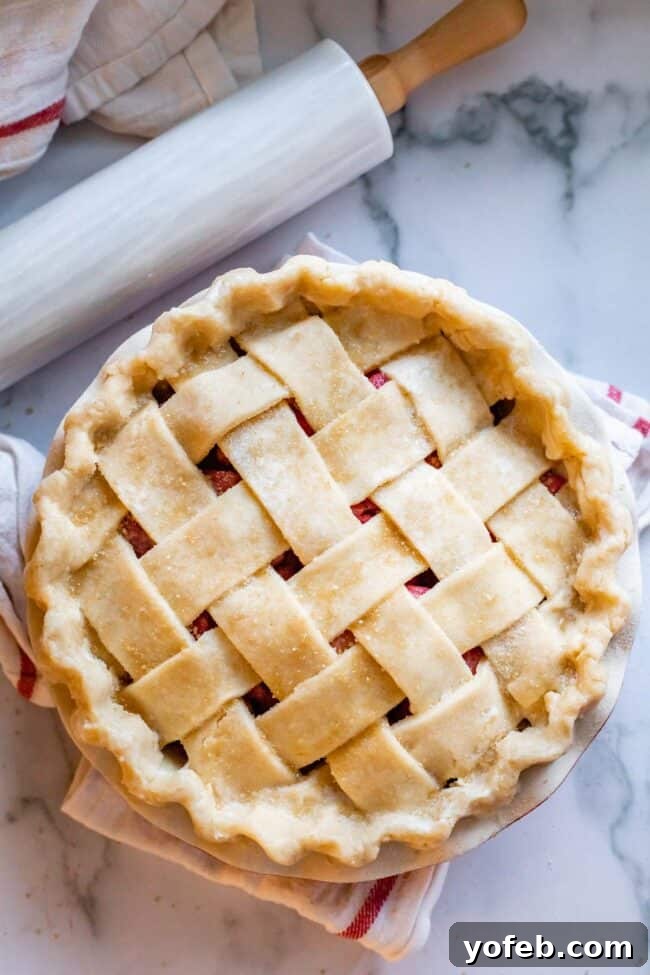
There’s a common misconception that creating a lattice pie crust is an arduous, professional-level task. Many aspiring bakers shy away from it, believing it to be “too difficult” or “only for seasoned pros.” But the truth is, while it requires a bit of patience and attention to detail, it’s far more accessible than you might imagine. In the world of baking, a lattice pie crust is the ultimate showstopper, transforming a delicious dessert into an edible work of art. Imagine the admiring glances and “oohs” and “aahs” when you present a pie adorned with a perfectly woven lattice top – it’s a moment of immense satisfaction that every home baker deserves to experience.

Even for experienced bakers, the lattice can sometimes feel like an elusive technique. However, the beauty of baking lies in the journey, not just the destination. There are moments when you simply want to push your culinary boundaries, to craft something truly special that speaks volumes about your dedication. A lattice pie crust is precisely that kind of project – a chance to get creative, to practice a valuable skill, and ultimately, to bask in the admiration of your friends and family. This detailed guide is designed to empower you with the confidence and knowledge needed to master this charming technique, turning any pie into an unforgettable creation.
How to Make a Lattice Pie Crust: A Step-by-Step Guide
The foundation of any exceptional pie, especially one featuring a lattice crust, is a truly fantastic pie dough. A flaky, tender, and flavorful crust provides the perfect canvas for your decorative efforts. For comprehensive instructions on creating the ideal dough, including tips for handling and chilling, be sure to check out our detailed guide on How to Make Flaky Pie Crust. Starting with well-prepared, chilled dough is perhaps the most crucial step for a successful lattice, so don’t skimp on this foundational element.
Step 1: Prepare Your Dough Strips with Precision
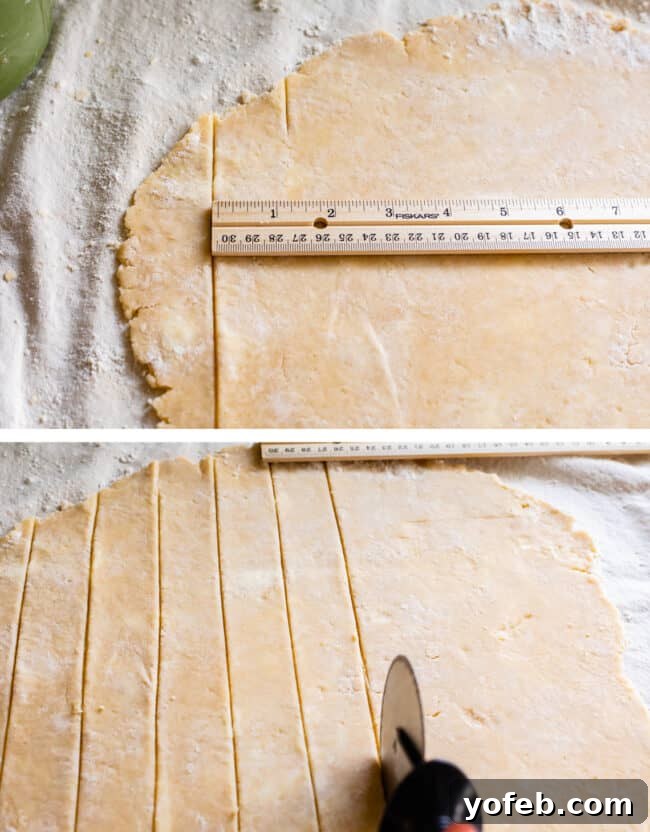
Begin by taking one disk of your chilled pie dough. On a lightly floured surface, roll it out into a circle approximately 10 to 11 inches in diameter. The thickness of your dough is important here: aim for about 1/8 to 1/4 inch. If the dough is rolled too thin, your strips will become delicate and prone to tearing, making them incredibly difficult to handle during the weaving process. If it’s too thick, the crust might be too dense. Use a ruler and a pizza cutter, lightly dusted with flour to prevent sticking, to cut your dough into even strips. You have artistic freedom here—you can make your strips as wide or as narrow as you prefer. For beginners, wider strips (around 1 to 1¼ inches) are generally easier to manage and less likely to break. Consistency in width will result in a more uniform and polished lattice pattern.
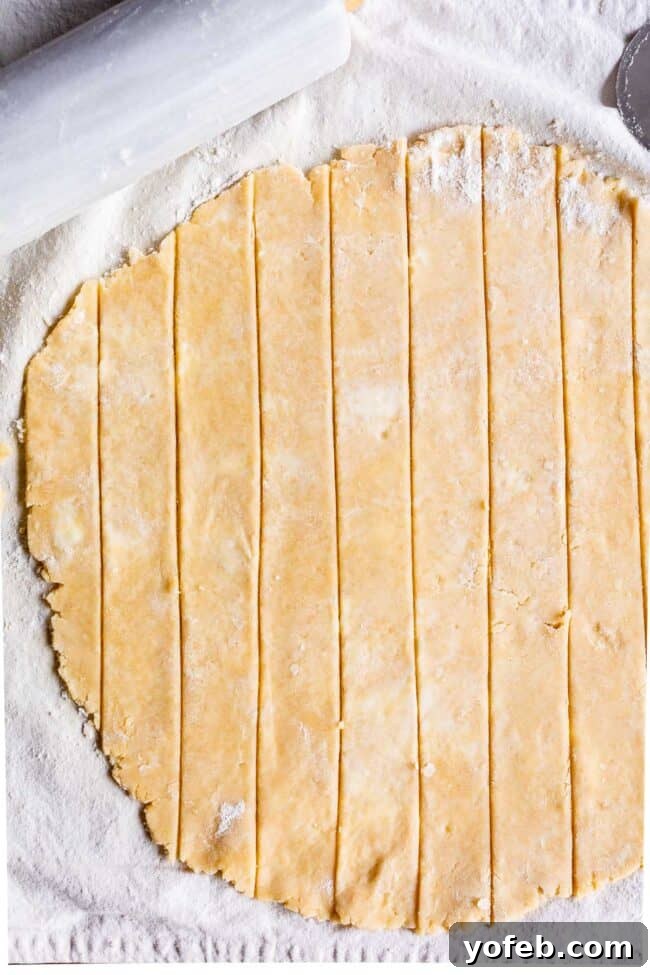 Once your strips are cut, it’s essential to keep them cold. Warm dough is sticky, soft, and unworkable. If your kitchen is warm or if you’re working slowly, the dough strips can quickly become too pliable. To prevent this, make sure to clear a space in your refrigerator or freezer beforehand. If at any point your dough starts to soften and become difficult to manage, simply place the entire sheet of strips (if on parchment) or even just the strips themselves into the fridge for 5-10 minutes, or the freezer for 2-3 minutes, to firm up. Rolling out pie crusts on a pastry cloth or parchment paper is a fantastic tip, as it allows for easy transfer to and from the chilling environment without disturbing the delicate strips.
Step 2: Prepare Your Pie Filling
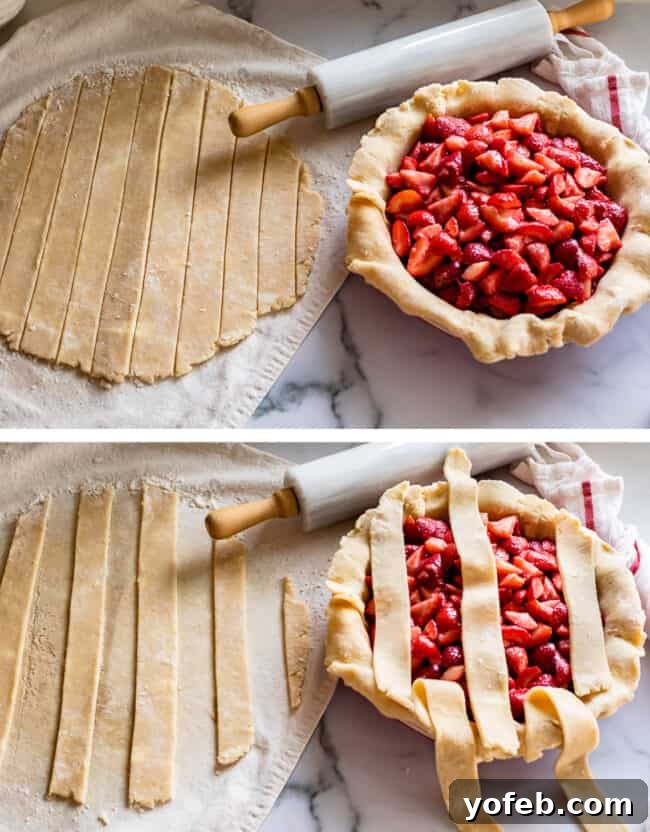
Before you begin the weaving process, your pie pan should be filled with your chosen pie filling. This step is critically important: your filling absolutely must be cold. Warm pie filling will quickly melt the butter in your pie crust strips, making them incredibly difficult, if not impossible, to weave without tearing or becoming a sticky mess. Ideally, your filling should be chilled to room temperature at a minimum, but cold or even frozen filling (for fruit pies) is even better. This helps to maintain the cold temperature of your dough strips as you manipulate them, ensuring they hold their shape. While it might seem like an extra, annoying step, it’s a non-negotiable one for lattice success. Once filled, place your pie pan back in the refrigerator or freezer while you finalize the dough strip preparation to ensure everything remains perfectly chilled.
Step 3: Begin the Lattice Weave
Now for the fun part: weaving! Start by laying out half of your prepared dough strips across the top of your pie filling in one direction. Arrange them parallel to each other, with small, even spaces in between. These will form the base of your lattice. The number of strips will depend on the size of your pie and the width of your strips, but typically 4-6 strips are a good starting point for a standard 9-inch pie.
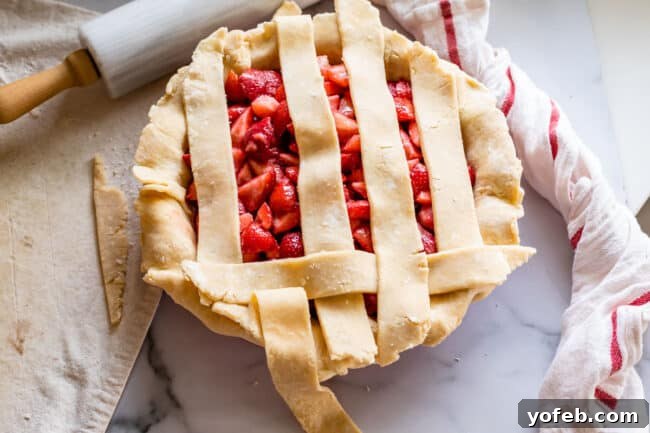
Take every other strip of dough from your base layer and fold it back completely, away from the center of the pie, exposing the filling underneath. For example, if you have strips 1, 2, 3, 4, 5, 6, fold back strips 2, 4, and 6. This creates gaps where your perpendicular strips will be placed. Place the first perpendicular strip of dough across the exposed filling, right up against the folded edges of the original strips. Ensure it’s snugly placed near the edge of the pie. Once this strip is in place, gently unfold the previously folded strips (2, 4, and 6) back over the new perpendicular strip, effectively weaving it underneath them. Take a moment to adjust and tuck this first perpendicular strip so it’s neatly nestled against the pie’s edge, creating a clean starting point for your weave.
Step 4: Continue the Weaving Pattern
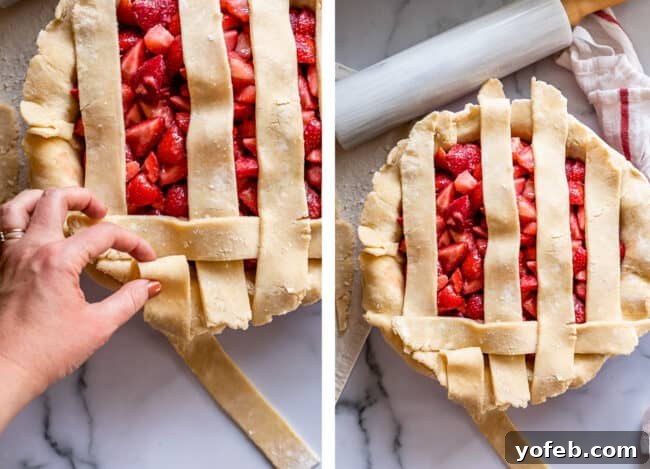
With your first perpendicular strip in place, it’s time to continue the classic “over and under” weave. For the next step, you will fold back the *other* set of strips from your original base layer – the ones that are now lying *underneath* the first perpendicular strip. In our example, these would be strips 1, 3, and 5. Fold these strips back, again exposing the pie filling. Remember, if you notice any small tears in your dough, don’t panic! Dip a finger in a tiny bit of ice water and gently press the torn edges back together. If the dough is becoming too soft to handle, pop the entire pie back into the freezer for a quick chill. Patience is your best friend here.
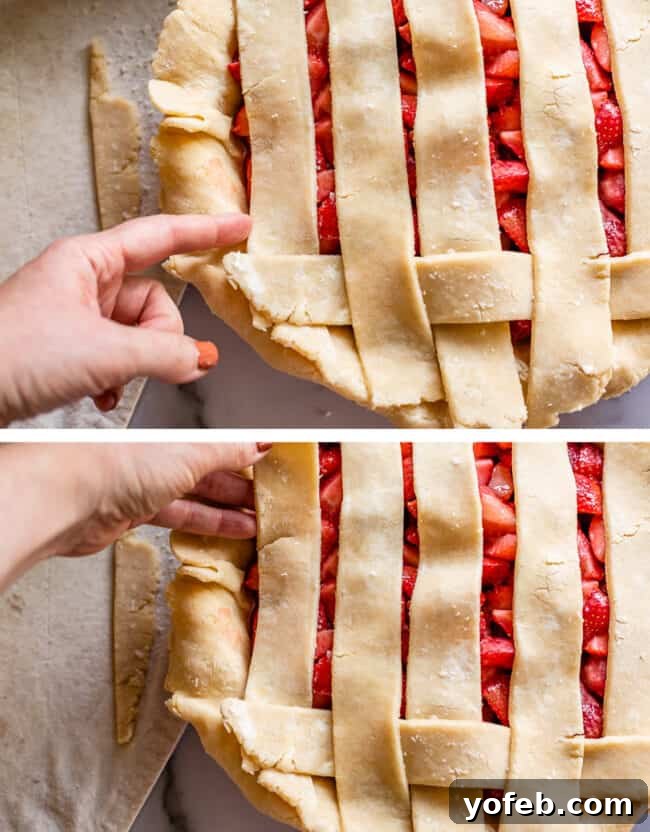
Once the ‘underneath’ strips are folded back, place your next perpendicular strip of dough. Position it parallel to the first one, ensuring it creates an even gap. Gently tuck it a little under the folded-back strips if necessary for a tighter weave. Then, carefully unfold the strips (1, 3, and 5 in our example) back into their original positions, laying them flat over the new perpendicular strip. You should now see the beginning of your lattice pattern forming.
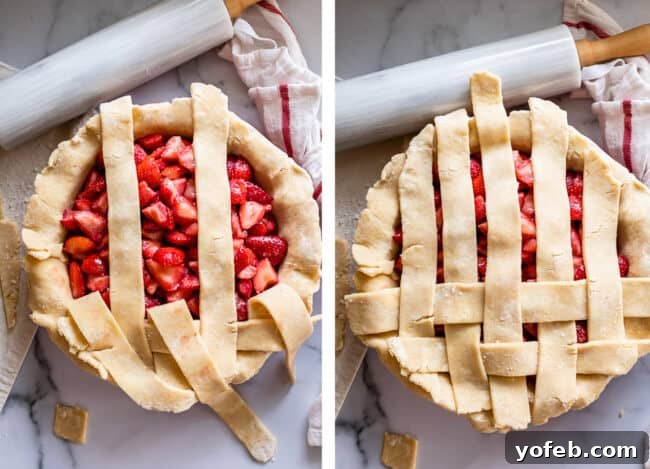
Repeat the pattern: fold back the strips that are currently *underneath* (the set you did not fold back in the previous step). Place another perpendicular strip, and then unfold the original strips back over it. Continue this methodical process, alternating which strips you fold back each time, until you have covered the entire surface of your pie with the woven lattice. The key is to maintain a consistent ‘over, then under, then over’ rhythm across the pie. Keep a bowl of ice water nearby for any minor repairs and don’t hesitate to use the fridge or freezer if your dough gets too warm. Remember, a cool dough is a cooperative dough.
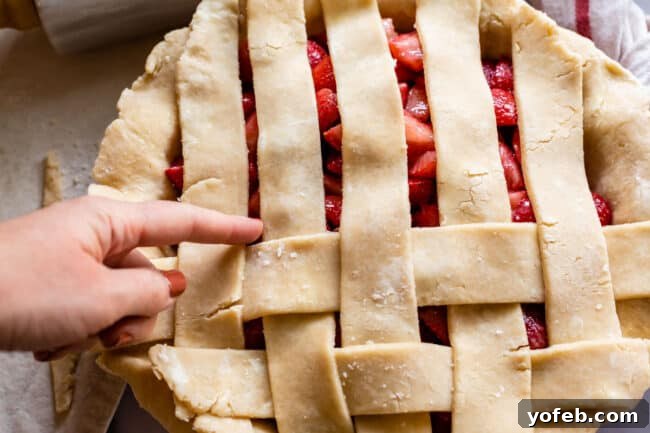
Focus on maintaining the pattern. Each time you place a new perpendicular strip, the strips from the original layer should alternate between being ‘over’ and ‘under’ it. This creates the classic woven look. With each new strip, gently secure it and smooth out any areas that seem to be lifting. Precision and a light touch are important, but don’t be afraid to adjust. Baking is as much an art as it is a science.
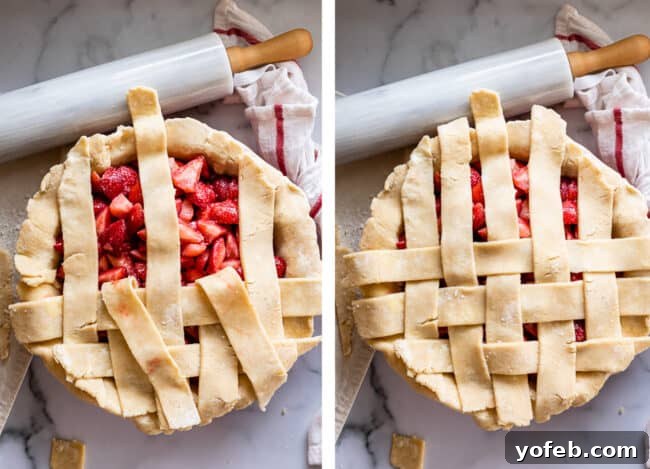
As you near the end of the weaving process, you’ll find that the remaining strips fit into place quite naturally, guided by the pattern you’ve established. Take your time to ensure all strips are neatly aligned and the weave is as tight as possible without distorting the dough. Once the entire pie is covered, take a moment to admire your work! You’ve successfully completed the most visually striking part of the lattice.
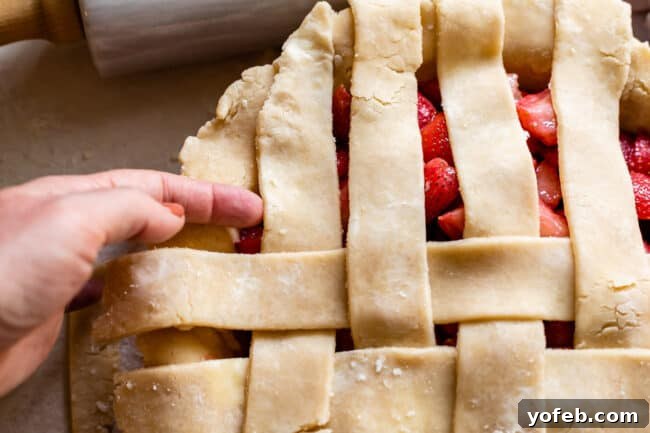
Continue to fold back the strips that are *underneath*, ensuring you’re alternating the pattern correctly. Each time, place a new perpendicular strip and then lay the folded strips back down. This repetitive motion, once understood, becomes intuitive. The goal is a uniform basket-weave appearance across the entire pie top.
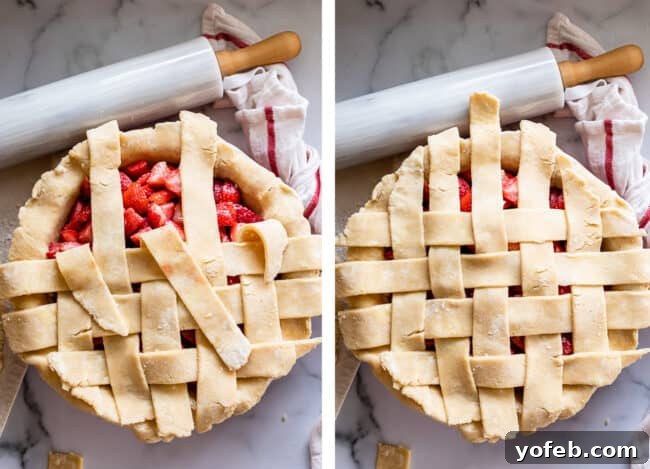
Place the final strips of dough, carefully completing the weave. Ensure the ends of all strips extend slightly over the pie plate’s edge, as this excess dough will be used for crimping and creating a beautiful border. This meticulous process might take some practice, but the outcome is always worth the effort.
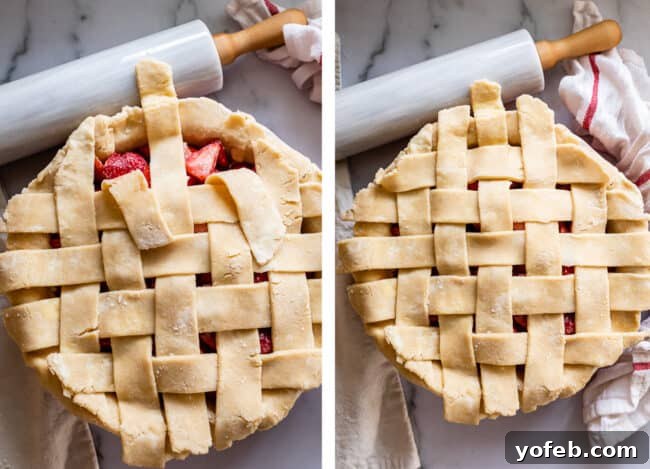
Finally, carefully lay the last strip of dough and unfold all the tucked-back pieces. Give it a gentle press to ensure all strips are adhered and your lattice is complete! You did it! A beautifully woven lattice pie crust, ready for its final touches before baking.
Step 5: Master the Art of Crimping and Finishing the Edges
With your lattice expertly woven, the next step is to create a polished and sturdy edge for your pie. Some bakers might suggest trimming the excess dough, but we believe every bit of that delicious pie dough is precious and should be utilized. Instead, we prefer to incorporate the longer ends of your lattice strips back into the pie’s main crust edge.
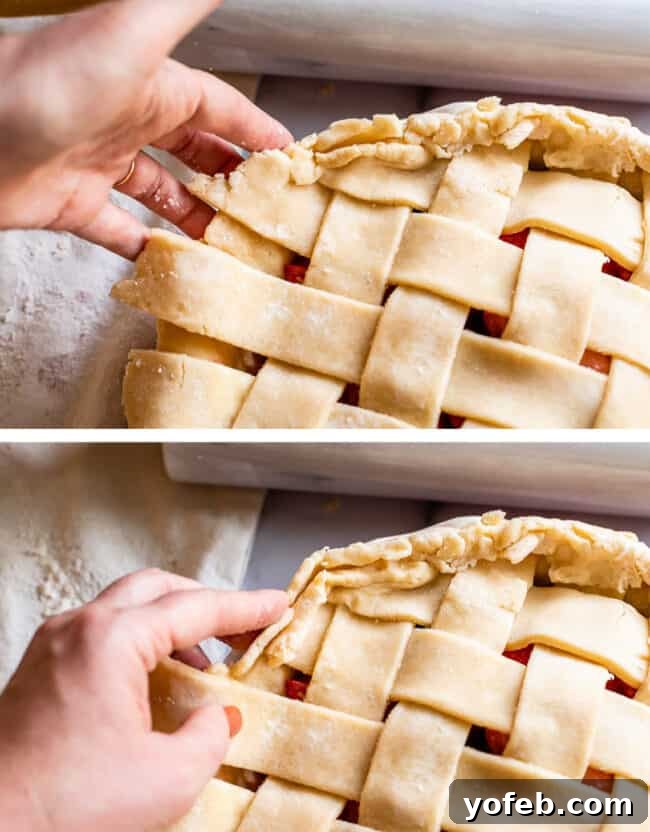
To begin shaping the crust, gently fold the overhanging edges of the bottom pie crust (and any incorporated lattice strips) up and over, tucking them slightly underneath to create a thicker rim. This technique not only secures the lattice but also creates a beautiful, substantial border for your pie. Alternatively, you can fold the edges directly underneath the main crust, resulting in a slightly flatter edge. Choose the method that best suits your aesthetic preference.
At this stage, your pie dough might look a little rugged, perhaps even crumbly or cracked, especially where you’ve folded and manipulated it. This is perfectly normal! Think of it like modeling clay. Use your fingers to gently smooth and mold the dough back together. Apply slight pressure, pressing out any cracks and blending the folded edges until you achieve a smooth, even, and well-formed border. If the dough is too stiff to mold, let it sit at room temperature for a minute or two, or apply a tiny dab of ice water to help bind the cracks.
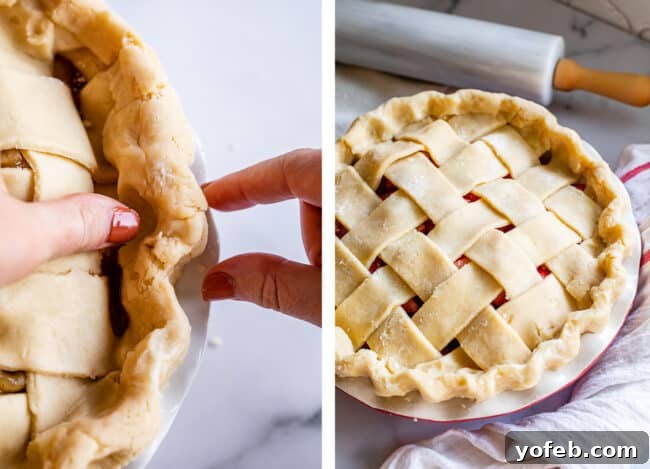
Once your pie crust edge is smooth and cohesive, it’s time to add a decorative crimp. This step not only enhances the visual appeal but also helps to seal the pie, preventing the filling from bubbling over during baking. There are many ways to crimp a pie crust, but a simple and classic method involves using your fingers. Place your thumb on the outside edge of the crust, between two fingers on the inside edge. Gently press inward with your thumb while simultaneously pressing outward with your two fingers, creating a scalloped pattern. Rotate the pie and repeat this action all around the perimeter. You can also use the tines of a fork to create a simple, rustic pattern.
With your lattice woven and edges perfectly crimped, your pie is almost ready for the oven. But don’t forget those crucial finishing touches that ensure a golden, beautiful crust. Before baking, gently brush the entire lattice and crimped edges with an egg wash (a whisked egg with a splash of water or milk) or just milk. This will give your crust a lovely golden sheen. For an extra touch of sparkle and a hint of sweetness, sprinkle granulated or coarse sugar over the top. This not only adds to the visual appeal but also creates a delightful textural contrast. After these final embellishments, immediately transfer your pie to the refrigerator or freezer for another 15-30 minutes. This last chill is vital for maintaining the shape of your lattice and ensuring a truly flaky crust. A cold pie entering a hot oven creates the steam necessary for those desirable layers of flaky pastry. For detailed guidance on baking temperatures, times, and how to use a pie shield to prevent edge burning, refer back to our How to Make Flaky Pie Crust post.
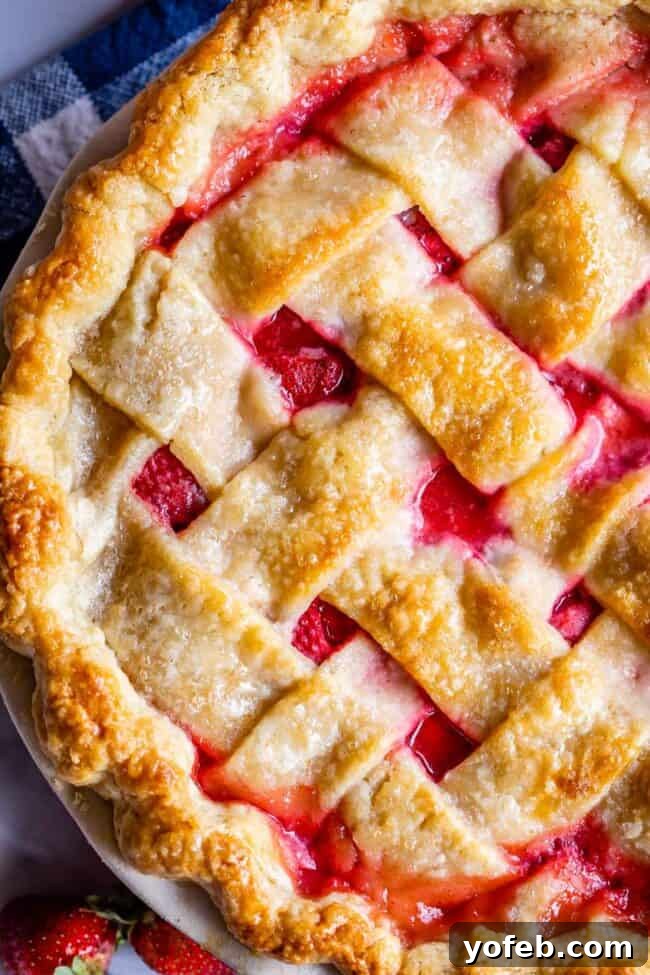
Done is Better Than Perfect: Embrace Imperfections
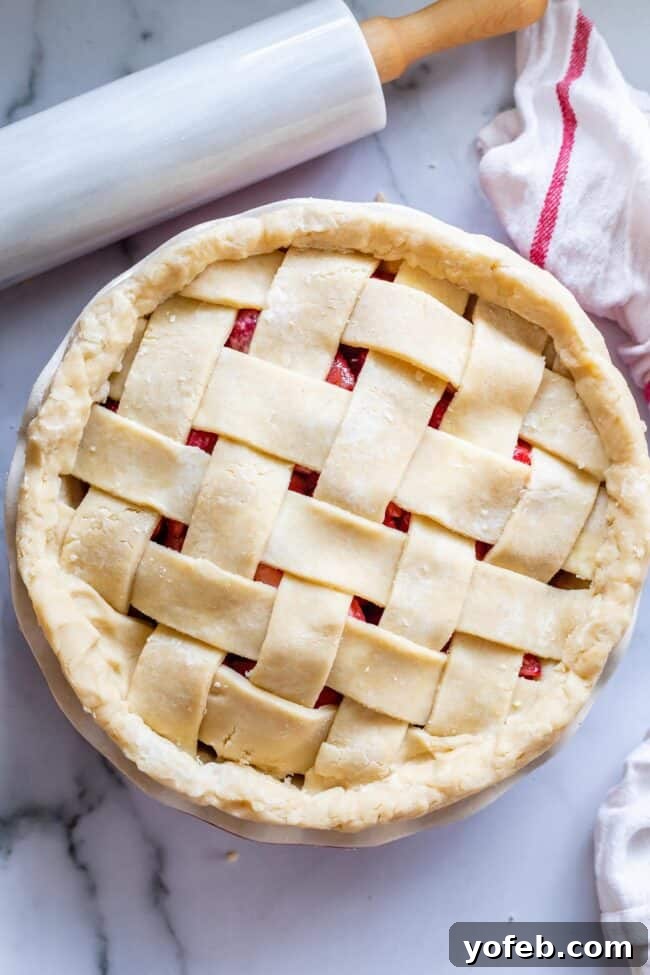
It’s easy to get caught up in the pursuit of perfection, especially when attempting a decorative technique like a lattice crust. But let me share a little secret: very few homemade pies are absolutely flawless, and that’s part of their charm. Here’s a photo of one of the first lattice crusts I made for this very guide.
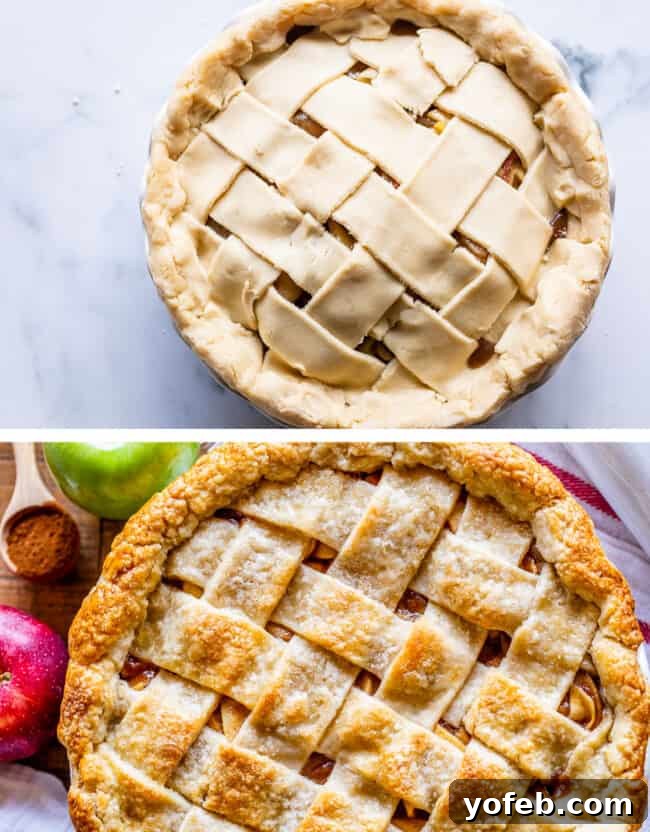
You might notice a tear here, a slightly uneven strip there. I remember feeling a bit frustrated when some of the strips kept tearing, but I learned quickly how to patch them up with a dab of ice water. The point is, even with minor imperfections, once baked, the pie still looked absolutely magnificent. The warmth of the oven melts away the minor irregularities, and the golden-brown finish disguises any small mishaps. So, if your dough tears, or your weave isn’t perfectly symmetrical, don’t despair. Patch it up, keep going, and remember that “done is better than perfect.” The sheer effort and artistry involved in a lattice crust will impress anyone you serve it to, regardless of a tiny flaw. Be proud of your accomplishment; you’ve created something truly special!
Essential Pie Crust Recipes & Related Guides:
- How to Make Flaky Pie Crust (Step by Step): This is your go-to guide for creating a tender, buttery, and easy-to-handle pie dough that’s perfect for any pie.
- How to Blind Bake a Pie Crust: Learn the simple technique for pre-baking your pie crust, a necessary step for many custard and cream pies, ensuring a perfectly crisp bottom every time.
Delicious Double Crust Pies to Make with a Latticed Top:
- Cranberry Custard Pie: A festive and flavorful choice, this pie is particularly wonderful during the holiday season, offering a delightful balance of tart and sweet.
- Rhubarb Custard Pie: Often hailed as a favorite, the unique tang of rhubarb paired with creamy custard creates an unforgettable dessert.
- Cranberry Cherry Pie: Combine the classic sweetness of cherries with the vibrant tartness of cranberries for a pie that truly sings.
- Apple Pie: A timeless classic, this is the definitive apple pie recipe, perfect for showcasing your lattice skills.
- Cherry Pie for 4th of July!: Celebrate summer with a burst of fresh cherry flavor, beautifully presented under a lattice crust.
- Blackberry Pie: A treasured family recipe, this blackberry pie brings back childhood memories with every bite.
- Baked Strawberry Pie: Featured in many of the photos throughout this guide, this vibrant pie boasts a coming-soon recipe that promises to be a new favorite.
- Blueberry Pie Recipe from Natasha’s Kitchen: A beloved berry pie with juicy blueberries.
- Four Berry Pie from FoodieCrush: A delightful medley of berries for an extra fruity experience.
Savor the Flavor: Lattice Savory Pies Too!
Lattice crusts aren’t just for sweet treats! They add an elegant touch to savory pies, turning them into impressive main courses or hearty sides. Here are some savory pie ideas that would benefit from your new lattice skills:
- Classic Double Crust Chicken Pot Pie: The ultimate comfort food, elevated with a beautiful lattice top.
- Roast Beef, Carrot, and Creamy Potato Pie: Imagine a delicious roast beef dinner, perfectly encased in a savory pie crust with an artistic lattice.
- Beef Pot Pie from Good Dinner Mom: A hearty and satisfying option for any meal.
How to Make a Lattice Pie Crust
Prep: 30 mins
Chill Time: 30 mins
Total: 1 hr
Servings: 1 latticed pie
Learn how to make a lattice pie crust with this easy step-by-step photo process! I show you EVERY step so you don’t get confused, from rolling out the dough to crimping the edges. Lattice pie crusts are so beautiful, and take your pie to the next level. Once you get the hang of it, it’s really pretty fun!
Ingredients
- 1 double pie crust (2 sheets of pie dough)
- Pie filling that is room temperature (even better if it’s cold or frozen)
- A lot of patience (highly recommended!)
- A fridge or freezer with space cleared out
- Ice water (to fix cracks)
- Flour (to help with rolling out)
Instructions
- Make sure to start with a chilled pie crust. It should have at least 30 minutes in the fridge before rolling it out. Let it sit at room temperature for a couple minutes to soften before rolling. For tons of details on how to make the best pie crust and roll it out successfully, check out my post for How to Make Flaky Pie Crust.
- Roll out your first pie crust into about a 13-inch circle and lay it in an ungreased 9-inch pie plate with the edges hanging over the edge. Stick your pie pan in the fridge or freezer if there is any time lag before the next step.
- Fill ‘er up. Fill your crust with COLD pie filling, mounding it in the middle. Your lattice is going to be so much easier to form if your filling is cold or frozen. (Room temperature filling at the very least.) A lattice is basically impossible to do with warm pie filling, because it will melt the butter in your crust and make it fall apart. Place your filled pie in the fridge or freezer if there is any time lag before the next step.
- Dust a work space with flour. I highly recommend rolling out the lattice on a pastry cloth or on parchment paper. That way it is easy to transfer the whole thing to the fridge or freezer if it gets warm and soft.
- Roll out your second pie crust into a circle that is about 10 inches across. You want this one to be rolled out thicker than the first one. First of all, you don’t need to worry about making it big enough to go up the sides of the pie plate (it’s just laying flat across the top) and second, thick strips are much easier to maneuver in a lattice situation than thin wimpy strips. Keep them sturdy; don’t roll out too thin.
- Cut into strips. Use a pizza cutter that you’ve rolled in flour to slice the pie dough into even strips. You can make the strips as wide or as thin as you want; if you are a beginner, you might want to make thick strips to simplify your life. I made my strips about 1 and 1/4 inches wide.
- Remember, if at ANY point your pie dough starts to get soft, stick the whole thing back in the fridge or freezer for a few minutes. I lift up my entire pastry cloth and transfer the whole thing to the freezer.
- Weave your lattice. Take every other strip of pie dough and lay it across your pie with a little space in between each one. See photos in the main article for visual guidance. Peel back every other strip that is on your pie, all the way to the edge.
- Lay an edge piece of dough perpendicular to the others, tucked up right against the edge. See photos! Replace the peeled back strips of dough to lay flat on top of the pie.
- Take the strips that are underneath, and peel them back. Lay down your next strip of dough. Replace the peeled back strips.
- Continue until the pie is completely weaved. I know this is hard to understand without a visual, so be sure to check the photos in the post! Remember, if at ANY point your pie dough becomes soft, toss all of it in the fridge or freezer. If you have a strip that tears, use a tiny bit of ice water to patch it with your fingers.
- Fold up the edges. You can trim any super long pieces of lattice that are hanging over the edge if you like, but I usually just leave them and incorporate them into the crust. For lattice pies, I like to fold the edges up and over onto themselves. It might look cracked and wimpy. That’s ok. Pretend it is play dough and just mold it back into a smooth edge.
- Crimp the edge. Use your fingers to crimp the edge of your pie crust. I like to use 3 fingers (many people use their knuckles) to make a curved edge. See photos!
- Refrigerate or freeze the whole pie to make sure that the pie dough goes into the oven completely cold. That’s what makes for a flaky crust!
- Don’t forget to brush the top of your pie with egg or milk (or a mixture of both, my favorite) and sprinkle with granulated or raw sugar before putting it in the oven. This will make your pie nice and brown.
- Halfway through your bake time, add a tin foil pie shield on the edges of your pie to protect the edges from burning. See my flaky pie crust post for all the details.
Nutrition
Serving: 1g | Calories: 2011kcal | Carbohydrates: 214g | Protein: 27g | Fat: 115g | Saturated Fat: 36g | Polyunsaturated Fat: 14g | Monounsaturated Fat: 54g | Potassium: 427mg | Fiber: 11g | Vitamin A: 4IU | Calcium: 84mg | Iron: 11mg
Metadata
Course: Dessert
Cuisine: American
Calories: 2011
Keyword: crust, how to make, lattice, pie, pie crust