
Your Ultimate Guide to a Stress-Free Holiday Feast: Irresistible Recipes & Tips
The holiday season is upon us, bringing with it the joyous opportunity to gather with loved ones and share in the delight of a perfectly prepared meal. Whether you’re hosting an elaborate Thanksgiving dinner, a festive Christmas celebration, or simply enjoying a cozy winter gathering, crafting a memorable menu can feel like a daunting task. But fear not! This comprehensive guide is designed to empower you with a collection of exceptional recipes, from delightful appetizers and essential side dishes to show-stopping main courses and decadent desserts. We’ll even share some essential tips and a few laughs from my own kitchen adventures to ensure your holiday feast is nothing short of spectacular. Get ready to impress your guests and create cherished culinary memories!
Preparing for a big holiday meal doesn’t have to be overwhelming. With a curated selection of tested and loved recipes, you can approach your kitchen with confidence. Each dish featured here is chosen for its incredible flavor, ease of preparation, and ability to complement a festive spread. Dive into these culinary gems and discover new favorites that will become staples in your holiday traditions for years to come.
Pimiento Cheese Ball
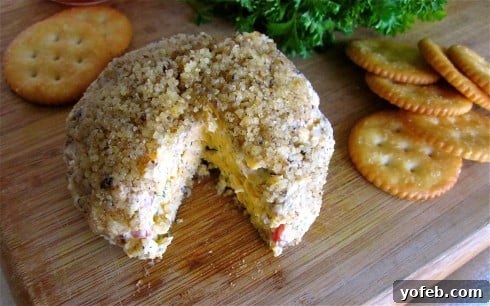
Kick off your feast with a crowd-pleasing classic: the Pimiento Cheese Ball. This creamy, savory appetizer is incredibly easy to prepare ahead of time, allowing you to focus on other dishes as your guests arrive. Its rich flavor and delightful texture make it an irresistible starter that will set a delicious tone for the entire meal. Serve it with crackers, celery sticks, or pita chips for a truly southern-inspired treat.
Chilled Pineapple Apple Cider
For a refreshing beverage that’s perfect for all ages, try this Chilled Pineapple Apple Cider. It’s a delightful blend of sweet and tangy, offering a vibrant counterpoint to the rich flavors of a holiday meal. Easy to mix and serve, this cider adds a touch of brightness to your table and keeps everyone hydrated and happy throughout the festivities.
Balsamic-Browned Butter Asparagus
Elevate a simple green vegetable into an exquisite side dish with Balsamic-Browned Butter Asparagus. The nutty notes of browned butter combined with the tang of balsamic vinegar transform fresh asparagus into an incredibly flavorful and elegant accompaniment. It’s a sophisticated yet straightforward dish that adds a vibrant green and a burst of flavor to your holiday plate.
Roasted Garlic Cauliflower
For a wholesome and incredibly tasty vegetable side, look no further than Roasted Garlic Cauliflower. Roasting brings out the natural sweetness of cauliflower, and the addition of garlic infuses it with a wonderfully aromatic flavor. This dish is not only delicious but also a lighter option that balances the richness of other holiday foods, making it a healthy and satisfying choice.
Big Fat Crescent Rolls
No holiday meal is complete without warm, fresh bread, and these Big Fat Crescent Rolls are truly something special. Soft, buttery, and utterly irresistible, they’re perfect for soaking up gravy or simply enjoying on their own. The aroma of freshly baked rolls filling your home will instantly create a comforting and welcoming atmosphere that embodies the spirit of the season.
Reesy Rolls (One Hour Yeast Rolls)
If time is of the essence, Reesy Rolls are your answer to homemade bread without the wait. These incredible one-hour yeast rolls are unbelievably quick to make, yet they deliver all the fluffiness and flavor you’d expect from a traditional recipe. They’re a fantastic option when you need warm bread in a pinch but refuse to compromise on quality and taste for your holiday spread.
The Best and Easiest Cranberry Sauce You’ll Ever Make!
Forget the canned stuff – once you try this Fresh Cranberry Orange Sauce, you’ll never go back. Its bright, zesty, and perfectly balanced sweet-tart flavor is an absolute game-changer for any holiday meal, especially with turkey. This sauce is remarkably simple to prepare, yet it adds a gourmet touch and a pop of vibrant color that will truly elevate your plate. A must-have!
Mashed Potatoes
Mashed Potatoes are the quintessential comfort food and an indispensable part of any holiday feast. This recipe delivers incredibly creamy, fluffy, and flavorful mashed potatoes that serve as the perfect canvas for gravy. Simple ingredients, expert technique – that’s the secret to creating a side dish that everyone eagerly anticipates and always comes back for seconds.
Parmesan Potato Gratin
For a more decadent potato option, the Parmesan Potato Gratin is a showstopper. Layers of thinly sliced potatoes baked in a rich, cheesy cream sauce until golden and bubbly, this dish is pure indulgence. It offers a wonderful textural contrast and deep, savory flavors that make it a truly memorable addition to your holiday spread, perfect for impressing guests.
Double Layer Pumpkin Cheesecake
When it comes to holiday desserts, why choose between pumpkin pie and cheesecake when you can have both? This Double Layer Pumpkin Cheesecake offers the best of both worlds – a creamy, spiced pumpkin layer atop a rich, tangy cheesecake. It’s an absolutely stunning and incredibly delicious dessert that will undoubtedly become the star of your dessert table.
Blackberry Pie
For a taste of timeless comfort, a classic Blackberry Pie is simply unbeatable. Bursting with juicy, sweet-tart blackberries encased in a flaky, buttery crust, this pie is a celebration of seasonal flavors. It’s a comforting and elegant dessert that evokes warmth and tradition, perfect for ending any festive meal on a high note, especially when served with a scoop of vanilla ice cream.
Chocolate Honey Chiffon Pie
For something a little different and incredibly light, the Chocolate Honey Chiffon Pie is a fantastic choice. This pie features a delicate, airy chocolate filling with subtle notes of honey, all nestled in a crisp crust. It’s a sophisticated dessert that feels indulgent without being overly heavy, providing a perfect sweet ending that won’t leave your guests feeling too full.
And now, for the grand finale, the centerpiece of your holiday table…
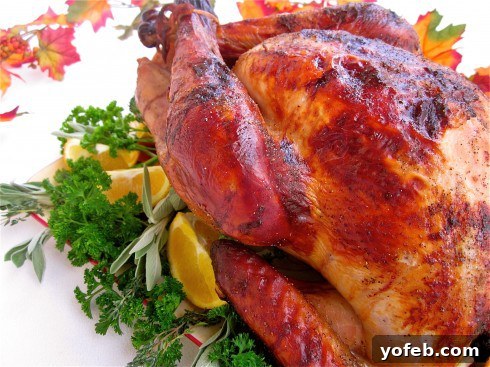
Here she is! My first-ever turkey, beautifully roasted and ready for carving! Specifically, an Apple-Cider Brined Turkey, and let me tell you, it is absolutely divine. You might expect the apple cider to make it sweet, but quite the opposite – it simply infuses the meat with an incredible depth of flavor and ensures it stays incredibly moist and tender. This recipe is a game-changer for achieving a perfectly roasted bird, even if you’re a novice like I was during my inaugural attempt.
My first turkey cooking experience was, shall we say, memorable. We won’t talk about the fact that I initially confused the neck with the giblets and consequently discovered the entire bag of them *after* I had already carved a significant portion of the cooked turkey! Or the less-than-graceful moment when I attempted to flip the hot, heavy bird with flimsy tongs, resulting in a rather significant tear in the delicate breast skin. (Seriously, don’t try that maneuver with tongs; it simply doesn’t work!) These minor mishaps only add to the rich tapestry of holiday cooking stories we all accumulate.
And then there was the thermometer saga. My trusty probe thermometer decided to call it quits that day, leading me to pull my “finished” turkey from the oven, only for a friend to arrive 10 minutes later with a working thermometer, revealing the turkey was a mere 135˚F – completely raw in the middle! After some rather tense turkey moments, I turned to Eric and asked, “I am probably the worst person in the world to cook with, huh?” to which he, with perfect comedic timing, responded, “Definitely not. I haven’t cooked with everyone in the world.” Such are the joys and challenges of cooking a holiday meal for the first time. But despite the comedy of errors, the turkey turned out absolutely delicious, proving that even with a few bumps, you can achieve a fantastic result!
Apple-Cider Brined Turkey with Savory Herb Gravy
Brining is a fantastic technique that infuses your turkey with moisture and flavor, guaranteeing a succulent and tender bird every time. This apple cider brine adds a subtle fruitiness and incredible savory notes without making the turkey sweet. Paired with a rich, homemade herb gravy, this turkey will be the star of your holiday table.
Source: Cooking Light
Brine Ingredients:
8 cups apple cider
2/3 cup kosher salt
2/3 cup granulated sugar
1 tablespoon black peppercorns, coarsely crushed
1 tablespoon whole allspice, coarsely crushed (or 1 tablespoon pre-ground allspice for convenience)
8 (1/8-inch-thick) slices peeled fresh ginger
6 whole cloves
2 bay leaves
Turkey & Roasting Ingredients:
1 (12-pound) fresh or frozen turkey, thawed
2 oranges, quartered
6 cups ice (approximately)
Remaining Ingredients for Roasting & Gravy Prep:
4 garlic cloves
4 fresh sage leaves
4 fresh thyme sprigs
4 fresh parsley sprigs
1 onion, quartered
1 to 2 (14-ounce) cans chicken broth (fat-free works excellently)
2 tablespoons unsalted butter, melted and divided
1 teaspoon freshly ground black pepper, divided
1/2 teaspoon salt, divided
Essential Equipment & Pro Tips:
You will need kitchen twine, several twist ties or extra twine, 2 turkey-size oven bags, a reliable oven thermometer, and a sturdy roasting pan with a rack. If you don’t have a roasting pan or enough storage space for one, a disposable aluminum pan works wonderfully. For a roasting rack alternative, use this clever trick: crumple several 12-inch squares of aluminum foil into balls and arrange them at the bottom of your pan to elevate the turkey. This prevents the bottom of the bird from becoming soggy in the drippings. One more crucial tip: Step 1 of the gravy recipe (preparing the turkey stock) can, and ideally *should*, be completed ahead of time. Do this concurrently with preparing your brine the day before you plan to cook the turkey. Your future self will be incredibly grateful for the reduced stress on cooking day!
Instructions:
1. Prepare the Brine: In a large saucepan, combine the first 8 brine ingredients (apple cider through bay leaves). Bring the mixture to a rolling boil over medium-high heat, stirring occasionally. Cook for about 5 minutes, or until both the sugar and salt are completely dissolved. It’s imperative that the brine cools completely to room temperature before adding the turkey. You can speed this process by placing the saucepan in an ice bath.
2. Prepare the Turkey for Brining: Carefully remove the giblets and neck from the turkey’s cavities. Ensure you reserve these for the Savory Herb Gravy; they are essential for building flavor. Rinse the turkey thoroughly with cold water, then pat it completely dry with paper towels to ensure the brine adheres properly. Trim any excess fat. Loosely stuff the body cavity with the orange quarters.
To brine, place one turkey-sized oven bag inside a second bag, creating a double layer for extra security against leaks. Carefully place these bags into a large stockpot or a clean, sturdy bucket. Gently place the prepared turkey inside the inner bag. Pour the cooled cider brine mixture over the turkey, then add the ice. (Don’t worry if you can’t fit exactly 6 cups of ice; a good amount is sufficient for chilling.) Secure the bags tightly with several twist ties or kitchen twine, ensuring no air can escape. Refrigerate for 12 to 24 hours, turning the turkey occasionally to ensure even brining.
Important Reminder: This is an excellent moment to complete Step 1 of the Savory Herb Gravy recipe (making the giblet stock) if you haven’t already. It’s a fantastic time-saver!
3. Preheat Oven: When you are ready to roast your turkey the following day, preheat your oven to a high temperature of 500ºF (260ºC).
4. Prepare Turkey for Roasting: Remove the turkey from the brining bags, discarding the brine, orange quarters, and bags. Rinse the turkey thoroughly inside and out with cold water to remove any excess salt from the brine. Pat the turkey completely dry with paper towels; a dry skin is key to crispy results. With the turkey breast side up, lift the wing tips up and over the back, then tuck them securely under the turkey’s body. (If this instruction is confusing, this video tutorial offers a great visual guide.) Tie the legs together securely with kitchen string. Place the garlic cloves, sage leaves, thyme sprigs, parsley sprigs, and quartered onion along with one can of chicken broth in the bottom of your roasting pan.
Place your roasting rack (or arrange your aluminum foil balls) in the pan. Position the turkey, breast side down, on the roasting rack. Brush the turkey’s back with 1 tablespoon of melted butter, then sprinkle evenly with 1/2 teaspoon of black pepper and 1/4 teaspoon of salt. Transfer the turkey to the preheated 500ºF oven and bake for 30 minutes. This initial high heat will help create a beautiful, golden-brown skin on the top side of the turkey.
5. Reduce Oven Temperature: After 30 minutes, carefully reduce the oven temperature to 350ºF (175ºC).
6. Flip and Season Turkey: Remove the turkey from the oven. Using sturdy oven mitts (tongs are generally insufficient and can tear the skin, as I learned!), carefully turn the turkey over so it is now breast side up. Brush the turkey breast with the remaining 1 tablespoon of melted butter, and sprinkle with the remaining 1/2 teaspoon of black pepper and 1/4 teaspoon of salt. Check the liquid level in the bottom of the pan; you want to ensure there’s enough liquid to prevent scorching and to create flavorful drippings for your gravy. I found adding an additional half can of chicken broth at this point to be very beneficial.
7. Continue Roasting & Rest: Return the turkey to the 350ºF oven and continue to bake for approximately 1 hour and 15 minutes, or until a reliable meat thermometer inserted into the thickest part of the thigh (making sure not to touch the bone) registers 170ºF (77ºC). If the turkey begins to brown too quickly, loosely tent it with aluminum foil to prevent over-browning. Once cooked, remove the turkey from the oven, transfer it to a carving board, and tent it loosely with foil. Let it rest for at least 20 minutes before carving. This resting period is crucial as it allows the juices to redistribute throughout the meat, ensuring a more tender and moist turkey. Crucially, reserve all pan drippings for the Savory Herb Gravy. Serve your perfectly roasted turkey alongside the rich homemade gravy. (If you’ve never carved a turkey before, Alton Brown offers an excellent video tutorial that breaks down the process.)
Savory Herb Gravy
Nothing complements a perfectly roasted turkey like a homemade, flavorful gravy. This recipe utilizes the reserved giblets and pan drippings to create a rich, herb-infused gravy that truly ties your holiday meal together. It’s the perfect finishing touch!
Source: Cooking Light
Ingredients for Giblet Stock:
2 teaspoons vegetable oil
Reserved turkey neck and giblets
4 cups water
6 black peppercorns
4 parsley sprigs
2 thyme sprigs
1 yellow onion, unpeeled and quartered
1 carrot, cut into 2-inch pieces
1 celery stalk, cut into 2-inch pieces
1 bay leaf
Ingredients for Gravy:
Reserved turkey drippings
3 tablespoons all-purpose flour
1/2 teaspoon salt
1/4 teaspoon freshly ground black pepper
Cornstarch, for optional thickening
Instructions:
1. Prepare Giblet Stock (Can be done ahead): Heat the vegetable oil in a large saucepan over medium-high heat. Add the reserved turkey neck and giblets (excluding the liver, which can make the gravy bitter); cook for about 5 minutes, browning them on all sides to develop deep flavor. Add the water and the next 7 ingredients (peppercorns through bay leaf) to the saucepan. Bring the mixture to a boil, then reduce the heat to low, cover, and simmer gently until the liquid has reduced to approximately 2 1/2 cups (this usually takes about 1 hour). Strain the cooking liquid through a fine-mesh colander into a bowl, reserving both the liquid and the turkey neck. Discard all remaining solids. Chill the cooking liquid completely in the refrigerator. Once chilled, skim any fat that has solidified on the surface and discard it. Carefully remove the meat from the turkey neck bone, finely chop the meat, and add it back to the skimmed cooking liquid. This rich stock forms the flavorful base of your gravy.
2. Prepare Turkey Drippings: After your turkey has finished cooking and rested, carefully strain the reserved turkey pan drippings through a fine-mesh colander into a shallow bowl, discarding any solids. To separate the fat, place the strained drippings in the freezer for about 20 minutes. This will cause the fat to rise to the top and solidify, making it easy to skim off and discard. You want to use the flavorful liquid below the fat for your gravy.
3. Make the Gravy: In a medium saucepan, place the all-purpose flour. Gradually whisk in 1/4 cup of the prepared giblet cooking liquid until you have a smooth paste (a roux). This prevents lumps. Slowly add the remaining giblet cooking liquid, the skimmed turkey drippings, 1/2 teaspoon of salt, and 1/4 teaspoon of freshly ground black pepper. Bring the mixture to a boil over medium-high heat, whisking frequently. Reduce the heat and simmer for about 5 minutes, or until the gravy begins to slightly thicken. This recipe tends to produce a thinner gravy, which many prefer. However, if you desire a thicker consistency, you can easily adjust it: in a small separate bowl, whisk together 1 teaspoon of cornstarch with a few tablespoons of your hot gravy until smooth. Return this mixture to the gravy pot, bring it back to a boil, and simmer until it reaches your desired thickness. Add more cornstarch slurry as needed, always whisking well and bringing to a boil to activate the thickening properties. Serve immediately and enjoy the fruits of your labor!
Congratulations on mastering your holiday feast! With these recipes and tips, you’re well-equipped to host a truly unforgettable meal that will delight your family and friends. From my kitchen to yours, happy cooking and happy holidays!