
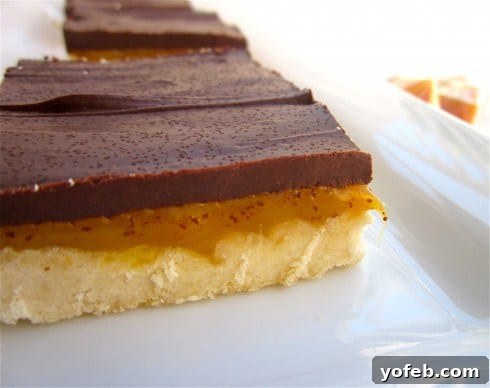
There are few confections that can truly captivate the taste buds and evoke a sense of pure delight quite like a Twix bar. For many, myself included, it represents the epitome of a perfect candy experience: a delightful trifecta of crisp shortbread cookie, luscious caramel, and rich chocolate. It’s a symphony of textures and flavors that consistently outshines its counterparts in the vast world of candy. While my appreciation for its nuanced layers has deepened over time, my childhood approach to candy was, admittedly, far more pragmatic and quantity-driven.
Unlocking Sweet Nostalgia: The Ultimate Homemade Twix Bar Recipe
My younger self, driven by an insatiable desire for prolonged sugary satisfaction, often bypassed the comparatively smaller Twix in favor of an overflowing bag of Skittles. The logic was simple: more pieces meant more time spent savoring. I’d meticulously sort them by color, often saving the coveted red ones for a grand finale, stretching a single bag across several days. This wasn’t just about enjoying candy; it was about mastering the art of delayed gratification, making every sweet morsel count. This peculiar hoarding tendency extended beyond colorful fruit chews, shaping many of my early confectionery encounters.
The Irresistible Appeal of Twix: A Childhood Reflection
I recall one particular Halloween, a true triumph of trick-or-treating, where I secured a pristine Reese’s Peanut Butter Cup amidst my diverse bounty. It was a prize of immense value, a treasure to be savored slowly, far too precious for immediate consumption. With the strategic cunning of a seasoned squirrel, I stashed it atop the refrigerator, out of sight and, I hoped, out of mind. My plan was to unveil this personal present on Christmas morning, a perfectly timed treat to complement the festive cheer. Two months of patient waiting culminated in eager anticipation on that fateful Christmas morn, only for my hopes to be dashed. My brother, a stealthy predator of all things sweet, had discovered and devoured my cherished Reese’s just hours before my planned unveiling. The sting of that betrayal, a lesson in the transient nature of hidden treats, resonated deeply.
These childhood episodes, marked by both strategic candy consumption and heartbreaking loss, perfectly illustrate the deep emotional connection we form with our favorite sweets. It’s not merely about the taste; it’s about the anticipation, the joy, and sometimes, the learned lesson of sharing (or not sharing!). These experiences eventually led me back to my true candy love: Twix. The store-bought “fun size” bars, however, always left me wanting more. This longing, combined with a desire to recreate that perfect balance of textures and flavors, is precisely what makes crafting homemade Twix bars such a rewarding endeavor.
More Than Just Candy: Lessons from a Sweet-Toothed Childhood
Creating your own batch of these iconic candy bars means you can bypass the limitations of pre-packaged treats. No more agonizing over fun-size portions; you can indulge in generous, satisfyingly robust bars that truly last. Beyond the sheer size advantage, making Twix at home offers a level of freshness and customization that simply can’t be matched by commercial versions. It’s an opportunity to dive into the nostalgia, to savor each layer, and to perhaps even avoid the heartbreak of a pilfered treat by having an abundance to go around.
Why Go Homemade? The Art of Crafting Your Own Twix
The beauty of homemade Twix bars lies not only in their superior taste and generous size but also in the pure satisfaction of creating a beloved treat from scratch. You control the quality of ingredients, ensuring a fresher, more wholesome dessert. Plus, there’s an undeniable charm in presenting a platter of these golden, caramel-laden, chocolate-topped masterpieces to friends and family. They truly are awesome, and unequivocally last longer than any fun-sized version you’d find in a store!
The Ultimate Homemade Twix Bar Recipe: A Step-by-Step Guide
Embark on a culinary adventure to replicate the magic of Twix in your own kitchen. This recipe delivers that iconic shortbread crunch, the gooey, rich caramel, and a decadent chocolate coating that will transport you straight back to your happiest candy memories. Prepare for compliments and requests for this recipe!
Source: High Heels & Grills
Ingredients for Homemade Twix Perfection:
- 1 cup salted butter, softened
- 1 cup powdered sugar
- 2 teaspoons pure vanilla extract
- 2 cups all-purpose flour
- 2-1/2 cups soft, chewy caramels, cut into small chunks (vanilla or plain work best)
- 3 tablespoons heavy cream
- 3 cups good quality chocolate chips (semi-sweet or milk chocolate, depending on your preference)
- 1 tablespoon vegetable shortening (optional, for a smoother chocolate finish)
Crafting the Perfect Shortbread Crust:
The foundation of an authentic Twix bar is its buttery, crumbly shortbread crust. Achieving the right texture is crucial for that signature snap.
Preheat your oven to a precise 300 degrees Fahrenheit (150 degrees Celsius). Prepare a 9×13 inch baking pan by lightly coating it with cooking spray, or, for easier removal, line it with parchment paper, allowing an overhang on the longer sides. This parchment “sling” will be your best friend later. Set the prepared pan aside. In a medium-sized mixing bowl, combine the softened salted butter, powdered sugar, and vanilla extract. Beat these ingredients together with an electric mixer until the mixture is light, fluffy, and well combined. Gradually add the all-purpose flour to the butter mixture. At first, the dough might appear dry and crumbly, but continue mixing until it comes together to form a soft, cohesive dough. Once the dough is ready, transfer it to your prepared baking pan. Using lightly floured fingertips or the bottom of a glass, press the dough evenly and firmly into the bottom of the pan, ensuring it reaches all edges. This evenness is key for uniform baking. After pressing, take a fork and prick the entire surface of the crust multiple times. This vital step creates small vents, allowing steam to escape during baking and preventing the crust from puffing up unevenly, ensuring a perfectly flat and crisp base. Bake in the preheated oven for approximately 30-35 minutes, or until the edges are a delicate golden brown and the center appears set. Immediately upon removing the pan from the oven, run a thin knife around the edges of the crust to loosen it from the pan. This prevents it from sticking as it cools and shrinks slightly. Allow the crust to cool completely in the pan on a wire rack before proceeding to the next step. A thoroughly cooled crust is essential for a clean separation between layers.
The Golden Caramel Layer:
The heart of a Twix bar is its rich, chewy caramel. This layer provides a delightful contrast to the crisp shortbread and smooth chocolate.
For the luscious caramel layer, combine the cut caramel chunks and heavy cream in a small saucepan. Place the saucepan over low heat, stirring constantly, until the caramels are completely melted and the mixture transforms into a smooth, thick, and uniform sauce. Exercise patience and keep the heat low to prevent the caramel from scorching or becoming grainy. Alternatively, you can melt the caramels and cream in a microwave-safe bowl, heating in 30-second intervals and stirring thoroughly after each interval until completely smooth. Once melted and perfectly smooth, immediately pour the warm caramel mixture evenly over the completely cooled shortbread crust. Use an offset spatula or the back of a spoon to gently spread the caramel across the entire surface, ensuring an even layer. Once spread, transfer the pan to the refrigerator for at least 30 minutes, or until the caramel layer has firmed up sufficiently to hold its shape. This chilling step is crucial for preventing the chocolate from mixing with the caramel and for achieving clean layers.
The Decadent Chocolate Topping:
The final touch is a generous layer of chocolate, providing that satisfying snap and sweet finish.
Now for the crowning glory: the chocolate layer. In a microwave-safe bowl, melt the chocolate chips in the microwave. Heat them in short bursts, typically 20-30 seconds at a time, stirring diligently after each interval, until the chocolate is smooth and melted. Be extremely careful not to overheat the chocolate, as it can seize and become unusable. If, after melting, the chocolate appears too thick to pour and spread easily, incorporate the optional tablespoon of vegetable shortening. Stir it into the melted chocolate until it’s fully dissolved and the chocolate has reached a pourable, glossy consistency. While adding shortening makes the chocolate easier to work with, it’s worth noting that it will result in a slightly softer chocolate layer once set, which can make for cleaner cutting later. Pour the melted chocolate evenly over the chilled caramel layer. Working quickly, use an offset spatula or the back of a spoon to spread the chocolate across the entire surface, ensuring complete coverage. Once the chocolate is evenly spread, return the pan to the refrigerator or freezer. Chill the bars until the chocolate layer is completely set and firm to the touch. This typically takes about 30 minutes to an hour in the refrigerator, or less time in the freezer.
Serving Your Homemade Masterpiece:
The moment of truth – slicing and enjoying your perfectly crafted homemade Twix bars.
Once all layers are thoroughly chilled and set, carefully lift the entire slab of Twix bars out of the pan using the parchment paper overhangs. Place the large rectangle onto a clean cutting board. To achieve neat, professional-looking cuts, use a sharp knife that has been warmed under hot running water and then thoroughly dried. Slice the slab into individual bars, aiming for the classic rectangular Twix shape or any size you prefer. For the cleanest possible cuts, wipe your knife clean after each slice. Store your delectable homemade Twix bars in an airtight container at room temperature for up to a week, or if you prefer them firmer, in the refrigerator for extended freshness. These bars are truly perfect for sharing, gifting, or simply savoring as a luxurious treat to yourself. Prepare to be delighted by every single bite!
Tips for Twix Bar Perfection
To ensure your homemade Twix bars are nothing short of spectacular, keep these expert tips in mind:
- Quality Ingredients Matter: The flavor profile of your bars will directly reflect the quality of your ingredients. Opt for good salted butter, chewy caramels (not hard ones), and your favorite brand of chocolate chips.
- Patience is Key: Rushing the cooling process between layers is the most common mistake. Allow each layer—especially the crust and caramel—to chill and set completely before adding the next. This prevents layers from merging and ensures distinct, appealing textures.
- Don’t Rush the Cooling: A well-chilled chocolate layer is not just for enjoyment; it’s crucial for achieving clean, professional-looking cuts. If the chocolate is too soft, your knife will drag, creating messy edges.
- Warm Knife for Cutting: For crisp, even edges on your chocolate, use a knife that has been warmed under hot water and then thoroughly dried. The warm blade will cut through the chocolate more smoothly.
- Customization is Fun: Feel free to experiment! Try different chocolate types (dark chocolate for a richer flavor), a sprinkle of flaky sea salt on the caramel layer before the chocolate sets, or even a different flavored extract in the shortbread crust.
Beyond the Bar: Creative Twix Variations
While the classic Twix combination is unbeatable, don’t hesitate to personalize your homemade creations with these delicious variations:
- Dark Chocolate Delight: For those who appreciate a deeper, less sweet flavor profile, swap out semi-sweet chocolate chips for a good quality dark chocolate (60-70% cacao). The slight bitterness perfectly complements the sweet caramel.
- Sea Salt Caramel Twix: Elevate your caramel layer with a sophisticated sprinkle of flaky sea salt just before pouring the chocolate. The contrast of sweet and salty is truly irresistible.
- Nutty Twix: Introduce a delightful crunch by incorporating finely chopped roasted nuts, such as pecans, almonds, or walnuts, into the shortbread crust. This adds an extra layer of texture and flavor complexity.
- Espresso Infusion: For coffee lovers, add a teaspoon of instant espresso powder to your melted chocolate layer. The subtle coffee note beautifully enhances the chocolate and caramel.
- White Chocolate Dream: Consider a layer of melted white chocolate for a different visual and flavor experience. You could even swirl in some food coloring or sprinkles for a festive twist.
The Joy of Homemade Sweet Treats
In a world bustling with convenient, store-bought options, there remains an unparalleled joy and immense satisfaction in crafting something truly delicious with your own hands. These homemade Twix bars are more than just a dessert; they are a testament to the simple pleasures of baking, a delightful journey down memory lane, and a celebration of sharing a labor of love. Whether you’re preparing them for a special gathering, a quiet afternoon treat, or simply to satisfy a nostalgic craving, this recipe promises a rewarding experience and an unforgettable taste. So, gather your ingredients, clear your schedule, and prepare to embark on a sweet adventure that culminates in the creation of your very own batch of Twix bar perfection. Enjoy every single, magnificent bite!