
We all have those days, don’t we? Days when the refrigerator seems to echo emptiness and the pantry offers little inspiration. What do you reach for when culinary creativity feels miles away? For many, it’s a desperate scramble for convenience, often leading to choices that might not be the healthiest. Or, if you’re like me, a sudden burst of energy might ignite for baking – a process that feels more like a creative escape than a chore, even when the idea of preparing a full meal is utterly daunting. It’s a curious paradox of the kitchen, this selective energy.
Just last week, after a marathon day of deep cleaning our home in preparation for Eric’s birthday – a clean house being my preferred gift to him – I found myself utterly depleted. The thought of cooking a proper dinner was simply too much. Ladies, if you’re looking for an advanced lesson in “Lazy Housewife 101,” it’s this: gradually reduce your household chore schedule until you only tackle major cleaning when guests are imminent, or for significant events like birthdays and holidays. You’ll be astonished at how little your partner notices the difference, and how much energy you save for things that truly matter, like celebrating or, perhaps, making an unexpectedly delicious quesadilla.
So, after all that scrubbing, wiping, and vacuuming, we were left to scrounge for dinner. Eric, bless his heart, concocted a rather dubious meal: a medley of leftover noodles, ancient tomato paste (which had seen several months in the freezer and a few weeks thawing in the fridge – I was moments from discarding it), a sprinkle of parmesan, and a generous dash of Italian seasoning. The visual was, to put it mildly, unappetizing. It’s a testament to his resilience, and perhaps my improving cooking skills, that he’s made it this far without having to rely solely on his own culinary inventions anymore.
My own “tired day” dinner was, thankfully, far more appealing. I quickly sautéed some thinly sliced zucchini, then folded it into a warm quesadilla filled with creamy Swiss and mozzarella cheeses. It was surprisingly satisfying. And yes, I dipped it in mustard. Please don’t judge; it created an unexpectedly delightful tang that cut through the richness of the cheese. Sometimes the most unconventional pairings yield the most delicious results!
Discovering the Delight of Homemade Kiwi Lime Jam
But enough about our tired-day dinners. Let’s talk about something truly exciting, something that captures the essence of vibrant, fresh flavor: **Kiwi Lime Jam**. Have you ever considered this magnificent combination? When I first encountered the idea, it struck me as utterly brilliant, leaving me wondering why I hadn’t thought of such a glorious pairing myself! This is precisely why the world of food is so endlessly fascinating and rewarding. There’s an infinite universe of new flavor combinations waiting to be discovered, experimented with, and savored.
The inspiration for this particular masterpiece came from my wonderfully witty friend, Ami, who had shared this recipe on her blog, “bunkers down,” some time ago. When a generous bounty of fresh kiwi arrived in our weekly co-op share, it felt like a clear sign from the produce gods. The universe, it seemed, was gently nudging me towards this tropical adventure, confirming that it was the perfect moment to create a batch of this unique, zesty jam. Making jam at home isn’t just about preserving fruit; it’s about capturing a moment of freshness, creating something truly special without artificial additives, and enjoying the pure, intense flavor that only homemade can deliver.
The Truth About Kiwi Seeds: A Gentle Surprise
Upon first glance, the tiny black seeds scattered throughout the kiwi might appear a bit formidable, perhaps even off-putting to those accustomed to perfectly smooth jams. However, let me assure you, their appearance is deceiving. Unlike raspberry seeds, which possess an almost indestructible quality and a notorious habit of embedding themselves firmly in one’s teeth – a truly odious experience, despite how delicious raspberries are – kiwi seeds are remarkably docile. They are soft enough that you barely notice them, easily crushed and blending seamlessly into the jam’s overall texture. This makes them a pleasant contrast to other seedy fruits, ensuring a smooth and enjoyable eating experience without any dental annoyances.
Endless Possibilities: Creative Ways to Enjoy Your Kiwi Lime Jam
Once you’ve made a batch of this tropical **Kiwi Lime Jam**, you’ll quickly realize its incredible versatility. While simple biscuits are a classic pairing, your imagination is the only limit to the amazing things you can do with it:
- Tropical PB&J: Elevate your classic peanut butter and jelly sandwich with a bright, tangy twist. The kiwi lime provides a refreshing counterpoint to rich peanut butter.
- Oatmeal Enhancer: Stir a spoonful or two into your morning oatmeal or yogurt parfait for a burst of fresh flavor and natural sweetness.
- Cupcake Filling: Pipe this luscious jam into the center of vanilla or coconut cupcakes for a delightful surprise.
- Cream Cheese Toast Spread: Mix it with softened cream cheese for a uniquely flavorful spread on toast, bagels, or crackers. It’s an elegant and simple appetizer.
- Dessert Topping: Drizzle it over ice cream, cheesecake, or panna cotta for an instant upgrade.
- Savory Pairings: Believe it or not, the tartness of kiwi lime jam can be a fantastic glaze for roasted chicken or pork, adding an unexpected tropical note.
- Cocktail Mixer: A small amount stirred into a gin fizz or a margarita can add a wonderfully fresh and exotic dimension.
- Straight from the Spoon: And yes, for those moments of pure indulgence, simply grab a spoon and enjoy! It’s that good.
Today, as I reflect on these delightful culinary explorations, I find myself listening to the wonderfully introspective “Do you Realize??” by The Flaming Lips. It’s a perfect soundtrack for moments of simple joy and creative contemplation in the kitchen.
Kiwi Lime Jam: The Easy No-Cook Recipe
This fantastic **Kiwi Lime Jam** recipe comes courtesy of my friend Ami over at bunkers down, and it’s a brilliant, straightforward approach to homemade preserves that even beginners can master. The beauty of this recipe lies in its simplicity and the incredible burst of fresh flavor it delivers. It’s a wonderful way to capture the essence of summer and enjoy it year-round.
Ingredients:
- 8 or 9 ripe kiwi (yielding approximately 2 cups mashed fruit)
- 4 cups granulated sugar
- 2 teaspoons fresh lime zest (feel free to add a bit more for extra zing!)
- 1/2 cup fresh lime juice (from about 3-4 limes)
- 1/2 cup water
- 1 (1.75 oz) package powdered fruit pectin (e.g., Sure-Jell, Certo)
Instructions:
1. Preparing the Kiwi: Peel and Mash
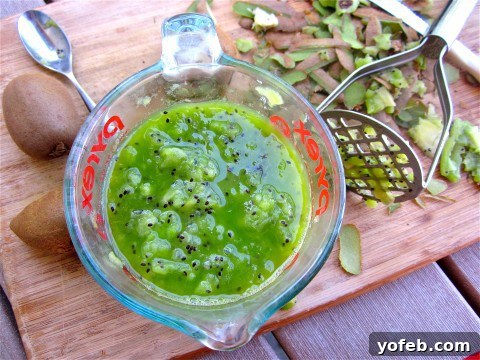
Begin by peeling your kiwi. Ami wisely notes, “Yes, peeling kiwis is a loathsome task that we all hate. But persevere, this jam is totally worth it.” She’s absolutely right. While some might attempt to cut them in half and scoop out the flesh, I’ve found that carefully peeling them with a sharp paring knife, or even using a spoon to scoop the flesh out of halved kiwi, makes the process less arduous. Once peeled, mash the kiwi in a large bowl. For a smoother, quicker mash, I often use my Kitchenaid mixer with the paddle attachment. Just be sure to use a splash guard or a kitchen towel draped over the top; I’ve definitely experienced rogue kiwis making a break for the wall during this process! Finish up with a hand masher to achieve your desired consistency – some chunks are perfectly fine and add lovely texture.
2. Infusing Flavor: Sugar and Zest
Once the kiwi is mashed, add the granulated sugar and lime zest directly to the fruit mixture. Stir everything together thoroughly. Allow this fruit mixture to stand for about ten minutes. This resting period is crucial as it allows the sugar to begin drawing out the natural juices from the kiwi, intensifying the flavor and helping the sugar dissolve more easily later on.
3. Activating the Pectin: The Boiling Phase
While your kiwi mixture rests, combine the water and fresh lime juice in a large, heavy-bottomed saucepan. Stir in the powdered fruit pectin until it is completely dissolved. Place the saucepan over high heat and bring the mixture to a rapid, rolling boil. Continue boiling hard for precisely one minute, stirring constantly to prevent scorching and ensure the pectin fully activates. This step is vital for achieving the proper set in your jam.
4. Combining and Cooling: The Final Steps
Carefully add the prepared kiwi and sugar mixture to the boiling pectin mixture in the saucepan. Stir continuously for about three minutes, or until you are certain that all the sugar has fully dissolved. This is a no-cook jam method, so you’re not boiling the fruit for an extended period, which helps preserve its fresh flavor and vibrant color. Remove the saucepan from the heat and allow the jam to cool for fifteen minutes before proceeding to storage.
5. Storing Your Homemade Kiwi Lime Jam
After cooling, carefully pour the fresh kiwi lime jam into clean, freezer-safe containers. Remember to leave about 1/2 inch of headspace at the top of each container to allow for expansion if you plan to freeze it. Let the filled containers stand at room temperature for 24 hours. This allows the jam to fully set and achieve its perfect consistency. Once set, your delightful **Kiwi Lime Jam** can be stored in the refrigerator for up to three weeks, or it can be frozen for up to a year, ensuring you have a taste of tropical sunshine whenever you desire. This recipe makes approximately five cups of jam, perfect for sharing or stocking up your pantry.