
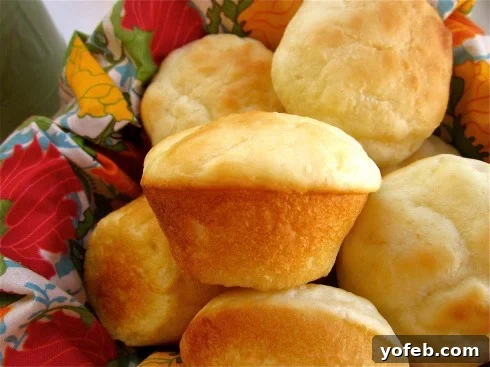
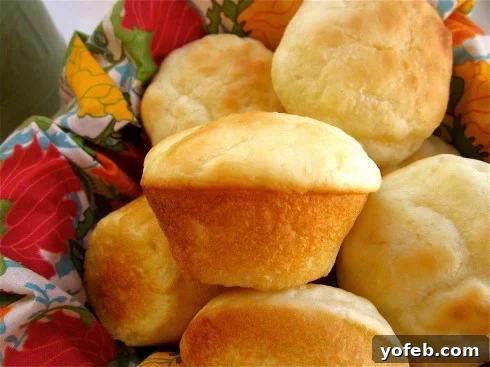
Welcome to your new favorite recipe: incredibly easy dinner rolls that require absolutely no kneading! Perfect for beginners and busy home bakers, these delightful yeast rolls can be made from start to finish in just over an hour, delivering light, fluffy, and utterly delicious results every time.
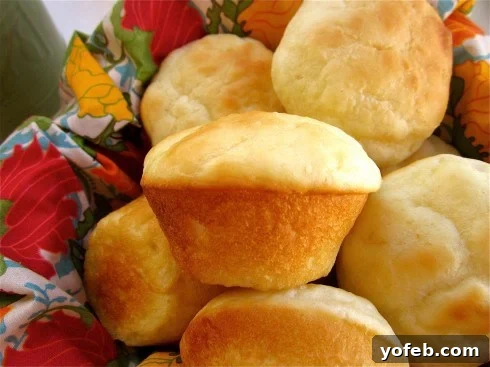
Table of Contents
- Why You’ll Love These Super Easy Dinner Rolls
- Essential Ingredients for Easy Dinner Rolls
- Step-by-Step Guide to Making No-Knead Yeast Rolls
- Creative Substitutions and Flavor Variations
- Best Ways to Serve Your Homemade Rolls
- Storing and Reheating Your Quick Yeast Rolls
- Easy Yeast Roll Recipe FAQs
- Easy Yeast Rolls Recipe Card
- More Irresistible Roll Recipes to Explore
There’s something incredibly comforting and satisfying about a basket of warm, homemade dinner rolls on the table. The aroma alone is enough to bring everyone running! But often, the thought of baking yeast rolls conjures images of endless kneading, complicated steps, and hours of waiting. What if I told you there’s a recipe that shatters those expectations? A recipe so straightforward, so quick, and so forgiving, it’s about to become your go-to for any occasion – from weeknight dinners to holiday feasts.
Our family lovingly refers to these as “Reesy Rolls,” named after Eric’s sister, Reesy, who adored them so much that the name stuck. And for good reason! These aren’t just any rolls; they are genuine yeast rolls that achieve perfect softness and fluffiness in an astonishingly short time. If you’ve ever felt intimidated by yeast baking, this recipe is designed specifically for you. It removes the most daunting steps – no vigorous kneading, no intricate shaping. Just simple mixing, a quick rise, and into the oven they go. You’ll be amazed at the professional-quality results you can achieve with such minimal effort.
Imagine freshly baked rolls, warm from the oven, ready to be slathered with butter, soaked in gravy, or enjoyed simply on their own. This recipe makes that dream a reality in just about an hour, proving that incredible homemade bread doesn’t have to be a labor-intensive project. Get ready to impress your family and friends (and yourself!) with these unbelievably easy and delicious yeast dinner rolls.
Why You’ll Love These Super Easy Dinner Rolls
Prepare to fall in love with these rolls for a multitude of reasons. First and foremost, they are designed for convenience without compromising on taste or texture. The “no-knead” method is a game-changer for beginners and experienced bakers alike, saving you significant time and effort. Instead of a strenuous kneading process, you’ll simply mix the ingredients until smooth, letting the yeast do the heavy lifting of developing the gluten structure.
The entire process, from combining ingredients to pulling golden rolls out of the oven, takes approximately one hour. This makes them ideal for last-minute additions to dinner, unexpected guests, or simply satisfying a sudden craving for fresh bread. Despite the speed, these are not quick breads; they are authentic yeast rolls that boast an incredibly light, pillowy texture. They have that characteristic airy crumb and delicate chew that only properly risen yeast dough can achieve.
Their versatility is another major plus. While fantastic on their own with a generous swipe of butter, these rolls are also the perfect accompaniment to a wide range of meals, from hearty stews and soups to holiday roasts. They’re also an excellent base for sweet variations, making them suitable for breakfast or brunch. Forget complicated techniques and long waiting times – these easy dinner rolls offer maximum reward for minimal work, making them a true culinary best friend.
Essential Ingredients for Easy Dinner Rolls
Achieving light and fluffy dinner rolls starts with a few basic, readily available ingredients. You likely have most of these in your pantry already! The key is using them correctly to ensure the perfect rise and texture. Here’s a detailed look at what you’ll need and why each component is important:
- Active Dry Yeast: This is the leavening agent that makes your rolls light and airy. Active dry yeast needs to be “activated” in warm liquid before being combined with other ingredients, ensuring it’s alive and ready to work its magic.
- Warm Water & Milk: The ideal temperature for these liquids (around 105°F or 40°C) is crucial for activating the yeast without killing it. Warm tap water often works perfectly, but you can use a thermometer for precision. Milk adds richness and helps create a softer crumb compared to water alone.
- Granulated Sugar: Sugar serves multiple purposes. It feeds the yeast, helping it to become active and produce carbon dioxide, which makes the dough rise. It also contributes to the rolls’ golden-brown color and delicious flavor.
- All-Purpose Flour: This is the foundation of your rolls. Using all-purpose flour rather than bread flour is essential for achieving a soft, tender texture. Bread flour has a higher protein content, which is great for chewy loaves but would result in tough dinner rolls. Always measure flour carefully by fluffing it first, then spooning it into a measuring cup and leveling it off.
- Kosher Salt: Salt enhances the flavor of the rolls and also helps to control the yeast activity, preventing the dough from rising too quickly.
- Shortening or Unsalted Butter: Shortening is specified for maximum softness and a pillowy texture due to its 100% fat content. However, unsalted butter can be used as a substitute, providing a rich, buttery flavor, though the rolls might be slightly less tender.
- Egg: A single large egg adds richness, moisture, and helps bind the dough together, contributing to the rolls’ structure and soft texture.
By understanding the role of each ingredient, you’re already on your way to baking perfect, easy dinner rolls!
Step-by-Step Guide to Making No-Knead Yeast Rolls
This recipe is incredibly straightforward, even for first-time bakers. Follow these simple steps to create delicious, fluffy yeast rolls with minimal effort. Remember, the key to success is using warm (but not hot!) liquids for the yeast and resisting the urge to add too much flour.
- Activate the Yeast: In a large mixing bowl or the bowl of a stand mixer, combine the active dry yeast with the warm water and warm milk. Ensure the liquids are around 105°F (40°C) – warm to the touch but not scalding. Add the granulated sugar and give it a gentle stir. Let this mixture sit for 5-7 minutes. You should see a foamy layer of bubbles forming on the surface, indicating that your yeast is active and alive. If there are no bubbles, your water might have been too hot or too cold, and you’ll need to start again with fresh yeast and properly tempered liquids.
- First Mix: Add one cup of the all-purpose flour to the yeast mixture, along with the kosher salt, shortening (or butter), and the large egg. Using a paddle attachment if you’re using a stand mixer, or a sturdy spoon for hand mixing, beat the ingredients until they are well combined and smooth. This step begins to develop the dough’s structure without any kneading.
- Second Mix & Dough Consistency: Incorporate the remaining all-purpose flour (2 & 1/4 cups + 2 tablespoons). Continue to beat the mixture until it is smooth, scraping down the sides of the bowl as needed to ensure all ingredients are fully incorporated. Beat for an additional 2 minutes to further develop the gluten. It’s crucial to note that this dough will be very sticky and wet – this is intentional! Do not add more flour, as this loose consistency is what contributes to the rolls’ incredible softness and “no-knead” nature.
- First Rise (Bulk Fermentation): Cover the bowl tightly with plastic wrap or a clean kitchen towel. Place the bowl in a warm spot in your kitchen (like on top of a preheating oven, near a sunny window, or in a slightly warmed oven that has been turned off). Let the dough rise for 30 minutes, or until it has noticeably increased in volume.
- Prepare for Baking: While the dough is rising, preheat your oven to 400°F (200°C). Generously grease a 12-cup muffin tin with nonstick cooking spray or butter, ensuring you coat not only the inside of each cavity but also the flat surface of the pan. This prevents the rolls from sticking as they bake and rise over the edges.
- Shape & Second Rise: Lightly coat a 1/4-cup measuring cup with nonstick spray or butter. Scoop portions of the sticky dough with the greased measuring cup and carefully drop them into each prepared muffin cup, filling them evenly. For a neater appearance, gently turn each roll over or use greased fingers to smooth the tops. Cover the filled muffin tin with a sheet of plastic wrap that has also been lightly sprayed with nonstick spray (to prevent sticking to the rising dough). Let the rolls rise again in a warm spot for another 20 minutes. During this second rise, the rolls should puff up significantly and extend over the edges of the muffin cups.
- Bake to Golden Perfection: Place the muffin tin in the preheated oven. Bake for 13-15 minutes, or until the tops are beautifully golden brown. To check for doneness, gently lift the edge of one roll; the bottom should also be golden. If the tops are browning too quickly, you can loosely tent the pan with foil for the last few minutes of baking.
- Serve Immediately: As soon as the rolls come out of the oven, carefully remove them from the muffin tin and transfer them to a wire rack to cool slightly. This prevents the bottoms from becoming soggy. Serve them warm with plenty of butter, jam, or as an accompaniment to your meal. Enjoy the fruits of your quick and easy labor!
Following these steps ensures a batch of perfectly baked, incredibly soft, and undeniably delicious yeast rolls every time.
Creative Substitutions and Flavor Variations
These easy dinner rolls are a fantastic blank canvas for culinary creativity. While delicious in their classic form, don’t hesitate to experiment with substitutions and additions to match your meal or mood. Here are some inspiring ideas to get you started:
- Sweet & Fruity: For a delightful treat, gently fold in a 1/2 cup of plump raisins, dried cranberries (Craisins), or finely chopped dried apricots into the dough during the second mixing stage. These make wonderful teatime buns or a unique breakfast pastry.
- Savory & Spicy: Elevate your rolls to a savory side dish by stirring in 1/2 cup of shredded sharp cheddar cheese and 2-3 tablespoons of finely chopped pickled jalapeño peppers (drained well) with the last addition of flour. These cheesy, spicy rolls are perfect with chili or tacos.
- Garlic Herb Infusion: After the rolls come out of the oven, brush them generously with melted garlic butter (melted butter infused with minced fresh garlic and a pinch of dried parsley). This is an excellent addition to Italian-inspired meals like spaghetti or lasagna.
- Citrus Cardamom Delight: For a subtly spiced and aromatic roll, add the zest of one orange and ⅛ teaspoon of ground cardamom to the dough along with the other dry ingredients. These are particularly lovely with coffee or tea.
- Jam-Filled Surprises: Create delightful filled rolls by spooning half the amount of batter into each muffin tin, adding a teaspoon of your favorite jam (strawberry, raspberry, apricot, or even a citrus marmalade) into the center, and then topping with the remaining batter.
- Honey Butter Glaze: Replace the granulated sugar in the dough with an equal amount of honey for a slightly different sweetness. Once baked and removed from the oven, brush the warm rolls with a mixture of melted butter and a touch more honey for a glistening, sweet finish.
- Rosemary Sea Salt Topping: For an earthy, rustic touch, brush the tops of the baked rolls with good quality olive oil and sprinkle with flaky sea salt and freshly chopped rosemary. This variation pairs beautifully with roasted chicken or lamb.
Remember to adjust quantities to your taste, and have fun exploring the endless possibilities with this versatile dough!
Best Ways to Serve Your Homemade Rolls
While my absolute favorite way to enjoy these warm, fluffy rolls is straight from the oven, slathered with butter, their versatility makes them a perfect companion for a variety of meals. They can transform a simple dinner into a comforting feast or elevate a holiday spread. Here are some of my top recommendations for serving your homemade yeast rolls:
- With Hearty Soups & Stews: There’s nothing quite like dipping a soft roll into a rich, flavorful soup or stew.
- Easy Broccoli Cheese Soup (30 Minutes) << This quick and creamy soup is ready almost as fast as the rolls, making for an effortless weeknight meal.
- Crock Pot Beef and Barley Soup << A winter staple in my home, this hearty soup (made on the stove or in the slow cooker) is perfectly complemented by a warm, absorbent roll.
- Alongside Roast Dinners: Rolls are a must-have for any substantial roast, perfect for soaking up delicious gravies.
- Honey Balsamic Pork Ribs in Crock Pot << Tender, flavorful ribs paired with these soft rolls and a simple side salad or vegetable create an ultimate Sunday dinner.
- Easy Fall-Apart Crock Pot Roast with Carrots (Slow Cooker) << If there’s any gravy left after your mashed potatoes, your rolls are ready to join the party and capture every last drop.
- With Pasta Dishes: A warm roll is ideal for wiping up that last bit of sauce from your favorite pasta.
- Zucchini Lasagna Recipe << The richness of cheesy, veggie-packed lasagna finds a perfect match in a warm, comforting roll.
- For Breakfast or Brunch: Don’t limit these to dinner! Split them, toast them lightly, and serve with scrambled eggs, bacon, or your favorite breakfast spreads. The sweet variations mentioned earlier also make fantastic brunch items.
- As Mini Sandwiches: Slice the rolls horizontally and fill them with deli meats, cheese, or even leftover roast for delightful sliders.
However you choose to enjoy them, these easy yeast rolls are guaranteed to be a hit at any meal!
Storing and Reheating Your Quick Yeast Rolls
One of the best things about these easy yeast rolls is that they’re just as delicious the next day, and they freeze beautifully for future enjoyment. Proper storage ensures they retain their wonderful texture and flavor.
- Countertop Storage (Short-Term): For up to 3 days, store cooled rolls in an airtight container, such as a Tupperware or a Ziploc bag, at room temperature on your kitchen counter. Keeping them sealed prevents them from drying out and becoming stale.
- Freezing (Long-Term): If you want to enjoy fresh rolls weeks or even months later, freezing is an excellent option. Ensure the rolls have cooled completely to room temperature before freezing. Place them in a freezer-safe, airtight container or a heavy-duty freezer bag. Removing as much air as possible from the bag will help prevent freezer burn. They will keep well in the freezer for about 3 months.
- Reheating from Frozen: To reheat frozen rolls, you have a couple of options:
- Oven Method: For best results, preheat your oven to 300°F (150°C). Place the frozen rolls directly on a baking sheet and heat for 10-15 minutes, or until warmed through and soft. This method helps to crisp up the exterior slightly.
- Microwave Method (Quick): For a faster reheat, wrap one or two rolls in a damp paper towel and microwave for 20-30 seconds, or until warm. Be careful not to over-microwave, as this can make them tough.
- Reheating from Refrigerated/Room Temp: Warm room temperature or refrigerated rolls in a 300°F (150°C) oven for 5-7 minutes, or until heated through.
With these storage tips, you can always have delicious, homemade yeast rolls on hand, ready to elevate any meal with minimal effort!
Easy Yeast Roll Recipe FAQs
Hard or tough dinner rolls are a common frustration for bakers, but often easily avoided. Here are the primary culprits and how to ensure your rolls are always wonderfully light and fluffy:
- Overworking the Dough: Kneading develops gluten, which is good for structure, but too much kneading can make dough tough. This recipe specifically minimizes that risk by being a no-knead dough, requiring only mixing. Avoid excessive handling once the ingredients are combined.
- Incorrect Flour Type: Always use all-purpose flour for soft dinner rolls. Bread flour, with its higher gluten content, is designed for chewier breads like pizza crusts or artisan sourdough, and will result in a tougher roll texture.
- Imprecise Flour Measurement: Too much flour is a frequent cause of dense, dry rolls. Flour should be fluffed up in its container, then spooned into a measuring cup and leveled off with a straight edge. Do not scoop directly from the bag, as this compacts the flour and leads to over-measurement.
- Inactive Yeast: If your yeast isn’t active, your rolls won’t rise. Always check for bubbles after activating the yeast in warm liquid.
Tough homemade rolls are typically a result of issues related to flour and gluten development. The main factors include using too much flour, over-mixing or over-kneading the dough, or using the wrong type of flour. For soft rolls, it’s critical to use all-purpose flour and measure it precisely (spoon and level method). Also, be mindful not to overwork the dough; this recipe’s no-knead approach helps mitigate that risk. The stickier consistency of this dough is key to its tenderness, so resist the urge to add extra flour during mixing.
Yes, absolutely! Letting rolls rise (often referred to as proofing) is an essential step in yeast baking. This allows the yeast to ferment, producing carbon dioxide gas that gets trapped in the dough’s gluten network, causing it to expand. This expansion is what creates the light, airy, and fluffy texture we love in dinner rolls. This recipe calls for two rises: an initial bulk fermentation after mixing, and a second, shorter rise after shaping in the muffin tin.
While both active dry yeast and instant yeast are types of commercial yeast used for baking, they have slight differences in how they are used. Active dry yeast typically requires rehydration in warm liquid (also known as “proofing” or “activating”) before being combined with other ingredients. Instant yeast, on the other hand, is designed to be mixed directly into the dry ingredients without prior activation. This recipe specifically calls for active dry yeast and includes the crucial first step of dissolving it in warm water and milk to ensure it’s active and ready.
Yes, you can definitely over-knead yeast dough, and it’s a common pitfall for bakers seeking soft rolls. Over-kneading develops too much gluten, which results in a very elastic, resistant dough that can lead to tough, chewy, and rubbery baked goods instead of light and tender ones. One of the greatest advantages of this particular recipe is that it is explicitly designed as a no-knead method, significantly reducing the risk of over-kneading and ensuring consistently soft results.
Brushing rolls before baking usually involves an egg wash (egg mixed with water or milk) to achieve a glossy, golden-brown crust. This specific recipe doesn’t require an egg wash before baking to achieve a beautiful golden top. However, brushing them with melted butter immediately after they come out of the oven is highly recommended! This adds an extra layer of rich, buttery flavor and a lovely sheen, further enhancing their appeal. It’s an optional step but one that truly elevates the experience of eating these already delicious rolls.
More Irresistible Roll Recipes to Explore
If these easy yeast rolls spark your passion for homemade bread, you’ll be delighted to know there’s a whole world of delicious roll recipes to explore. From classic holiday favorites to unique global flavors, here are some other fantastic options:
- Aunt Shirley’s Famous Homemade Dinner Rolls << A cherished family recipe, these buttery rolls are a staple for any holiday gathering.
- Easy Fluffy One Hour Dinner Rolls << Another quick and delicious option for soft, pillowy rolls bursting with buttery flavor.
- Soft and Fluffy Parker House Rolls << Discover the secret ingredient (potato flakes!) that gives these rolls an impossibly cloud-like texture.
- Big Fat Crescent Rolls, yeah << These addictive, beautifully shaped crescent rolls are sure to be a showstopper on your holiday table.
- Samoan Coconut Rolls (Pani Popo) << If you adore King’s Hawaiian Rolls, prepare for a mind-blowing homemade upgrade with a rich, sweet coconut glaze.
- Braided Dinner Rolls Recipe from In the Kitchen with Honeyville << For those who enjoy a more intricate presentation, these braided rolls are both beautiful and delicious.
- Quick Dinner Bread Rolls with Green Onions from Ahead of Thyme << A savory twist on dinner rolls, perfect for adding a fresh, aromatic touch to your meal.
Happy baking!
Connect with me:
Facebook |
Pinterest |
Instagram

Easy Yeast Rolls
5
15
50
1
10
12 rolls
Ingredients
- 1 tablespoon active dry yeast
- 1/4 cup warm water (around 105°F)
- 1 cup warm milk (around 105°F)
- 3 tablespoons granulated sugar
- 1 and 1/2 teaspoons kosher salt
- 3 tablespoons shortening*
- 1 large egg
- 2 & 1/4 cups + 2 tablespoons all-purpose flour
Instructions
-
In a large bowl or the bowl of a stand mixer, combine 1 tablespoon of active dry yeast with 1/4 cup warm water and 1 cup warm milk. The liquids should be around 105°F (40°C).
-
Add 3 tablespoons of granulated sugar and stir gently. Let the mixture sit for 5 minutes. You should see bubbles forming on the surface, indicating the yeast is active. If no bubbles appear, the yeast may be dead or the water temperature was incorrect; you will need to start over.
-
Add 1 cup of the all-purpose flour, 1 and 1/2 teaspoons kosher salt, 3 tablespoons shortening, and 1 large egg. Beat with a paddle attachment (for a stand mixer) or a sturdy spoon until the mixture is smooth.
-
Add the remaining flour (2 & 1/4 cups + 2 tablespoons). Continue to beat the mixture until it is smooth, scraping down the sides of the bowl as needed. Beat for another 2 minutes. The dough will be very sticky and loose; resist the urge to add more flour, as this is crucial for the rolls’ soft texture.
-
Cover the bowl loosely with plastic wrap or a clean kitchen towel and let the dough rise in a warm spot for 30 minutes, or until noticeably increased in volume.
-
While the dough is rising, preheat your oven to 400°F (200°C).
-
Generously coat a 12-cup muffin tin with nonstick spray or butter, ensuring all cavities and the flat top surface are well greased.
-
Lightly spray a 1/4 cup measuring cup with nonstick spray or grease it with butter. Scoop portions of the sticky dough and carefully drop them into each muffin cup, filling them evenly. You may oil your hands slightly if needed to handle the dough.
-
For a smoother top, gently turn each roll over in the muffin cup or use a greased spoon/fingers to smooth the dough surface.
-
Cover the muffin tin with a sheet of plastic wrap that has also been sprayed with nonstick spray to prevent sticking.
-
Let the rolls rise for an additional 20 minutes in a warm spot (e.g., on top of the fridge). They should rise significantly, puffing up over the edges of the pan. You can let them rise a little longer for extra puffiness if you have time.
-
Bake in the preheated 400°F (200°C) oven for 13-15 minutes, or until the tops are golden brown. Lift the edge of one roll to check that the bottom is also starting to brown. If tops are browning too quickly, loosely tent with foil.
-
Remove the rolls from the pan immediately after baking and transfer them to a wire rack to cool slightly. Serve warm with butter and jam, or your preferred accompaniments!
Notes
*Shortening vs. Butter: While shortening is recommended for maximum softness due to its 100% fat content, you can substitute with unsalted butter. Your rolls will still be delicious, but may be slightly less pillowy.
Nutrition
Serving: 1 roll
|
Calories: 116 kcal
|
Carbohydrates: 20g
|
Protein: 3g
|
Fat: 2g
|
Saturated Fat: 1g
|
Polyunsaturated Fat: 1g
|
Monounsaturated Fat: 1g
|
Trans Fat: 1g
|
Cholesterol: 14mg
|
Potassium: 34mg
|
Fiber: 1g
|
Sugar: 2g
|
Vitamin A: 103 IU
|
Vitamin C: 1 mg
|
Calcium: 7 mg
|
Iron: 1 mg
Did you make this? I’d love to see it!
Mention @thefoodcharlatan or tag #thefoodcharlatan!