

Welcome to your culinary journey to recreate the irresistible taste of restaurant-quality Naan bread right in your own kitchen! If you’ve yet to experience the pure delight of a warm, fresh, tender, and buttery homemade naan, you’re truly missing out on a simple pleasure that elevates any meal. This comprehensive guide will show you exactly how effortlessly you can master this iconic Indian flatbread, transforming it into the ultimate companion for soaking up every last drop of your favorite curry or stew.
This timeless recipe, originally shared in July 2012, has been meticulously updated with enhanced instructions and fresh photography as of July 2020. However, the accompanying personal anecdote from 2012 remains untouched, serving as a reminder that some stories are too wonderfully flawed to ever be erased—especially those chronicling an unexpected adventure with a baby in an unconventional setting.

Table of Contents
- Why You’ll Love This Easy Homemade Naan Recipe
- Essential Ingredients for Perfect Naan
- Step-by-Step Guide to Making Naan Bread at Home
- Delicious Pairings: What to Serve with Naan
- Storing Your Homemade Naan for Freshness
- Common Questions About Naan Bread
- More Irresistible Bread Recipes to Try!
- Complementary Curries for Your Naan Creations
- Naan Recipe Card
A Trip Down Memory Lane: The Shelby Saga (2012)
Life has a way of throwing unexpected curveballs, and sometimes those curveballs come in the form of a deceased family vehicle. Last week, our trusty old Buick, affectionately named Ethel, breathed her last in Shelby, Montana. At a respectable 220,000 miles, you really can’t fault her for finally calling it quits, though the timing was, to put it mildly, inconvenient. Thankfully, Eric’s dad, whom we fondly dubbed “Rescue Man Chip,” embarked on a seven-hour journey (each way!) to come to our aid and bring us home.
This left us with an unexpectedly long and rather memorable period to spend in Shelby, Montana. With Ethel out of commission, our mobility was limited to what we could reach on foot. Pushing our stroller, we explored Main Street, eventually gravitating towards the most promising establishment serving food: the Montana Club Bar.

Upon our arrival at 6 PM, we were greeted by a rather tipsy couple at the door, whose conversation was delightfully incoherent. Eric and I exchanged amused glances, feigning understanding as we made our way inside. My eyes immediately took in the scene: a profoundly decrepit establishment, the most rundown I had ever encountered. The air was thick with hazy smoke, countertops gleamed with a greasy sheen, stuffing burst from worn bar stools, and piles of miscellaneous junk and discarded furniture littered every corner. Wires dangled conspicuously from missing ceiling panels, adding to the general sense of disarray.
Clutching Charlotte a little tighter, we navigated towards a table. Instinctively, I scanned for a high chair, before remembering the rather salient detail that I had brought my 17-month-old daughter into a *bar*. Predictably, no high chairs were to be found.

Eventually, an elderly gentleman with long, unkempt hair ambled over to take our order. My immediate internal plea was, “Please, let this man not be preparing my food.” Yet, the stark realization that he most likely would be compelled me to clear my mind and attempt to conjure happy thoughts. I began to inquire about the Chicken Ranch Wrap, but before I could even complete my sentence, he curtly barked, “No chicken,” punctuating his reply with an intimidating glare. Whether this meant they were simply out of chicken or that chicken was explicitly unavailable *for me* remained an unsettling mystery.
Fortunately, we emerged from the ordeal unscathed. (This included another encounter with the inebriated couple at the door, who called after us to lament the absence of a kids’ menu. No kidding, indeed.)

Ultimately, the experience did yield a surprisingly decent Philly Cheesesteak and a profound reinforcement that avoiding alcohol is generally a wise decision. Or perhaps, more simply, we learned that giving Shelby, Montana, a wide berth is *always* a good idea. This memorable detour only strengthened my appreciation for the comforts and culinary delights of home, like a freshly baked batch of Naan, far from questionable roadside taverns.
Why You’ll Love This Easy Homemade Naan Recipe
If you’ve ever dined at an Indian restaurant, you know that the meal feels incomplete without the presence of warm, fluffy Naan. For many, including myself, Indian cuisine simply isn’t Indian cuisine without this incredible bread. Naan is a uniquely delicious, buttery flatbread that offers an unparalleled textural experience—crisp on the outside, incredibly soft and chewy within. It’s so good, in fact, that if Indian restaurants served only Naan, I’d still be a regular patron. (Though, to be fair, there were no Indian restaurants to be found in Shelby, Montana, so the point is moot there.)
While traditional Naan is famously baked in scorching 900˚F Tandoori ovens, achieving that authentic char and puffiness at home might seem daunting. The good news is, you don’t need a specialized Tandoor oven to create fantastic homemade Naan. Our best and most reliable method for home cooks is using a stovetop skillet, preferably cast iron. I’ve personally experimented with baking Naan in a conventional oven at 500˚F, but the results consistently fall short of the stovetop method, often yielding a drier, less pliable bread. The stovetop allows for direct, high heat that mimics the Tandoor’s intensity, creating those signature bubbles and a beautifully cooked texture.
Essential Ingredients for Perfect Naan
Crafting delicious homemade Naan requires just a handful of common pantry staples. Each ingredient plays a vital role in achieving that perfect fluffy, tender, and flavorful bread. For a complete list of quantities and detailed instructions, be sure to refer to the recipe card below!
- Whole Milk: Provides richness and contributes to a soft, tender crumb.
- Sour Cream or Full-Fat Greek Yogurt: Essential for Naan’s characteristic tang and incredibly tender texture.
- Granulated Sugar: Feeds the yeast, aiding in activation and providing a hint of sweetness.
- Active Dry Yeast: The leavening agent responsible for Naan’s delightful puffiness and airy texture.
- Egg: Adds richness, helps with structure, and contributes to a beautiful golden color.
- Oil (Olive or Vegetable): Keeps the dough pliable and adds moisture.
- All-Purpose Flour: The primary structural component of the bread.
- Kosher Salt: Enhances the flavor of the dough.
- Salted Butter: Melted butter is brushed on the hot Naan for an irresistible, savory finish.
- Fresh Garlic: Minced garlic infused into the melted butter adds an aromatic, classic touch.
- Chopped Parsley: A fresh garnish that brightens the flavor and presentation of your homemade Naan.
Step-by-Step Guide to Making Naan Bread at Home
Making Naan at home is a wonderfully rewarding process, and surprisingly straightforward. We’ll start by gently warming our liquid ingredients. For this recipe, I often reach for sour cream, and yes, I’m happy to admit it! While plain full-fat Greek yogurt is the more traditional choice for Naan, I find sour cream yields equally fantastic results and often have it readily available in my fridge. Its rich, thick, and fatty profile imparts a superb flavor and incredibly tender texture to the Naan.
If you prefer to stick to tradition, or simply have yogurt on hand, it works beautifully too. The key is to use full-fat yogurt. It seems non-fat options are everywhere these days, but when it comes to Naan, we truly want that gorgeous fat content for maximum flavor and tenderness. So, whether it’s full-fat sour cream or full-fat Greek yogurt, either will lead to delicious results. If authenticity is your top priority, opt for yogurt.

With our liquid base sorted, the next crucial step is activating the yeast. Ensure your milk and sour cream (or yogurt) mixture is warm, but never hot. Think of it like a cozy bath for a newborn; if it’s too hot for your finger, it’s too hot for the yeast, which will prevent it from activating. Once the temperature is just right, stir in a tablespoon of sugar and your active dry yeast. Let this mixture rest for about five minutes. You’ll know your yeast is alive and well when a beautiful, foamy layer forms on the surface—a clear sign that it’s ready to bring your Naan to life.
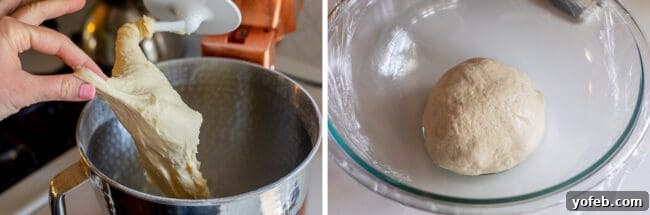
Once the yeast is bubbly, crack in an egg and drizzle in some olive oil. Give it a good whisk to combine everything. Then, it’s time to incorporate the dry ingredients: all-purpose flour and kosher salt. Mix until a shaggy dough forms, then turn it out onto a lightly floured surface or use the dough hook of a stand mixer. Knead for approximately five minutes. The goal is to achieve a smooth, elastic, and slightly tacky dough. Resist the urge to add too much flour; just enough to make it manageable. After kneading, shape the dough into a ball, lightly grease a bowl, and let it rise in a warm spot for about one hour, until it has doubled in size.

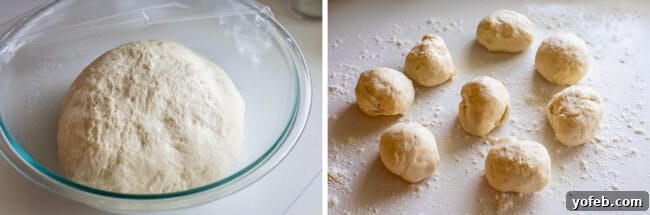
Once risen, gently punch down the dough to release the air. Then, divide the dough into either six or eight equal pieces. I personally lean towards six pieces, as this results in slightly thicker, more substantial Naan, which I find particularly satisfying. However, eight pieces will give you a thinner, crispier Naan, so choose the thickness you prefer. Roll each piece into a neat ball, place them on a lightly floured surface (a pastry cloth is ideal here), and cover with a tea towel to rest for about ten minutes. This resting period helps the gluten relax, making the dough easier to roll.
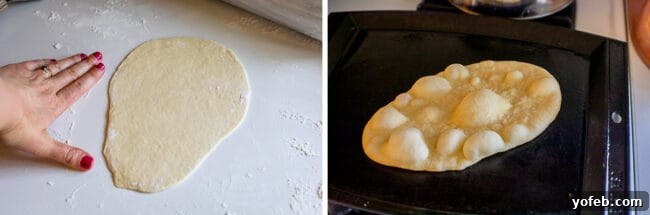
Now for the cooking! The secret to truly great stovetop Naan is high heat. If you own a cast iron pan, this is its moment to shine, as it excels at retaining and distributing heat evenly. A heavy-bottomed skillet will also work wonderfully. Preheat your pan over medium to medium-low heat. Roll out each dough ball into an oval or triangle, roughly 9 by 5 inches—don’t worry about perfection. For extra thick Naan, let the rolled-out dough rest for an additional 3-5 minutes before cooking. Lightly oil the hot pan, then place one piece of rolled dough in. Cook for 1-2 minutes until you see beautiful bubbles forming across the entire surface of the Naan, indicating it’s cooking through and puffing up. Flip it and cook the second side for about one minute until golden brown spots appear. Adjust the heat as needed; every stove is different, and you want to avoid burning the Naan.
As each Naan comes off the pan, brush it generously with melted butter infused with minced garlic. This garlic butter is optional but highly recommended, adding an incredible depth of flavor. A sprinkle of fresh parsley completes the presentation. Serve your Naan hot off the pan, reveling in its tender, pliable texture!

The resulting Naan is wonderfully tender and pliable, making it perfect for scooping, wrapping, or simply enjoying on its own. It’s a culinary triumph that will surely impress!
Delicious Pairings: What to Serve with Naan
This irresistible homemade Naan is the ideal accompaniment for a vast array of dishes, particularly those with rich and flavorful sauces. It’s a match made in heaven for your favorite Indian curries, designed to be torn into generous pieces and used to scoop up every delectable drop. Imagine it alongside a hearty Slow Cooker Chicken Tikka Masala, its buttery texture perfectly complementing the creamy, spiced sauce. It would also be exceptional with this aromatic Slow Cooker Basil Chicken in Coconut Curry Sauce, or a robust Slow Cooker Beef Curry. The combination of warm Naan with curry is simply divine!

Beyond traditional Indian fare, Naan’s versatility shines through. Consider using it as a delectable wrap for these savory Homemade Greek Gyros, or as the perfect vessel for a flavorful Chicken Shawarma. The possibilities are endless, and you’ll quickly find yourself craving creative ways to incorporate this delicious flatbread into your meals. It truly makes any wrap or sandwich feel gourmet!
And just for a bit of nostalgia, here is a glimpse of the original 2012 photo:

Storing Your Homemade Naan for Freshness
Proper storage is key to extending the life and maintaining the delicious texture of your homemade Naan. Once cooled, Naan can be stored in an airtight container or a resealable plastic bag at room temperature for 1-2 days. For slightly longer storage, you can keep it in the refrigerator for up to 4-5 days. Be sure to press out as much air as possible from the bag or container to prevent it from drying out.
If you’re looking to prepare Naan ahead of time or have leftovers you want to enjoy much later, freezing is an excellent option. Wrap individual pieces tightly in plastic wrap, then place them in a freezer-safe bag. Frozen Naan will maintain its quality for up to 2 months. When you’re ready to enjoy it again, simply thaw the Naan at room temperature or in the refrigerator. For best results, warm it gently in the oven or microwave before serving to restore its soft, tender texture and aromatic qualities.

Common Questions About Naan Bread
While Naan and pita bread both fall into the category of flatbreads and might appear similar at first glance, they are distinct in their origins, ingredients, and resulting textures. Pita bread, originating from the Middle East, is typically made with a simpler dough consisting of flour, water, salt, and yeast. It often forms a pocket when baked due to steam, offering a relatively consistent texture. Naan, on the other hand, hails from India and uses a richer dough that often includes dairy (like milk, yogurt, or sour cream) and sometimes egg. These additions contribute to Naan’s characteristic thicker, fluffier, and more pliable texture, making it less prone to forming a distinct pocket and more ideal for tearing and scooping.
Naan is unequivocally a traditional Indian flatbread, deeply rooted in Indian cuisine and culture. It’s a staple often served alongside a wide variety of curries, tandoori dishes, and other classic Indian main courses. Its history traces back centuries within the Indian subcontinent. However, while its origin is Indian, Naan is a universally beloved bread, and if you choose to serve it with Thai food or any other cuisine, rest assured, I won’t stop you! Naan is delicious and versatile enough to be enjoyed with anything you desire.
Naan is typically served as a versatile side dish with countless classic Indian main dishes. Traditionally, the most common and enjoyable way to eat Naan is to tear off large, rustic chunks of the warm bread and use them as an edible utensil to scoop up your chosen entree. Its soft, slightly chewy texture and gentle flavor make it perfect for soaking up rich sauces and flavorful gravies. Beyond this traditional method, Naan can also be used as a base for mini pizzas, as wraps for various fillings, or simply enjoyed on its own with dips like hummus or raita. Looking for the perfect Indian meals to serve alongside your homemade Naan? Don’t miss my popular Chicken Tikka Masala, the aromatic Slow Cooker Basil Chicken in Coconut Curry Sauce, or this hearty Slow Cooker Beef Curry.
If your piece of Naan fits, then absolutely! After it’s been baked and cooled, you can certainly use a toaster to reheat it. However, most standard pieces of Naan are considerably larger and often irregularly shaped compared to a typical slice of sandwich bread. This means you’ll likely need to tear or cut your Naan into smaller, more manageable pieces to fit into conventional toaster slots. A toaster oven, on the other hand, would work perfectly for reheating whole or larger pieces of Naan. If you do opt for a standard toaster with smaller pieces, remember to keep a close eye on them. Naan is generally thinner than regular sandwich bread, so it can toast and burn much more quickly. A minute or two is usually sufficient to warm it through and restore its warmth.

More Irresistible Bread Recipes to Try!
If you’ve enjoyed making this homemade Naan, you’re in for a treat! The world of homemade bread is incredibly diverse and rewarding. Here are some more fantastic bread recipes that are sure to become new favorites in your kitchen:
- Roti (Buttery Indian Flatbread): This un-yeasted Indian flatbread is similar to Naan in its versatility but offers a slightly different texture. It’s incredibly easy to make and pairs exceptionally well with any curry.
- Olive Garden Breadsticks: Recreate the beloved, soft, and garlicky breadsticks from your favorite Italian-American restaurant. These are surprisingly quick to whip up and unbelievably tasty!
- Reesy Rolls (One Hour Yeast Rolls): A delightful recipe for soft, fluffy yeast rolls that come together in just about an hour. My mother-in-law’s classic recipe, cherished by her kids for years.
- Fast Focaccia Bread: Indulge in a quick and easy Focaccia bread, perfect for a weeknight. Don’t forget to load it up with Parmesan cheese for an extra flavor boost!
- Garlic and Rosemary Skillet Bread: This savory skillet bread is a guaranteed winner, as countless glowing reviews attest. Infused with aromatic garlic and fresh rosemary, it’s a perfect side for any hearty meal.
- Peshwari Naan from Fatima Cooks: For something a little different, try this sweet and nutty Naan, typically stuffed with desiccated coconut, almonds, and raisins—a true delicacy.
- Chicken Spinach Alfredo Flatbread from Kenneth Temple: Turn flatbread into a main course with this creamy, rich chicken and spinach Alfredo topping.
Complementary Curries for Your Naan Creations
Once you’ve mastered the art of homemade Naan, you’ll need the perfect curry to pair it with! These recipes are tried-and-true favorites that promise a flavorful and satisfying meal, ideal for dipping, scooping, and savoring with your freshly baked bread:
- Slow Cooker Basil Chicken in Coconut Curry Sauce: This vibrant and aromatic curry is consistently one of the top-performing recipes on The Food Charlatan. It’s incredibly easy and bursting with flavor.
- Slow Cooker Chicken Tikka Masala: Achieve that amazing, roast-y chicken flavor by adding the rich, creamy sauce at the very end. A restaurant favorite made simple in your slow cooker.
- Slow Cooker Beef Curry: If you’ve ever doubted the combination of beef and curry, this recipe will change your mind! Inspired by a vacation in Australia, it’s hearty and utterly delicious.
- Sheet Pan Curry Chicken and Carrots with Basmati Rice (Biryani): Embrace the convenience of sheet pan dinners with this flavorful curry chicken and carrots, served with aromatic basmati rice for an easy weeknight meal.
- 6-Ingredient One-Pot Vegetable Curry: This super-easy weeknight dinner utilizes jarred sauce to dramatically speed up prep time, making healthy and delicious vegetable curry accessible to all.
- 20-Minute Vegetable Green Curry from A Beautiful Mess: For a quick and vibrant option, this green curry is packed with vegetables and comes together in no time.
- Thai Pumpkin Curry with Chicken from Flavor the Moments: A cozy and creamy Thai-inspired curry featuring the subtle sweetness of pumpkin, perfect for a comforting meal.
Facebook | Pinterest | Instagram

Naan Recipe

Ingredients
- 1/3 cup milk, I use whole milk for richness
- 1/3 cup sour cream OR plain full-fat Greek yogurt, for tenderness and a subtle tang
- 1 tablespoon granulated sugar, to activate yeast and add slight sweetness
- 1 tablespoon active dry yeast, for leavening and airy texture
- 1 large egg, for structure and golden color
- 3 tablespoons oil, such as olive or vegetable oil, for dough elasticity
- 2 to 2 & 1/2 cups all-purpose flour, as needed for dough consistency
- 1 teaspoon kosher salt, to enhance flavor
- 1/4 cup salted butter, melted (for brushing the cooked naan)
- 1-2 cloves fresh garlic, smashed and minced (for topping, optional but highly recommended)
- fresh chopped parsley, to garnish
Instructions
- In a glass measuring cup or a small, microwave-safe bowl, combine 1/3 cup of whole milk with 1/3 cup of sour cream or full-fat Greek yogurt. Heat the mixture in the microwave in 20-second intervals until it is comfortably warm, but never hot. You should be able to dip your finger into it without any discomfort, much like testing the temperature of a baby’s bath. This precise temperature is crucial for activating the yeast without killing it. If you accidentally overheat the mixture, simply place it in the fridge for a few minutes to cool down before proceeding to the next step.
- To the warm dairy mixture, add 1 tablespoon of granulated sugar and 1 tablespoon of active dry yeast. Stir gently to combine these ingredients. Allow the mixture to sit undisturbed at room temperature for approximately 5 minutes. During this time, you should observe bubbles forming on the surface, which indicates that your yeast is active and healthy. If no foam or bubbles appear, your yeast may not be viable (perhaps due to being too old or the liquid being too hot); in this case, it’s best to discard the mixture and start fresh.
- Once your yeast mixture is foamy and active, crack in 1 large egg and drizzle in 3 tablespoons of oil (such as olive oil). Break the yolk with a fork or whisk and thoroughly mix all the liquid ingredients together until well combined.
- In a separate large mixing bowl or the bowl of a stand mixer, combine 2 cups of all-purpose flour and 1 teaspoon of kosher salt. Pour the activated yeast mixture into the dry ingredients. Stir everything together until a shaggy dough forms. If using a stand mixer, attach the dough hook. If kneading by hand, transfer the dough to a lightly floured surface. Knead the dough for about 5 minutes. As you knead, gradually add more flour (starting with 1/4 cup, and up to 1/2 cup total) only as needed, aiming for a dough that is smooth, stretchy, and elastic. It should still be slightly tacky to the touch but should easily form into a ball without excessive stickiness on your hands.
- Lightly spray a clean large bowl with nonstick cooking spray or coat it with a small amount of oil. Shape your kneaded dough into a smooth ball and place it in the greased bowl. Turn the dough over once to ensure that all surfaces are lightly coated with oil, preventing it from drying out during the rise.
- Cover the bowl tightly with a clean tea towel or plastic wrap. Allow the dough to rise in a warm, draft-free place for approximately 1 hour, or until it has roughly doubled in size. If you’re pressed for time, a 45-minute rise can also work in a pinch.
- Once the dough has risen, gently punch it down to release the air. Transfer the dough to a lightly floured work surface (a pastry cloth is excellent for this step). Divide the dough into 6 or 8 equal pieces. Opting for 6 pieces will yield a thicker, chewier Naan, while 8 pieces will result in a thinner, slightly crispier version. Roll each piece into a neat ball, cover them with a tea towel, and let them rest for 10 minutes. This resting period helps the gluten relax, making the dough much easier to roll out evenly.
- Take one ball of rested dough and use your hand to gently flatten it. Then, use a rolling pin to roll the dough into an oval or triangle shape, roughly 9 by 5 inches. Don’t worry about achieving perfect symmetry; rustic shapes are part of Naan’s charm. For that extra fluffy, thick Naan reminiscent of restaurant quality, consider letting your rolled-out dough rest for an additional 3-5 minutes before cooking. This brief secondary rest helps the dough puff up beautifully.
- While the dough rests, preheat a 12-inch cast iron skillet or a heavy cast iron griddle over medium to medium-low heat. Cast iron is ideal due to its excellent heat retention, but any heavy skillet will work. Lightly spray or brush the pan generously with oil. Place one rolled-out piece of Naan dough into the hot pan. Cook the first side for about 1-2 minutes, or until numerous bubbles form all over the surface of the dough. Using a spatula, flip the Naan and cook the second side for approximately 1 minute, until golden-brown spots appear. Continuously monitor and adjust your stove’s heat between medium and medium-low as needed, as cooking times can vary. If your Naan starts to burn, reduce the heat slightly.
- In a small bowl, melt 1/4 cup of salted butter. Add 1-2 cloves of finely minced garlic to the melted butter. While the garlic is optional, it adds an incredibly delicious and aromatic touch that is characteristic of classic Naan.
- Immediately after removing each hot Naan from the pan, place it on a plate and generously brush it with the melted garlic butter. For an extra touch of freshness and color, sprinkle with freshly chopped parsley. Serve your Naan hot to enjoy its optimal texture and flavor.
- If your main meal isn’t quite ready when your Naan is finished cooking, you can keep the Naan warm without overcooking it. Place the cooked Naan on a cooling rack set inside your oven on the “keep warm” setting (typically around 170°F or 75°C) until you’re ready to serve.
- Store any leftover Naan in a sealed airtight container or a resealable plastic bag at room temperature for up to 3 days to maintain its freshness and soft texture.